|
 |

01-10-2023, 05:32 AM
|
 |
US Veteran
|
|
|
Join Date: Dec 2014
Location: S&W Florida
Posts: 5,092
Likes: 6,735
Liked 13,417 Times in 3,344 Posts
|
|
Who makes the best optic mounting screws?
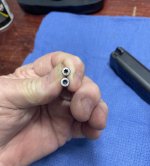
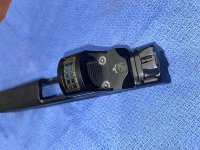
After shearing off the original S&W screws using the factory mounting plate, I purchased a C&H mounting plate, but the supplied screws were too long. I trimmed them down to the proper length and mounted the optic. Prior to mounting, I ran a tap down through the holes in the slide and degreased the slide. I applied fresh blue loctite on the screws and mounted to the proper torque. I thought everything was good to go, but after running 150 rounds through it, the screws started backing out. I tightened them at the range and ran another two mags. They were loose again when I finished. I went ahead and pulled the optic off and finished up the session with open sights. Anyway, now I’m looking at some aftermarket screws like Jagerwerks or similar and was wondering what everyone else was using that have gone to an aftermarket solution. I’ve got over 2K rounds through my M&P 2.0 10mm. Latest 200 rounds were 180 grain FMJFP over 9.3 grains Longshot, so they were some pretty warm rounds. Is the optic mount just not designed for that kind of abuse?
__________________
USS Brewton FF1086
SWCA#3597
|
The Following User Likes This Post:
|
|

01-10-2023, 07:42 AM
|
 |
Member
|
|
|
Join Date: Feb 2012
Location: Wisconsin
Posts: 1,025
Likes: 1,064
Liked 1,298 Times in 465 Posts
|
|
try the red loc tight, if you ever need to remove it you can heat it with a hair drier or heat gun and it can be broke loss.
|
The Following 2 Users Like Post:
|
|

01-10-2023, 07:57 AM
|
 |
US Veteran
|
|
|
Join Date: Dec 2014
Location: S&W Florida
Posts: 5,092
Likes: 6,735
Liked 13,417 Times in 3,344 Posts
|
|
Quote:
Originally Posted by cracker57
try the red loc tight, if you ever need to remove it you can heat it with a hair drier or heat gun and it can be broke loss.
|
Thanks…I will. I do want to get some new screws first, though. Now that these have loosened up on me twice, I don’t trust their tensile strength. I just don’t want to go through the ordeal of sheared screws again.
__________________
USS Brewton FF1086
SWCA#3597
|

01-10-2023, 09:34 AM
|
Banned
|
|
|
Join Date: Mar 2022
Location: Lake Cumberland, Ky
Posts: 335
Likes: 526
Liked 543 Times in 218 Posts
|
|
Idk who makes the best screws out there, but I have another suggestion for thread locker. The wife and I took an MOS operator course. Early on the first day the screws on her optic loosed. The instructor cleaned the threads with alcohol and reattached the optic using the wife’s fingernail polish. Just plain clear, cheapo fingernail polish.
After lunch she went back to using the pistol, roughly an hour to set up. Probably 750 rounds thru it after that. Since then she has over 10,000 rounds thru that pistol with zero fails. I’m going to redo all our optic pistols this winter with fingernail polish. Clear after cleaning the threads, torqued to 13”/lbs with just a dab of red polish on the screw head and optic housing as a visual confirmation that everything is tight.
Loosening doesn’t have any effect from tensile strength.
I have a few more rounds thru a G-40 of “hotter” Longshot loads then your number. At least 10 k, probably closer to 12k. Zero issues with the screws or loosening of the plate.
Good luck, I hope you get it straightened out. 10mm is da bomb!
Regards, Rick Gibbs
|
The Following 3 Users Like Post:
|
|

01-10-2023, 12:51 PM
|
 |
Member
|
|
|
Join Date: Feb 2016
Posts: 422
Likes: 22
Liked 342 Times in 153 Posts
|
|
Who makes the best optic mounting screws?
I got some from swamp fox. They seem to fit nicely and you can get the kit.
Edit: I have not shot the gun with the optic mounted. But I did get the tip from a M&p forum on Facebook.
Sent from my iPhone using Tapatalk
Last edited by markmiela; 01-10-2023 at 03:10 PM.
|
The Following User Likes This Post:
|
|

01-11-2023, 06:12 PM
|
Member
|
|
|
Join Date: Oct 2008
Location: Detroit
Posts: 1,090
Likes: 857
Liked 961 Times in 422 Posts
|
|
McMaster Carr but you would need to buy a box of 50.
I would not use red locktite. Blue is what you need and the stick kind will let you put it exactly where you need it. Make sure you degrease everything, slide, plates, screws and bottom of the optic. How long did you let it set up before you started to shoot?
__________________
Plastic has no soul
|
The Following 2 Users Like Post:
|
|

01-11-2023, 06:44 PM
|
 |
US Veteran
|
|
|
Join Date: Dec 2014
Location: S&W Florida
Posts: 5,092
Likes: 6,735
Liked 13,417 Times in 3,344 Posts
|
|
Quote:
Originally Posted by Ethang
McMaster Carr but you would need to buy a box of 50.
I would not use red locktite. Blue is what you need and the stick kind will let you put it exactly where you need it. Make sure you degrease everything, slide, plates, screws and bottom of the optic. How long did you let it set up before you started to shoot?
|
It was at least a couple of days from when I assembled it until I went to the range. I’ve dealt with McMaster Carr quite a bit over the years…lots of good stuff, but I never thought of them for gun parts. I’ll see if I can track down a stick of blue loctite too.
__________________
USS Brewton FF1086
SWCA#3597
|

01-11-2023, 06:49 PM
|
Member
|
|
|
Join Date: Oct 2008
Location: Detroit
Posts: 1,090
Likes: 857
Liked 961 Times in 422 Posts
|
|
Quote:
Originally Posted by tlawler
It was at least a couple of days from when I assembled it until I went to the range. I’ve dealt with McMaster Carr quite a bit over the years…lots of good stuff, but I never thought of them for gun parts. I’ll see if I can track down a stick of blue loctite too.
|
What optic are you using?
__________________
Plastic has no soul
|
The Following User Likes This Post:
|
|

01-11-2023, 06:52 PM
|
Member
|
|
|
Join Date: Dec 2011
Posts: 173
Likes: 90
Liked 161 Times in 79 Posts
|
|
I went to Permatex High Strength Orange Removable when my screws were getting loose with Vibra-tite, and also with blue Loctite.
The orange Permatex is stronger than blue Loctite but I have never had any issues getting the screws back out torqued to 15"lbs.
I may also start trying the above nail polish method.
Thanks for that!
I also noticed with the M&P 2.0 core, the threads go all the way through the slide, and oil will seep up into them and probably soak into the screws, degrading any thread locker which may cause them to back out sometimes.
When cleaning my slide I always try hard to make sure I don't let any lubricant go down into those thread holes.
Last edited by Gman556; 01-11-2023 at 07:09 PM.
|
The Following User Likes This Post:
|
|

01-11-2023, 06:53 PM
|
 |
US Veteran
|
|
|
Join Date: Dec 2014
Location: S&W Florida
Posts: 5,092
Likes: 6,735
Liked 13,417 Times in 3,344 Posts
|
|
Quote:
Originally Posted by Ethang
What optic are you using?
|
Holosun 507c
__________________
USS Brewton FF1086
SWCA#3597
|

01-11-2023, 06:58 PM
|
Member
|
|
|
Join Date: Oct 2008
Location: Detroit
Posts: 1,090
Likes: 857
Liked 961 Times in 422 Posts
|
|
Quote:
Originally Posted by tlawler
Holosun 507c
|
Sent you a PM
__________________
Plastic has no soul
|
The Following User Likes This Post:
|
|

01-12-2023, 10:52 AM
|
Member
|
|
|
Join Date: Dec 2022
Posts: 76
Likes: 2
Liked 50 Times in 29 Posts
|
|
A place called boltdepot.com has any size screw you need.
Sent from my SM-S908U using Tapatalk
|
The Following User Likes This Post:
|
|

01-12-2023, 11:02 PM
|
Member
|
|
|
Join Date: Aug 2009
Location: Seattle
Posts: 3,477
Likes: 1,173
Liked 3,674 Times in 1,552 Posts
|
|
Quote:
Originally Posted by tlawler
It was at least a couple of days from when I assembled it until I went to the range. I’ve dealt with McMaster Carr quite a bit over the years…lots of good stuff, but I never thought of them for gun parts. I’ll see if I can track down a stick of blue loctite too.
|
it's not a gun part, it's a screw that happens to fit a tapped hole in a S&W part. Sometimes we need to step back from a problem and actually define what the actual problem is.
loosening screw, and where to get more.
__________________
NRA RSO
|
The Following User Likes This Post:
|
|

01-13-2023, 09:56 AM
|
Member
|
|
|
Join Date: Feb 2015
Posts: 1,323
Likes: 895
Liked 1,533 Times in 728 Posts
|
|
Are you using a torque wrench?
If you hand tighten enough screws without one you will get a good feel for how much force to use. But you have to strip a few to know how much is too much. I don't deal with small screws often enough to get a good feel so I use a torque wrench.
|
The Following User Likes This Post:
|
|

01-13-2023, 10:03 AM
|
 |
US Veteran
|
|
|
Join Date: Dec 2014
Location: S&W Florida
Posts: 5,092
Likes: 6,735
Liked 13,417 Times in 3,344 Posts
|
|
Quote:
Originally Posted by Dave Lively
Are you using a torque wrench?
If you hand tighten enough screws without one you will get a good feel for how much force to use. But you have to strip a few to know how much is too much. I don't deal with small screws often enough to get a good feel so I use a torque wrench.
|
I didn’t the first couple of times I mounted it, but I’m going to pick up a FAT driver before I do it again. I ordered screws and a blue loctite stick from McMaster Carr yesterday. I’ll update when I get all the components together.
__________________
USS Brewton FF1086
SWCA#3597
|

01-13-2023, 11:24 AM
|
Member
|
|
|
Join Date: Aug 2014
Posts: 714
Likes: 949
Liked 1,150 Times in 438 Posts
|
|
Are you certain that the mating surfaces were clean before applying the blue locktite?
Blue locktite is appropriate for that installation, I give it 24 hours to set.
Red locktite is overkill for small screws and it will prove problematic to remove them.
Last edited by Oldsalt66; 01-13-2023 at 11:37 AM.
|
The Following 2 Users Like Post:
|
|

01-13-2023, 12:20 PM
|
 |
US Veteran
|
|
|
Join Date: Dec 2014
Location: S&W Florida
Posts: 5,092
Likes: 6,735
Liked 13,417 Times in 3,344 Posts
|
|
Quote:
Originally Posted by Oldsalt66
Are you certain that the mating surfaces were clean before applying the blue locktite?
Blue locktite is appropriate for that installation, I give it 24 hours to set.
Red locktite is overkill for small screws and it will prove problematic to remove them.
|
I’m thinking I might have trimmed the screws shorter than I needed. They were bottoming out and I didn’t want to strip them out or shear one during installation, so I cut them a little shorter. After I cut them, I had only about .19” going down into the slide. I took some measurements with some longer screws, and found that I could go about .29” before the threads started binding. Measurements are from memory; I’m at work right now and have them written down at home.
__________________
USS Brewton FF1086
SWCA#3597
|

01-13-2023, 05:35 PM
|
Member
|
|
|
Join Date: Aug 2009
Location: Seattle
Posts: 3,477
Likes: 1,173
Liked 3,674 Times in 1,552 Posts
|
|
for proper thread engagement, you need the length at least as long as the width. So a 1/4-20 needs to have at least 1/4" thread engagement.
__________________
NRA RSO
|
The Following User Likes This Post:
|
|

01-14-2023, 04:42 PM
|
 |
US Veteran
|
|
|
Join Date: Dec 2014
Location: S&W Florida
Posts: 5,092
Likes: 6,735
Liked 13,417 Times in 3,344 Posts
|
|
I picked up the FAT wrench at Bass Pro yesterday and the screws and loctite stick got delivered this morning. I gathered all the components together and got to work. First, I gave the slide a good cleaning with Hoppe’s, then ran a tap down through the mounting holes to clean out the threads. I degreased first with mineral spirits, then HD Degreaser, letting it air dry well between degreasings. I dabbed the loctite on the lower two thirds of the screws and immediately ran them in. I finished off by torquing to 15 in-lb of torque with the FAT wrench. I’ll let the loctite set up for at least 24 hours before I take it to the range. Now that I have a plentiful supply of screws, I’ll be changing them after each 1K rounds. Does anyone have a different idea of change interval?
The screws are a little different than OEM. They take a T15 driver instead of the T10 that the OEMs take, which is ok because the smallest T-bit in the FAT wrench set is T15. The bits in the set are longer than standard bits and one of the standard bits I tried wouldn’t allow the FAT wrench to get a good square purchase to engage the screw head properly.
I’ll let everyone know how well it works.
__________________
USS Brewton FF1086
SWCA#3597
|

01-14-2023, 06:48 PM
|
Member
|
|
|
Join Date: Oct 2008
Location: Detroit
Posts: 1,090
Likes: 857
Liked 961 Times in 422 Posts
|
|
why would you change screws at a round count interval and not just when the optic was removed/installed?
__________________
Plastic has no soul
|

01-14-2023, 10:37 PM
|
 |
US Veteran
|
|
|
Join Date: Dec 2014
Location: S&W Florida
Posts: 5,092
Likes: 6,735
Liked 13,417 Times in 3,344 Posts
|
|
Quote:
Originally Posted by Ethang
why would you change screws at a round count interval and not just when the optic was removed/installed?
|
In the link you sent me, I think a few posters mentioned changing the screws at some point after so many rounds. I’ll have to go back and re-read it. And I’ve got a bunch of screws.
If anyone needs a pair of screws, PM me up and I’ll send you two if you pay postage.
__________________
USS Brewton FF1086
SWCA#3597
|

01-15-2023, 05:49 PM
|
 |
US Veteran
|
|
|
Join Date: Dec 2014
Location: S&W Florida
Posts: 5,092
Likes: 6,735
Liked 13,417 Times in 3,344 Posts
|
|
Quote:
Originally Posted by Ethang
why would you change screws at a round count interval and not just when the optic was removed/installed?
|
I went back and re-read the thread. There’s three posts where they talk about changing screws, but it’s with RDS’s that have bottom mount batteries. They have to unmount the RDS to change the battery, so they remount with new screws. Since the Holosun’s have side mounted batteries, I’m not going to worry about it. I’ll just put a stripe from a paint pen with a toothpick across the screws so I’ll be able to tell if there’s any movement.
__________________
USS Brewton FF1086
SWCA#3597
|

01-17-2023, 03:51 AM
|
Member
|
|
|
Join Date: Jul 2009
Location: Secret City, Tennessee
Posts: 433
Likes: 93
Liked 471 Times in 192 Posts
|
|
I have some experience mounting optics and tracking what works and what doesn’t. Through a lot of trial, error, research, experimentation, and consultation with mechanical engineers as well as optic, plate, and pistol manufacturers we have developed a mounting system that works very well. I will throw out there that my experience is almost exclusively with 9mm handguns, so 10mm is still a bit of an unknown.
The screws you ordered will possibly work on your 507C but are not ideal for Holosun optics and would likely fail on a 508T with its titanium body. The head diameter is too wide for the countersink in the optic and they will contact the side of the optic body. On the aluminum versions such as the 507C it will probably move the metal out of the way because it’s fairly minimal contact and may seat just fine.
I stopped using the McMaster alloy steel screws for the Holosun when I discovered the issue, and I now order the 6-32x1/2” stainless steel (18-8) from McMaster because those screws have a smaller diameter head that is compatible with Holosun optics. While you’re there, order some longer T-10 or IP-10 bits since the Holosun places the screws so close to the shroud it’s almost a necessity.
When we mount optics, we’ll do the following:
1. Confirm you have all the proper parts/screws/plates.
2. Confirm the optic is functional
3. Test fit all parts to ensure they fit.
4. Degrease all interacting surfaces to include the optic pocket, plate, slide threaded holes, plate threaded holes (if applicable), and the screws themselved. I most frequently use alcohol pads and they work well.
5. Apply a decent threadlocker. Vibrating VC-3 is trash. Loctite 248 is my favorite because it is a paste and is easy to put the right amount in the right spot without using too much.
6. Torque to the proper spec of the interacting parts (lowest spec of the interacting parts with a few exceptions based on my experience). The FAT wrench works but I like the Vortex just because I get individual inch-pound adjustments. I have a way I torque the optics that involves working up the torque wile alternating screws.
7. I apply a bit of oil-based paint from a paint pen to the used alcohol pad wrapper and then use the toothpick I used to get the alcohol pad into the threaded holes to apply indicator marks to the screws.
8. Let it cure for 24 hours.
I’m a few hundred optics in and have seen probably a few hundred thousands of rounds through optic guns that I and a few of my fellow partners have mounted. Hopefully this helps.
|
The Following 2 Users Like Post:
|
|

01-17-2023, 12:34 PM
|
Member
|
|
|
Join Date: Dec 2006
Location: Brisbane,Australia
Posts: 10
Likes: 0
Liked 6 Times in 5 Posts
|
|
Brownells have screw sets/kits. I wanted to have spare screws to mount a
LPA rear sight on my S&W 686.
The set that I bought is :Pachmayr Master Gunsmith Screw Kit #03061
The above info may be of help ?
|
The Following User Likes This Post:
|
|

01-17-2023, 12:52 PM
|
 |
US Veteran
|
|
|
Join Date: Dec 2014
Location: S&W Florida
Posts: 5,092
Likes: 6,735
Liked 13,417 Times in 3,344 Posts
|
|
Quote:
Originally Posted by SoCalDep
I have some experience mounting optics and tracking what works and what doesn’t. Through a lot of trial, error, research, experimentation, and consultation with mechanical engineers as well as optic, plate, and pistol manufacturers we have developed a mounting system that works very well. I will throw out there that my experience is almost exclusively with 9mm handguns, so 10mm is still a bit of an unknown.
The screws you ordered will possibly work on your 507C but are not ideal for Holosun optics and would likely fail on a 508T with its titanium body. The head diameter is too wide for the countersink in the optic and they will contact the side of the optic body. On the aluminum versions such as the 507C it will probably move the metal out of the way because it’s fairly minimal contact and may seat just fine.
I stopped using the McMaster alloy steel screws for the Holosun when I discovered the issue, and I now order the 6-32x1/2” stainless steel (18-8) from McMaster because those screws have a smaller diameter head that is compatible with Holosun optics. While you’re there, order some longer T-10 or IP-10 bits since the Holosun places the screws so close to the shroud it’s almost a necessity.
When we mount optics, we’ll do the following:
1. Confirm you have all the proper parts/screws/plates.
2. Confirm the optic is functional
3. Test fit all parts to ensure they fit.
4. Degrease all interacting surfaces to include the optic pocket, plate, slide threaded holes, plate threaded holes (if applicable), and the screws themselved. I most frequently use alcohol pads and they work well.
5. Apply a decent threadlocker. Vibrating VC-3 is trash. Loctite 248 is my favorite because it is a paste and is easy to put the right amount in the right spot without using too much.
6. Torque to the proper spec of the interacting parts (lowest spec of the interacting parts with a few exceptions based on my experience). The FAT wrench works but I like the Vortex just because I get individual inch-pound adjustments. I have a way I torque the optics that involves working up the torque wile alternating screws.
7. I apply a bit of oil-based paint from a paint pen to the used alcohol pad wrapper and then use the toothpick I used to get the alcohol pad into the threaded holes to apply indicator marks to the screws.
8. Let it cure for 24 hours.
I’m a few hundred optics in and have seen probably a few hundred thousands of rounds through optic guns that I and a few of my fellow partners have mounted. Hopefully this helps.
|
I noticed the heads don’t sit quite flush, but I’m sure I got a firm bottom out and the optic is locked down good. I may have dug into the side of the optic slightly; I’ll look at it under magnification when I get home. What is the tensile shear strength on the McMaster-Carr 18-8 SS screws? If it’s close enough to the 180K PSI of the allow steel, it may be a viable option for the 10mm. I wonder how much more shear force is generated by hot 10mm ammo over any 9mm.
__________________
USS Brewton FF1086
SWCA#3597
|

01-17-2023, 08:12 PM
|
 |
US Veteran
|
|
|
Join Date: Dec 2014
Location: S&W Florida
Posts: 5,092
Likes: 6,735
Liked 13,417 Times in 3,344 Posts
|
|
I took some pictures looking through lighted magnifier mounted on my work bench. The screws do sit a little proud, but I’m not going to lose sleep over it. The optic is solid, and I’ll be monitoring it to make sure it doesn’t loosen again.
__________________
USS Brewton FF1086
SWCA#3597
|

01-18-2023, 09:52 AM
|
Member
|
|
|
Join Date: Oct 2008
Location: Detroit
Posts: 1,090
Likes: 857
Liked 961 Times in 422 Posts
|
|
Quote:
Originally Posted by tlawler
I took some pictures looking through lighted magnifier mounted on my work bench. The screws do sit a little proud, but I’m not going to lose sleep over it. The optic is solid, and I’ll be monitoring it to make sure it doesn’t loosen again.
|
if you did not make the connection SoCalDep is the expert in the link I sent you. I trust his opinion on this topic and have been following his advice in my own endeavor.
Also... Hey Trey.
__________________
Plastic has no soul
|

01-22-2023, 11:41 PM
|
Member
|
|
|
Join Date: Jul 2009
Location: Secret City, Tennessee
Posts: 433
Likes: 93
Liked 471 Times in 192 Posts
|
|
Quote:
Originally Posted by Ethang
if you did not make the connection SoCalDep is the expert in the link I sent you. I trust his opinion on this topic and have been following his advice in my own endeavor.
Also... Hey Trey.
|
Hey Ethan... Hopefully you’re doing well and your program is continuing to move forward.
As for the screws not seating... That’s an issue with 9mm and the likelihood that a warm 10mm round will exceed 9mm is real. That said, I don’t remember a 507C mount failing - They are all 508Ts that came loose, so you’ll be a good data point.
To answer the question about the stainless screws vs alloy, we need to discuss how the screws work and what forces act upon them. There are three primary forces that are occurring when you’re using screws on an optic, and that means three points of potential failure. Tensile strength is the ability to hold two parts together that are trying to pull apart. Torque is the rotational force being placed on a fastener (screw) as one tightens it down, and shear force is the force placed perpendicular to the direction in which the screw is being tightened. There’s little compressive force because we’re generally dealing with metal that doesn’t compress. It’s there but it’s less relevant. In fact, it’s probably relevant in getting the screw past the 507C optic body to seat but that’s another conversation and a whole lot more experimentation.
So the McMaster alloy steel 6-32x1/2” screws have a listed tensile strength of 140,000 psi.
The McMaster stainless steel (18-8) screws have a listed tensile strength of 60,000 psi.
Depending on what engineering formula/theory you use, which I believe if I remember correctly depends on the ductility of the steel in the screw, you’re looking at around 57 or so % of the tensile strength to get the shear strength. This means that in a very oversimplified way the stainless steel screws have 42% of the tensile strength and shear strength of the alloy steel.
That’s a thing, and I think the increased strength of the alloy steel screws will provide a potential early warning to a loose screw prior to catastrophic failure and shearing.
It doesn’t prevent the screw from coming loose, and a loose screw is the problem. Again, my experience is with 9mm, but I believe that a screw does not shear on an optic from tensile forces. If mounted properly with a good mounting system as long as it’s tight the shear forces are primarily on the optic against the plate and not the screws. Once an optic comes loose, the shear forces are enormous. It doesn’t take long for a screw to be fatally injured.
So this brings up what that “fatal injury” means. A screw is like a very rigid spring. It has a certain amount of deformation that is “elastic” meaning that it can return to it’s original dimensions. Once the screw is stressed beyond it’s elastic range and reaches plastic deformation it cannot return to it’s original dimensions and it begins to be damaged.
As we have seen, there is fairly minimal tensile forces against the screws, so they should hold to that force. The torsional forces, so long as they don’t exceed elastic deformation dissipate rapidly, so tightening the screw doesn’t hurt the screw unless it’s beyond the screws capability to begin with. Shear forces are high, but as long as the optic isn’t moving with the slide’s reciprocation that can be controlled. Since we don’t have compressive force (of any real measure) we need something to keep the screw in place and tight. That’s where threadlocker comes in. The purpose of a torque spec is primarily to lock the minimally compressive materials (the optic body and the slide with maybe the sandwich of a plate) together without exceeding the elastic deformation range in strength of the screw regarding the torsional forces. If that were to happen, the screw would loose strength rapidly as the - in my words - critical line - was crossed and exceeded. At that point the mount is doomed from the start. That’s rare.
Lots of words... what does it all mean?
Tensile (and the related shear) strength of the screw is less important than proper mounting. If the mounting stays tight then the system should work.
I see several issues in the previous posts in this thread... things that we have done and encountered - the mistakes of our past.
First... The screws from C&H were not too long. They were probably not the same thread pitch. The M&P has through-bored threaded holes. You can use a pretty long screw, but not if it’s the wrong pitch (they use something like 6-40 on some of their stuff...). I’ve experienced C&H sending the wrong screws before on more than one occasion. This couldn’t have been great for the threads in your slide. Add to that you ran a tap, which may have corrected the initial damage, but if the tap was on the large side of spec may allow more “looseness” and reduce how tightly the screw is able to secure the optic.
So, ideally you now have good screws installed correctly on your slide/optic, but if they don’t have good 360 degree contact with the optic body, and they are proud of the pocket because the aluminum body has prevented the screw from tightening down, that small surface area of the screw has the potential to move the metal on the aluminum optic body when the slide reciprocates. It’s too small of a contact area and in a 10mm I sure wouldn’t trust it. I’ve seen that several times on multiple platforms in the past. As soon as the aluminum (being softer than the alloy steel) deforms enough to allow the optic to move... it is done. The optic will come loose. The shear force will begin to compromise the integrity of the screw, and if not caught early it will shear. Even alloy steel.
How do I know this? I and several other members of our unit fired 1,985 rounds in about 20 minutes through an M&P with a Trijicon SRO mounted with McMaster alloy steel screws. It was so hot that we poured water from a hose down the ejection port/barrel and on the slide to cool it when we couldn’t shoot it any more. The heat (I think) ultimately loosened the threadlocker, which allowed a screw to start backing out. This lead to peening of the plastic plate (now things are moving with much more force), and when doing a final accuracy test we noticed a significant zero shift. I saw the indicator marks had moved (more on the right side) and went to the armory to check. I tried to remove the right screw and it began turning (probably the top against the cracked/sheared section) and broke free. The other screw came out intact.
The recoil forces were no more than the several optics I’ve mounted with stainless steel screws that have higher round counts. The problem was that the screw came loose.
|
 |
Posting Rules
|
|
|
|
|