|
|
 |

03-21-2014, 02:24 AM
|
 |
Member
|


|
|
Join Date: Mar 2014
Posts: 4
Likes: 3
Liked 0 Times in 0 Posts
|
|
 M&P-10 Takedown Pin Stuck
I just picked up an M&P-10 this week. While performing the first breakdown and a thorough inspection, I ran into a problem almost immediately. The Takedown Pin should be easily pushed through the two receivers, then, easily pulled the rest of the way from the other side. However, the Takedown Pin cannot be budged without using a hammer and nylon punch. After getting the TD pin loose, I removed the pistol grip to ensure the detent and spring were installed properly. They were. To ensure there was no issue with the TD pin, the detent and spring, or the lower receiver, I left the upper receiver detached and inserted the TD pin back through the lower receiver until the detent caught the groove of the fully inserted TD pin.
The TD pin was now easily manipulated with a thumb or finger and freely moved out of the lower receiver until caught in the opposite groove by the detent. I reattached the upper receiver and began inserting the pin through. It immediately caught in the upper and required a few taps with the hammer to fully insert.
I have thoroughly cleaned and lubricated all parts involved with no improvement. The bolt carrier group, trigger assembly, and general fitment seem to be good. I will have to put a few rounds through to see if that loosens it up a bit.
I have many ARs by several manufacturers, including a couple other S&W M&Ps, but have never encountered this particular issue. Anyone else have this issue? Any thoughts/suggestions?
Thanks

|
03-21-2014, 04:58 AM
|
|
Member
|


|
|
Join Date: Oct 2013
Location: Mississippi
Posts: 5
Likes: 0
Liked 1 Time in 1 Post
|
|
I have the same issue with my new M&P 10. I think it has to do with the little rubber "anti-play" nubs on the underside of the upper receiver. If it doesn't break in with time, I may just shave those nubs off with a razor blade.
|
|
The Following User Likes This Post:
|
|
03-21-2014, 09:07 AM
|
|
Member
|
|
|
Join Date: Aug 2013
Posts: 374
Likes: 1
Liked 233 Times in 135 Posts
|
|
You can shave the nubs down to no ill affect and the play between the upper & lower doesn't hurt anything but they will settle in with use and be much easier to push. Shooting the rifle seems to help. Mine started off needing a tool but now simple finger pressure works
|
03-21-2014, 02:41 PM
|
|
Member
|

|
|
Join Date: Jan 2012
Location: God's Country
Posts: 4,711
Likes: 1,235
Liked 3,535 Times in 1,770 Posts
|
|
I've got four AR's from three manufacturers. One rattles, one takes down easily with no rattles, one takes down hard, and one requires a punch and hammer.
I'll take the punch and hammer every time and let it wear in through the hard stage to the easy stage. I hope it never reaches the rattle stage. FWIW, I grease the pins when I take the gun down to reduce wear.
|
|
The Following 2 Users Like Post:
|
|
03-21-2014, 04:49 PM
|
 |
US Veteran
|


|
|
Join Date: Apr 2009
Location: N.E. Iowa Boondocks USA
Posts: 2,888
Likes: 5,524
Liked 1,599 Times in 993 Posts
|
|
I've had the same issue with a couple different MSR's. I'd leave well enough alone and let it break itself in. It WILL get loose enough in time. You do any trimming now, it could/will be too loose later.
__________________
THIS WE'LL DEFEND ΜΟΛΩΝ ΛΑΒΕ
|
|
The Following 2 Users Like Post:
|
|
03-22-2014, 12:01 AM
|
|
Member
|
|
|
Join Date: Dec 2013
Posts: 309
Likes: 1
Liked 75 Times in 66 Posts
|
|
God I love those little anti-rattle rubber things they have out there, I would never trim them!
I do have to compress the upper/ lower slightly to make the pin run smooth, but well worth it.
You could allways polish the hole through the upper is things are a bit stickey.
|
|
The Following User Likes This Post:
|
|
03-22-2014, 10:36 AM
|
 |
Member
|
|
|
Join Date: Jan 2013
Location: Va
Posts: 257
Likes: 523
Liked 122 Times in 77 Posts
|
|
I have to use a punch on the rear tdp but the forward tdp is gtg. I've put 400rds through my m&p10 and the rear tdp is still as tight as day one. I hate any kind of play in a rifle so being a little tight is ok with me.
|
|
The Following 2 Users Like Post:
|
|
03-22-2014, 10:53 AM
|
|
Member
|
|
|
Join Date: Aug 2013
Posts: 374
Likes: 1
Liked 233 Times in 135 Posts
|
|
Don't polish the pin holes. You don't wanna remove any of the anodizing in there
|
|
The Following 2 Users Like Post:
|
|
03-23-2014, 12:07 AM
|
|
Member
|
|
|
Join Date: Dec 2013
Posts: 309
Likes: 1
Liked 75 Times in 66 Posts
|
|
Quote:
Originally Posted by MistWolf

Don't polish the pin holes. You don't wanna remove any of the anodizing in there
|
Ok Mist, I said polish, you could just wait ten years for the same thing to happen! Sometimes a bit of 1000 grit works wonders!
These guns seem to come pretty nice, but! In the real world, to me these things are still basically a bigger mil spec rough modular AR platform that is rough around the edges and built to a price. The finish in itself is rough, and for good reason makes it a good field gun/ beater if need be.
I will not wait ten years to get my stuff working and wear in if I can easily fix it! This stuff is too cheaply built, they come with surface imperfections from new, it does not effect the operation, no big deal, make it work, as in what if you were issued this gun and actually had to use the thing!
|
03-23-2014, 01:36 AM
|
|
Member
|
|
|
Join Date: Aug 2013
Posts: 374
Likes: 1
Liked 233 Times in 135 Posts
|
|

It's your rifle, it's your money.
Just keep in mind that before you discount my advice, I work in aviation as a certificated Airframe & Power Plant Technician with over thirty years of dealing with the repair, modification, assembly and fabrication of aluminum parts and structures including sheetmetal, extrusions and forgings.
Anodizing protects aluminum from corrosion and not just the usual electro-chemical kind. It also protects aluminum from fretting, another type of corrosion. Remove the anodizing and expose the softer material underneath, as well as enlarging the hole diameter, increases the chance of fretting due to the parts rubbing against each other from recoil and the play between parts. If they fret, it wears away the material as well as enlarging the holes. The larger the holes get, the more the parts fret, the faster they wear.
Out of the four ARs that I have owned, all have had stubborn take down pins when new. All have broken in nicely in a short time just from normal use. I'm just passing along what I know from years of training and experience to help out a fellow shooter. You are free to do with the information what you will
Last edited by MistWolf; 03-23-2014 at 07:18 PM.
|
|
The Following 2 Users Like Post:
|
|
03-23-2014, 05:06 PM
|
|
US Veteran
|
|
|
Join Date: Apr 2009
Location: N.E. Iowa Boondocks USA
Posts: 2,888
Likes: 5,524
Liked 1,599 Times in 993 Posts
|
|
Point well made MistWolf.
__________________
THIS WE'LL DEFEND ΜΟΛΩΝ ΛΑΒΕ
|
03-24-2014, 03:25 PM
|
|
Member
|

|
|
Join Date: Mar 2014
Location: Vermont
Posts: 12
Likes: 1
Liked 8 Times in 5 Posts
|
|
Mine has the really tight takedown pins if I try to just push them out like I do on my AR15, however, I read somewhere else that the pins are not actually tight in the holes (i.e. don't sand the holes bigger), but that the elastomer bumpers that eliminate play between the upper and lower are putting a slight shear load on the pins by pushing the holes in the upper and lower in opposite directions. So now, to take the pins out, I grab with my fingers wrapped around the top of the upper (over the folded rear buis in my case) and my thumb wrapped around the lower just behind the selector, right on the radius where the pistol grip starts. I give her a little squeeze, and the pins slide right out with minimal finger effort and no resistance. Much easier to me than trying to modify anything.
|
|
The Following User Likes This Post:
|
|
04-19-2014, 12:51 PM
|
|
Member
|
|
|
Join Date: Sep 2013
Posts: 57
Likes: 6
Liked 19 Times in 18 Posts
|
|
Quote:
Originally Posted by Vermont
Mine has the really tight takedown pins if I try to just push them out like I do on my AR15, however, I read somewhere else that the pins are not actually tight in the holes (i.e. don't sand the holes bigger), but that the elastomer bumpers that eliminate play between the upper and lower are putting a slight shear load on the pins by pushing the holes in the upper and lower in opposite directions. So now, to take the pins out, I grab with my fingers wrapped around the top of the upper (over the folded rear buis in my case) and my thumb wrapped around the lower just behind the selector, right on the radius where the pistol grip starts. I give her a little squeeze, and the pins slide right out with minimal finger effort and no resistance. Much easier to me than trying to modify anything.
|
Finally, someone comes by with a little common sense & a bit of mechanical aptitude! Gee, I wonder what those little plastic nubs were put in there for, and just exactly how do they work? Guys, this stuff isn't rocket science. S&W went to the trouble of installing those little nubs in the receiver to solve one of the major complaints a lot of people have had about the AR since the day Eugene Stoner designed it (i.e. Upper/lower fitment being too loose; rattle, rattle, loosey/goosey, can't be accurate, etc.). Now that S&W has solved the issue, we have other people complaining about the upper/lower fitment being too tight! Let's see now, I wonder, if I squeeze the two halves together a bit while I'm trying to push-out the pins, will that make it a little easier? The human mind never ceases to amaze does it? God, I hope my nubs never wear down. For once, I've got an upper and lower that actually fit together like I want them to.
|
04-23-2014, 03:40 PM
|
|
Member
|
|
|
Join Date: Mar 2014
Posts: 4
Likes: 3
Liked 0 Times in 0 Posts
|
|
I've run 300 rounds through it now. I wasn't expecting much change, but it's still as tight as the day I picked it up. While I can appreciate the idea of compressing the upper and the lower, with the thought that this will align the holes better, making it easier to push the pin, it just doesn't have any effect in my case. Thinking that maybe I just couldn't compress the upper and lower with enough pressure using my hand, I used a wood clamp to apply pressure. No luck.
Without applying any pressure by hand or with the clamp, the pin easily slides through the upper, but will not push through to the left side of the lower. With the pin pulled out to the detent, applying pressure by hand has the same result. The pin goes through the upper, but will not push through the left side of the lower without striking the pin with a nylon hammer.
When the clamp is applied with just a minimal amount of force, the pin will not enter the upper without being struck lightly with the nylon hammer, and requires a few decent strikes to move through the left side of the lower.
At this point, I removed the clamp, backed the pin out using hammer and punch. I re-applied the clamp with a bit more force and could not even get the pin through the upper without striking it pretty hard with the hammer. At this point, I removed the clamp, pushed the pin through the where it stopped at the left side of the lower, reapplied the clamp with moderate pressure. I struck the pin with the hammer a couple of times and it didn't budge. I tried this several times with the clamp placed towards the front, in the middle, and at the rear of the upper and lower. All had the same result. The pin would not budge.
Not wanting to cause any damage to the upper, lower, or the pin, I stopped at this point. Inspecting these three parts did not reveal any obvious marring or damage of any kind that would lead to any concrete conclusions, however, I have formulated a theory based on my experiences.
It seems that the upper may be seated slightly to the rear, causing the TD pin to move through the upper at a slight angle to the rear. So, when it reaches the left side of the lower, it is just slightly out of alignment, and requires the extra force to pop it into place. I theorize this because, compressing the upper and lower with a clamp only increases the resistance, making me think that the clamping causes downward misalignment in conjunction with the rearward misalignment, as well as binds the pin between the right side of the lower and the upper.
I need to get everything into some better light and under some magnification to better check for marring or damage. Once I do, I'll post my findings.
|
04-29-2014, 01:37 PM
|
|
Member
|
|
|
Join Date: Mar 2014
Posts: 4
Likes: 3
Liked 0 Times in 0 Posts
|
|
Upon further investigation, I have determined that the TDP hole in the upper receiver is actually slightly forward of the holes in the lower receiver. This causes the pin to pass through the upper, and be just offset enough once it reaches the left side of the lower to require a punch and hammer to fully seat the pin.
I've never come across this type of issue, and I'm not sure that this is something that can be resolved by continued use.
Anyone have a similar experience? Any thoughts would be appreciated.
|
04-29-2014, 08:47 PM
|
|
Member
|
|
|
Join Date: Aug 2013
Posts: 374
Likes: 1
Liked 233 Times in 135 Posts
|
|
If it's that far off it would be better to contact S&W about the problem
|
04-29-2014, 09:48 PM
|
|
Member
|
|
|
Join Date: Jan 2013
Posts: 28
Likes: 1
Liked 20 Times in 9 Posts
|
|
Unless it is significantly hindering your operation of the rifle, I say leave it alone. It is simply not a problem, and I consider it a nice change to have a couple of tight fitting receivers.
I built an AR from Fulton parts last year. The upper and lower are a tight match, and they do exactly what you describe yours does. It shoots just great- and tapping out that takedown pit is easier than prying the trigger guard free on a Garand.
Mistwolf is exactly right- DO NOT EVEN THINK of grinding/polishing/sanding the pin holes in the receivers. Leave that anodizing intact, you definitely want it there. If you can't live with it for the time being and have to change something, consider an undersized takedown pin. Get a replacement takedown pin and see if it fits any looser. If not, consider chucking it in a drill and polishing the center of it with fine sandpaper to slightly reduce the diameter of the center (where it passes through the lug on the upper).
Otherwise, this is an issue that a case or three of .308 will address by itself over time.
|
01-14-2016, 07:01 PM
|
|
Member
|
|
|
Join Date: Jan 2016
Posts: 1
Likes: 0
Liked 0 Times in 0 Posts
|
|
My Solution to Rear Takedown Pin Issue
First, thanks for having this discussion so that I know I wasn't the only one having this issue. My M&P 10 I bought in November 2015 was also too tight for the pin to move without tapping it out and back in. But in addition to the tightness, I found while moving the pin to the position to separate the upper and lower receivers, the takedown pin was coming completely out of the lower receiver along with the detent pin that sat atop the spring. I was in the U.S. Army for 22 years and worked in the arms vault a good deal of time and knew that this wasn't a normal issue. After many discussions with the S&W customer service and finally being told they could not ship me another takedown pin due to legal reasons, I set off on my own to find a solution and, while it is not the perfect solution, I found one that is a lot better than what I had.
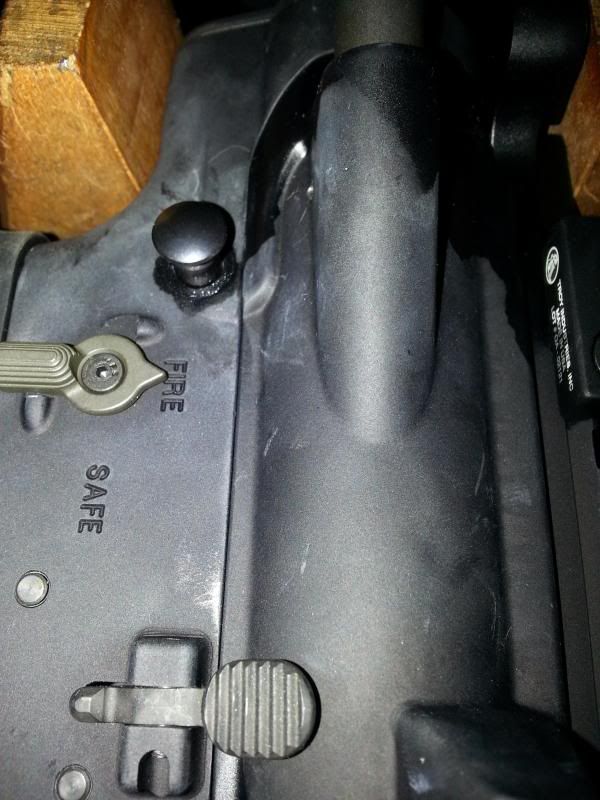
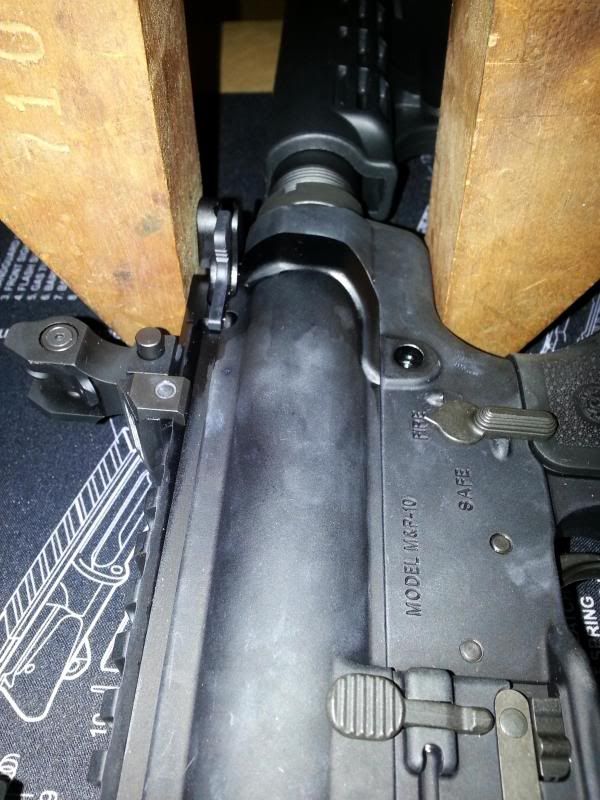
I ordered several takedown pins from various websites, but finally found one that I thought would solve the issue. I ordered a takedown pin for an Armalite AR10 (part #ARML-EA1113) from a website called RifleGear <http://www.riflegear.com/p-606-armalite-ar10-takedown-pin-rear.aspx>. I just received it and immediately installed the pin (took about 5 minutes) and PRESTO, the tightness of the takedown pin was gone. I can now push the pin in and out using only my finger with the same consistency as the front pin and the pin doesn't/can't push out all the way through the lower receiver as before. The only downside to it all is that when the pin is fully engaged into both the upper and lower receiver, the head of the pin that should be flush with the lower receiver protrudes approximately an 1/8" (see pictures) out of the receiver wall. Not perfect, but a lot better than how it was before.
Thought I'd let you know!
|
01-15-2016, 05:48 PM
|
|
Member
|
|
|
Join Date: Dec 2015
Posts: 12
Likes: 9
Liked 2 Times in 1 Post
|
|
Mine was delivered with the buffer tube one thread too deep in the lower. The tube was in contact with the upper and pushed the upper forward slightly. Since adjustment it is far easier to manipulate the TD pin. Still take some effort but no longer need the punch and hammer.
|
|
 Posting Rules
|
|
|
|
|


 Linear Mode

