bench design

DSC00075.jpg


This is the NRMA bench made exactly to their plans. My Dad and I built this 30+ years ago. It's been broken down and rebuilt multiple times over the years. Yet is still as stable as a the day we built it.

Sorry that this is a bit dark. In retrospect I should have never had finished it in dark stain. LIGHT stain or natural is THE way to go.

My shotshell bench and my work/cleaning bench are both natural with Varathane matte finish and they look much nicer. And the light finish reflects light too.

FN in MT
 
Matlock that is the best setup I have ever seen! My dream is to have a place where I can have my own range, but your "shooting/reloading house" takes the cake.

Joe
 
Frank, Joe,
Thanks for the kind words. To give everyone a bit better idea of the construction, below is a picture of the exterior. You can see the two windows (for the shooter and spotter) as well as the overhang to keep the rain away from the windows. The small window provides extra light at the metallic reloading bench. R11 insulation is in the walls, ceiling and floor. This winter 1500 watts could keep the inside temperature 40-45 degrees above the outside temperature. If you open the window then a second electric or portable propane can make it very warm. The building is on five 6"x6" beams supported on 25 concrete block pads. The eliminated having to deal with a building permit.

DSC_0067.jpg


The next picture shows the sand filled tractor tire backstop for center fire rifles. I also use tree stumps for rimfire targets and have a metal plate(at 45 degrees)/wood support for targets at for various distance pistol shooting.

DSC_0066.jpg


This last picture shows the interior entrance and a closet in which the brass tumbler, spare MECs and other larger stuff is stored. Frank commented on having enough light and he is exactly right. I put in five overhead florescent shop lights and it is just enough. They are switched in groups and when shooting I may turn some off to brighten the scope image.

DSC_0058.jpg


Joe just like you I always dreamed of my own range and a few years ago that became possible. The lots in this area are narrow but a 1/4 mile long so it fit the need perfectly. Many of my neighbors also shoot judging by the amount of gunfire I hear on a pretty day.

Matlock
 
Matlock, you are living my dream! I probably shouldn't complain because I only have to drive about 30 miles to get to an outdoor range and I can buy and shoot just about anything I lust after. That said, you have put together one of the nicest set ups I have seen.

FrankD
 
My reloading bench is pretty plain and simple. It's made of 2 x 4 lumber and plywood. It is rock solid and heavy with pretty usable space. I've probably got $100 in it. I bought all clear and straight lumber for some what of a premium but I built the whole thing in about a day.
IMG_1251small.jpg
 
First, welcome to the forum. Lots of very sharp guys here, lots to learn and contribute.

That looks like a really nice, repeatable design. If you add a press or other stuff you can just build another bench and bolt them together. Good work!

Frank
 
Hey Mark,
Those are pretty impressive pictures of your "shootin' shed". I can't imagine where you came up with the idea of a "shootin' shed". Just kidding - Mark is my brother and we do lots of shooting together. In my back yard, I have a 300 yard shooting range with a converted chicken into a wood stove heated and air conditioned "shootin' shed". My reloading stuff is in my basement however.
Mark did have a little help in design and lining up the builder from his little brother "Mikey".
 
Matlock, there just has to be something illegal or immoral about having such a great set up! Not that I'm jealous mind you.
 
Try going to your local big box construction store like Home Depot or Lowes. Look for the Simpson StrongTies display. They are metal hangers and clips that form the corners and angles that you nail through. They will have a boatload of plans hanging up to take with the ties. It really makes for a strong bench. Use at least 3/4" plywood for the top and I would put a formica like laminate on it with contact cement.

http://www.strongtie.com/ftp/fliers/DIY-PROJECTKT06.pdf
 
Matlock- the shed looks nice but the four tires is an accident waiting to happen... bounceback is a reality with that set up!

Security of the shed would be a concern... especially with the non shaded windows etc.
 
A lot of people have some great set-ups here... Similar to the Strong Tie bench corners are some products I used to make my benches and shelves. They are from 2x4 Basics (www.2x4basics.com) and are extremely sturdy. The kit comes with the resin parts as well as screws and some plastic hangers, etc. Home Depot used to carry them, but don't seem to anymore. I purchased a bench and shelves kit on Amazon for $30 with free shipping. Some examples:

DSC00184.jpg

DSC00185.jpg
 
Since you asked!

Since there is a thread already dedicated to the "man cave" I guess I will just add to it rather than create a new one!

So, here goes!

Enter only if you qualify!
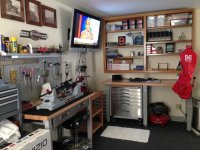
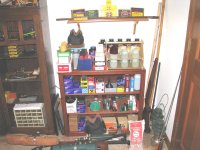
Enter.jpg


Storage Shelves:
StorageArea.jpg

(I think I have enough 45ACP!)

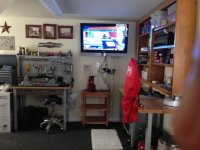
Computer in the corner: (On the Smith & Wesson Forum of course!)
Computerinroom-1.jpg


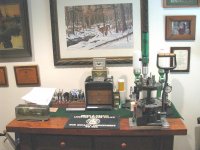
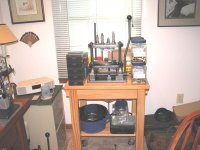
Bench with presses. XL650 on the right, Square Deal B in the middle and a Lee Classic Cast Turret Press on the left: (Notice the manual on the bench!)
Bench1-1.jpg


While I was organizing things, I found several empty ammo boxes. Since everything was clean and organized, I felt it my duty to "christen" it today too. I chose the load that I started it all with a couple of decades ago. 3.5gr of Bullseye under a 160gr LSWC! (Bet you thought it would have been "THE LOAD"! ;) )
Guesswhattheemptyboxesmean.jpg


Primers are in the old room. It will get cleaned up and will be my primer/bullet lubing/bullet storage area.

At any rate, Merry Christmas. All of the kids are coming over on Monday for our Christmas.

p.s. I loaded 150 of those loads on the XL650 in about a tenth of the time I did when I started loading, even with a caliber change!
 
Baker's Table/Reloading Bench............

Several years ago I decided to move my reloading area from the basement to an extra bedroom on the upper level of my home. I wanted a nicer bench than the one I had in the basement. I selected a baker's table from the local unfinished furniture store along with a high back swivel bar stool and a small bookshelf. I stained and finished the three pieces to match and mounted three eyeball lights in the ceiling over the bench. I designed a quick change mount for my presses and accessories as I did not want to drill a lot of holes in a bench this nice. My mount is made of aluminum since I am a home shop machinist, I have seen similar designs made from wood that work just as well. I have a Bose wave radio for entertainment and plan to add a small TV sometime soon. My gun vault sits in one corner and the walls are covered with sporting prints, etchings and vintage firearm advertizing. The closet stores all my hunting clothes, backpacks etc.. It is my man cave and I look forward to spending more time at the loading bench when retired.
 

Attachments

  • IMG_1307.jpg
    IMG_1307.jpg
    74.4 KB · Views: 470
  • IMG_1309.jpg
    IMG_1309.jpg
    67.1 KB · Views: 441
  • IMG_1311.jpg
    IMG_1311.jpg
    83.3 KB · Views: 431
double it.

Boy, some great rooms. My only advice, like garages and decks, figure out how big you need it to be, then DOUBLE IT. Matlock, your room/range is outstanding. I officially don't like you. Your friend for life, Beaver.
 
Last edited:
Here is my new addition to the man cave. I came home from work yesterday and the wife was just pulling in too. She had said that she had a present for me. I asked: "Why?" Well, it was our anniversary Friday and she just felt like getting me something!

At any rate, this is from Harbor Freight. It was on sale and since it was a gift, I didn't ask how much it cost! ;)

This is a heavy bench and with the few 45Colt loads that I made today, it doesn't seem to need to be anchored to the wall. Now, for a press that seats primers on the up stroke, that is amazing! The XL650 looks kind of lonely on there, doesn't it?

At some time in the future, I will probably move the Star luber/sizer over there from the other room.

At any rate, seems sturdy enough. Solid Oak is a bit of a stretch. There is a bit of particle board in the drawer bottoms and one brace is. Went together pretty easily.

I'll let you know how she holds up! :)

HarborFrieghtBench.jpg
 
Skip, happy anniversary and congrats on the new piece of "cave furniture". That looks like a sturdy addition to the shop, I may stop by our local harbor freight one of these days and see if they have ones like that around here. I think my workshop real estate is dwindling though...

Also, I see you use as many folgers plastic coffee cans as I do!
 
Just want to say thanks for pinning this thread as it helped me in my decision process. And since the last post is several years old, I'd thought add a link to a terrific work bench I found and purchased for reloading from Harbor Freight for $160 that my local store had in stock. I can honestly say it's on oar with some benches hundreds of dollars more, a great value!

60 in. 4 Drawer Hardwood Workbench


Sam's sell work benches that work very well as loading benches. I dropped a piece of plywood on the bottom to make a storage shelf and then bolted them to the studs in the wall. One bench is set up for pistol rounds with Dillon Presses and the other is set for rifle rounds.
 
Just want to say thanks for pinning this thread as it helped me in my decision process. And since the last post is several years old, I'd thought add a link to a terrific work bench I found and purchased for reloading from Harbor Freight for $160 that my local store had in stock. I can honestly say it's on oar with some benches hundreds of dollars more, a great value!

I just purchased this same bench. It's on sale until the end of the month, and there is a further $20 off coupon you can print up for it. It cost me $139 + tax. I can't say enough about it. Went together flawlessly. The only extra thing that I did was glue all overlapping joints before screwing them together. It's almost too nice to use as a work bench.
 
That octopus is a fused power strip! It contains

  1. HDBaseT for HDMI over Cat6 from the main house (DirecTV from the game room)
  2. 1x2 HDMI splitter and connection for other 1/2 of room
  3. 1000BaseT for network
  4. Coax for Antenna
  5. Power for WAP/router, splitter, TV
I unplug everything when I leave as we just completed our lightning strike claim from 11/21/13. THAT was the event that postponed much of my work. It looks worse than it is but I need access. I'm pondering a better solution every time I go to the reading room! Also, you may see the new TV in one of the pictures. This one suffered some damage in that strike. I just need another helping hand to lift it into place, or more precisely, lift THAT beast down. I had only hung that TV days before the strike. Most everything that was connected to an RJ45, an HDMI, or a COAX got sizzled. You know, HIGH potential meets low resistance!

Much of that will actually tuck up behind the TV once replaced.

It looks real good, but I don't like the look of that "octopus" of wires on that outlet. I'd recommend getting a fused power strip to replace that mess. It would be a shame for that nice setup to go up in flames. ;)
 
Last edited:
Mine looks similar to the old reloading association one but I used 4x4's for the legs and bolted it with 5/16" lag bolts. I wanted it heavy and strong.
 
Last edited:
Time to resurrect this thread with my extremely modest bench. It might not have a lot of expensive high tech components, but I really enjoy it!

997E6E6C-4CA0-47EE-9AC9-881B22CA2571.jpg
 
Last edited:
Draw up your plans and dimensions and all you need is plywood, 2x4's, and Simpson Strong Ties. Assemble, cover it with several coats of Sanding Sealer and you're done.

I put 3 or 4 coats of varnish on the top-side of my table-top, but that's optional.

Cheap $$$
 

Latest posts

Back
Top