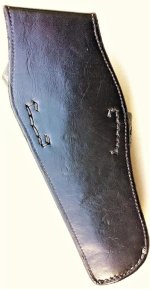
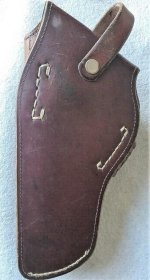
"Brill-ology”: Stag handled Old Model Ruger .44

Wyatt Burp

Well-known member
Joined
Dec 9, 2008
Messages
6,777
Reaction score
17,709
Location
Northern California
Having studied Brillology in my correspondence course on S&W and Colt Forum reading Red Nichol's posts and using "Holstery" as my textbook, I've been concentrating on tight fit and proper welt structure on holsters in general based on the Brill welt concept. I just finished this Ruger holster and was sure that it would be too tight and was a little panicked. But the fit turned out perfect. Turned upside down, both it and the basketweave N frame holster I made earlier hold the guns tight yet release easily when drawing. Hammer thong added anyway on the Ruger holster. The welts are 2 layers but 3 layers at the trigger guard and toe, hand stitched.
The belt, Ruger holster, and soon to be finished snub holster are for the same person. I still have a lot to learn, but all the Brill info found on this forum was a revelation.


Last edited:
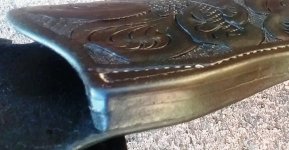
You've mastered it, Wyatt: the "Art of the Threepersons". Yours compares favorably with Tom's own; and by that I mean your sculpting, your straight drop, the closeness of the welt to the frame (so that the trigger guard is extending off it), the use of multiple layers of welts (called a 'welt stack'). His welt is very wide and I do the same; why not:

restored (14).jpg

Early Brills did NOT use more than one welt; it wasn't until N.J. Rabensburg was brought in, in '32, to run A.W. Brill by son Arno Brill when the Kluge brother who made them originally fell ill (and nobody here would want to travel back in time to have bowel cancer; no chemo then so surgery yes, cure no). At that time N.J. typically used three welts and appears to have created complex welt structures even for the autos because the holsters were not wet molded (we have pics) but sold 'in the flat'. That SAA ejector rod would've caused all kinda trouble for a dry, flat holster.

Now: I make 'em the way Tom's is made: one full length welt, with a very short second welt that is skived from full to zero thickness just at the frame. The benefit for me is that my sewing machine is going to succeed at that very thick section without having to get it right for 4x that distance, too. Using horsehide as I do, which Brill didn't nor Tom's maker, makes it literally 'harder'; horsehide has the consistency of tempered masonite and even my giant stitcher will say 'no' if overtasked (bends or breaks needles; and this does bad things to holsters).
 
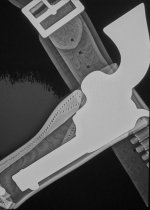
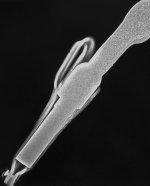
Apologies if I've already provided these images for you Wyatt -- X-rays of Tom's own holster:

xray (1).jpg

xray (3).jpg

That's a solid aluminium SAA casting inside it and so it appears as solid white. Anyway, the relationship of the welt stack to the revolver is clear. The holster measures out as being for a 5-1/2" and has a 4-3/4" inside it (both of Tom's Colts were the latter) and that left room for him to have a leg thong riveted through the holster. Notice also the welts have been cut away at the inside corner of the mouth; cutting that away would have caused the need for stitching repairs by a subsequent owner, as noted in the holster's provenance.
 
Last edited:
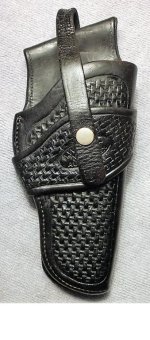
Red, was the Threepersons welt compromised by someone trimming off the corner or does it still give enough pressure against the frame? Here's a basketweave holster I made but didn't like because I felt the leather was to thin. But then after all the Brill info here (before the book came out) I rebuilt it with proper welt and lined the back. Now it's my favorite, though I know Brills were for pants belt, not wide gunbelts like this. This one and the upside N frame here were my first attempts at making welts do what they were intended to. Next time I'll make the bottom edge "lip" to stitch to the bottom of the fender. The bottom one here and the Ruger holster I just made have welts cut to touch as much frame in front of the trigger guard as possible. Is that mandatory, or should it just put pressure on part of it?


Those are all good questions :-). Tom's holster, you can see in the X-ray, does touch the SAA frame well past the trigger guard; so I make mine the same. You know, in a case like that the lack of wet molding probably added to the grip on the frame, and extended its lifetime of grip, too. Tom's does not absolutely hold the revolver with that corner cut off; but then it is calculated to be exactly 100 years old so that's to be expected regardless.

The lip on the Brill, which holster design came from cutting down the much larger King Ranch that preceded it, appears to be intended to take all the pressure off the muzzle with the unformed holsters. What a pain, though, it is to polish the welt stack with that lip in the way! Yet even today's buyers expect it as an authentic touch.

Be aware that the Brill WAS made for wide belts; but rather than lowering the cuff, Rabensburg raised the fold of the fender to increase the space available above the cuff; thereby lowering the pistol on the belt:

brill da rev (41).jpg wide belt

brill da rev (55).jpg wide belt

brill da rev (39).jpg narrow belt
 
I think you have been paying attention sir. I appreciate your efforts. Please share your future findings...............
 

Latest posts

Back
Top