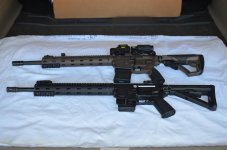
I recently ordered the 4 piece kit from Tactocool22 to change the rail on my 15-22. I also added a "modified" barrel nut to the order so I could try both nuts. I have a DD DDM4 V7/brown cerakote which comes with the DD MFR rail installed. I really like the looks of this rail system and the ability to add or remove the 3 inch sections easily. I wanted to install the same rail on my 15-22.
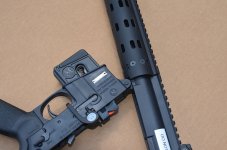
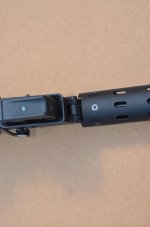
I first installed the MFR using the standard Tacticool22 adapter nut. With this adapter the gap between the upper and the MFR rail was .228 of an inch. While this gap did not look too bad and I don't plan to have anything mounted that would span both rail sections, I decided to go ahead and modify the upper, remove the two tabs, and use the modified adapter nut.
It only took about 20 minutes to remove the tabs. I used a small 4 inch narrow metal hack saw blade and then small files to finish and smooth things up. I cleaned all of the threads on the barrel, adapter nut, and DD barrel nut with simple green and wiped them clean. I then placed the barrel in a vise and installed the modified adapter nut. I torqued it to what I felt was around 20 ft pounds. I used no locktite, nothing but dry clean threads. I then installed the DD MFR rail barrel nut and tightened it with the supplied DD wrench until it started causing the adapter nut to turn. Again, no locktite etc.
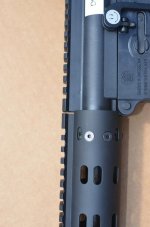
The DD MFR kit is a two piece barrel nut assembly. It comes with the inside ring already installed in the rail. I slid the rail section down the barrel until it slipped into the inside ring of the rail. All I had to do after this was start the 4 allen screws that hold the MFR to the barrel nut, screw them in until they touch the inside ring, make sure everything is lined up on the top of the rails, and then tighten the 4 allen screws evenly until they are good and snug. There is no need to over tighten these screws.
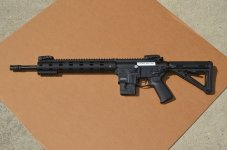
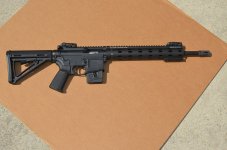
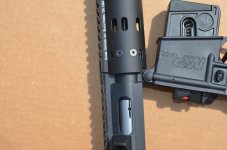
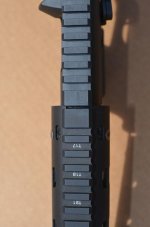
It really was an easy install and looks great. The end result is a small gap of just .074 of an inch. The top rail sections line up great and are level with no high or low area along the entire length. I am going to try and post some pictures next. I am very pleased with the ease of this install, the quality of the products used and the looks. I know this is an expensive rail, but it is what I wanted and I paid for it. I did get what I think was a good buy, $208.76 plus $9.00 shipping....$217.76.
Daniel Defense claims the weight of this 12 inch rai/handguard is 14.2 OZ. I am not sure if that includes the total weight with all 3 3inch rail sections installed or not.
This rail really feels good in my "regular-to small" hands and is a lot more comfortable. It comes with the MFR rail, three 3inch removable rail sections, barrel nuts, and barrel nut wrench.
I first installed the MFR using the standard Tacticool22 adapter nut. With this adapter the gap between the upper and the MFR rail was .228 of an inch. While this gap did not look too bad and I don't plan to have anything mounted that would span both rail sections, I decided to go ahead and modify the upper, remove the two tabs, and use the modified adapter nut.
It only took about 20 minutes to remove the tabs. I used a small 4 inch narrow metal hack saw blade and then small files to finish and smooth things up. I cleaned all of the threads on the barrel, adapter nut, and DD barrel nut with simple green and wiped them clean. I then placed the barrel in a vise and installed the modified adapter nut. I torqued it to what I felt was around 20 ft pounds. I used no locktite, nothing but dry clean threads. I then installed the DD MFR rail barrel nut and tightened it with the supplied DD wrench until it started causing the adapter nut to turn. Again, no locktite etc.
The DD MFR kit is a two piece barrel nut assembly. It comes with the inside ring already installed in the rail. I slid the rail section down the barrel until it slipped into the inside ring of the rail. All I had to do after this was start the 4 allen screws that hold the MFR to the barrel nut, screw them in until they touch the inside ring, make sure everything is lined up on the top of the rails, and then tighten the 4 allen screws evenly until they are good and snug. There is no need to over tighten these screws.
It really was an easy install and looks great. The end result is a small gap of just .074 of an inch. The top rail sections line up great and are level with no high or low area along the entire length. I am going to try and post some pictures next. I am very pleased with the ease of this install, the quality of the products used and the looks. I know this is an expensive rail, but it is what I wanted and I paid for it. I did get what I think was a good buy, $208.76 plus $9.00 shipping....$217.76.
Daniel Defense claims the weight of this 12 inch rai/handguard is 14.2 OZ. I am not sure if that includes the total weight with all 3 3inch rail sections installed or not.
This rail really feels good in my "regular-to small" hands and is a lot more comfortable. It comes with the MFR rail, three 3inch removable rail sections, barrel nuts, and barrel nut wrench.
Last edited: