PainterlyShotgroup
Member
- Joined
- Jan 29, 2011
- Messages
- 633
- Reaction score
- 263
How to make a dust cover for your M&P15-22
The following is an attempt to help others make a suitable dust cover for their rifles using some basic materials and simple tools. Results may vary depending on time and effort, design Etc.
Items you will need: suitable work surface, some kind of measuring tool, tin snips, pliers (I used my Leatherman Wave), files (I used the files on my Leatherman Wave, one was a diamond file and the other was a normal course file), sheet metal around 1/32 of an inch thick, a broom handle (for shaping the curvature of the cover), 400 grit and 1000 grit automotive sandpaper, 3M double sided automotive tape, one butter fly style paper clip (a section of which will become the hinge pin), the spring from a cheap retractable pen (or better yet something similar but in stainless from your local hardware store), one magnet roughly 1/8th to ¼ inch in thickness diameter about the size of a dime, Spray paint- a sandable primer and finish with a flat black, rubbing alcohol.
Step one: First thing you need to do is research your design. Have a look at an existing dust cover and take note of all the features it has and how it is constructed. You will be trying to replicate the form and function of the real thing. The difference will be in the materials you use and the design will tend to vary slightly because of the gun’s contours and measurements are different.
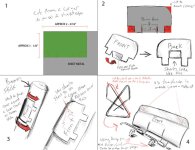
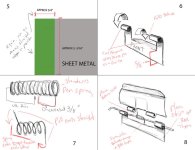
First thing you notice is that the ejection port is a lot smaller than a real AR. Take a measurement of the ejection port and the area around it. You want to have the door cover at least 1/8th of an inch around the ejection port and as close as you can get to the brass deflector without the door rubbing up against it when it tries to open.
Take your desired measurements and using a corner of the sheet of sheet metal (I recommend this because in doing so, two edges of the cover will be straight for sure. Why make more work for yourself?) cut out the general shape and dimensions of the door. Mine happens to be 2-3/16“ wide by 1 – 1/8” high and the thickness of the sheet metal is probably around 1/32 of an inch, but don’t quote me on that.
Step two: Cut the two tabs that will end up being your upper hinge points. The exact measurements are up to you, however, remember to cut away the outsides and fold the middle tab behind the cover as per diagram 2. Also round the leading corner of the cover.
Step three: After the basic shape of your cover is cut out, begin rounding it to fit the contour of the rifle chamber. You can do this by using a thick dowel rod or a broom stick. NOTE: This will more than likely have to be done multiple times to maintain the correct shape. The metal will tend to bend as you work with it, so corrections will have to be made as you go. I recommend holding the cover up to the ejection port frequently to make sure it is keeping proper shape.
Step four: Begin to curl hinge tabs upwards to form hinge loops. Use the section of butterfly paper clip outlined in the diagram as both your hinge pin and as a guide to help curl hinge tabs properly. The use of needle nose pliers will assist in curling tabs into position. You may also want to take a straight edge to the top 1/4 inch of the door to create a upper lip (see diagram 4). This will help strengthen the door by turning the curvature you put into it with the broom stick into a ridge or "spine" if you like. It also becomes more inline with the actual contour of the gun around the ejection port (as you can see by looking at your gun, the ejection port is round but then flattens out towards the top). This also gives you the basis and top ridge for the "T" indentation I put into mine.
The following is an attempt to help others make a suitable dust cover for their rifles using some basic materials and simple tools. Results may vary depending on time and effort, design Etc.
Items you will need: suitable work surface, some kind of measuring tool, tin snips, pliers (I used my Leatherman Wave), files (I used the files on my Leatherman Wave, one was a diamond file and the other was a normal course file), sheet metal around 1/32 of an inch thick, a broom handle (for shaping the curvature of the cover), 400 grit and 1000 grit automotive sandpaper, 3M double sided automotive tape, one butter fly style paper clip (a section of which will become the hinge pin), the spring from a cheap retractable pen (or better yet something similar but in stainless from your local hardware store), one magnet roughly 1/8th to ¼ inch in thickness diameter about the size of a dime, Spray paint- a sandable primer and finish with a flat black, rubbing alcohol.
Step one: First thing you need to do is research your design. Have a look at an existing dust cover and take note of all the features it has and how it is constructed. You will be trying to replicate the form and function of the real thing. The difference will be in the materials you use and the design will tend to vary slightly because of the gun’s contours and measurements are different.
First thing you notice is that the ejection port is a lot smaller than a real AR. Take a measurement of the ejection port and the area around it. You want to have the door cover at least 1/8th of an inch around the ejection port and as close as you can get to the brass deflector without the door rubbing up against it when it tries to open.
Take your desired measurements and using a corner of the sheet of sheet metal (I recommend this because in doing so, two edges of the cover will be straight for sure. Why make more work for yourself?) cut out the general shape and dimensions of the door. Mine happens to be 2-3/16“ wide by 1 – 1/8” high and the thickness of the sheet metal is probably around 1/32 of an inch, but don’t quote me on that.
Step two: Cut the two tabs that will end up being your upper hinge points. The exact measurements are up to you, however, remember to cut away the outsides and fold the middle tab behind the cover as per diagram 2. Also round the leading corner of the cover.
Step three: After the basic shape of your cover is cut out, begin rounding it to fit the contour of the rifle chamber. You can do this by using a thick dowel rod or a broom stick. NOTE: This will more than likely have to be done multiple times to maintain the correct shape. The metal will tend to bend as you work with it, so corrections will have to be made as you go. I recommend holding the cover up to the ejection port frequently to make sure it is keeping proper shape.
Step four: Begin to curl hinge tabs upwards to form hinge loops. Use the section of butterfly paper clip outlined in the diagram as both your hinge pin and as a guide to help curl hinge tabs properly. The use of needle nose pliers will assist in curling tabs into position. You may also want to take a straight edge to the top 1/4 inch of the door to create a upper lip (see diagram 4). This will help strengthen the door by turning the curvature you put into it with the broom stick into a ridge or "spine" if you like. It also becomes more inline with the actual contour of the gun around the ejection port (as you can see by looking at your gun, the ejection port is round but then flattens out towards the top). This also gives you the basis and top ridge for the "T" indentation I put into mine.
Attachments
Last edited:

")