Help needed reassembling .32DA

Geezer7

US Veteran
Joined
Jun 6, 2017
Messages
171
Reaction score
76
City & State/Province
Columbus, OH
Dear Colleagues

I'm trying to reassemble a .32 DA after getting a replacement trigger return spring.

What the secret to reassembling the lockworks? Any published guides?

Frustratedly yours
Geezer7
 
Photos

Hey Geezer,
I guess nobody wants to tackle this one.
I can help you out with assembly.
Can you post photos of your 32 DA in pieces?
I want to see what replacement spring you purchased? Is it the wire spring or a flat type that matches the original?

Murph
 
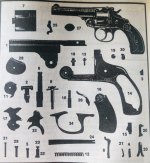
Schematic drawing

Here is a schematic. Number 33 is what an original spring looks like.

Murph
 

Attachments

  • 4FC8C442-C773-4D33-BD48-204EBFA42D32.jpg
    4FC8C442-C773-4D33-BD48-204EBFA42D32.jpg
    97.2 KB
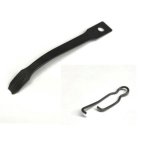
Wire spring

In the photo you see an original flat type spring sometimes a V’ shape and a common wire replacement type spring.

The newer wire springs are not unlike coil springs. Virtually indestructible but they often require specialized fitting. Even heating and bending, grinding, etc. Not for the novice.

Murph
 

Attachments

  • 7B016057-A658-4393-BA9A-03761840C6FF.jpeg
    7B016057-A658-4393-BA9A-03761840C6FF.jpeg
    37.1 KB
correct--and I have a replacement.

but parts reassembly sequence must be crucial. Any guidance?
 
It can take a dozen tries to get those V springs to stay in place. Most of the time one leg is slightly longer than the other and that seems to work out best on the trigger. On other guns, it seems that the longer leg on the top seems to stay in place better. It rides on the front ledge of the trigger. You need to set the spring in place with the revolver upside down. I usually remove the cylinder and stocks, then place the revolver in a cushioned vise to free up both hands. The delicate step is placing the trigger guard in the front slot and slowly close it down on the frame. Push forward with your hand and it should snap down into the slot. Persistence pays off, but no one gets it right the first time.

There is enough space in the frame to allow the front of the spring to rise up and snap out of place. I have fashioned a small piece of steel to fit ahead of the spring on really stubborn guns that keep it in place.
 
Last edited:
.32DA reassembly

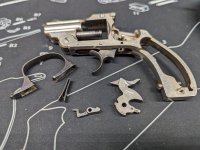
Pic of parts attached.

Thanks for the guidance--and reassurance that it is tricky. Sometimes I think I must be going senile...
 

Attachments

  • PXL_20230206_132810564.jpg
    PXL_20230206_132810564.jpg
    130.9 KB
Last edited:
Dave Chicoine's Antique Firearms Assembly/Disassembly book provides detailed instructions on the title topic for virtually any and all of our toys. The ONLY hiccup I've ever encountered is with the "pre 5 screw 4 screw" hand ejectors instructions, and a "special tool" graciously provided by Mike Priwer solved that problem---right now! Lest any be put off by the "special tool" nomenclature, it's a piece of wooden dowel "cut to suit and beat to fit" to cope with the trigger spring's attendant difficulties----right now! Let me know if instructions are desired for fabrication and use.

His Gunsmithing Guns of The Old West book may be of help with more complex tasks (fitting). As for me, I leave the more complex tasks to the professionals-----and I've only encountered one such task in recent memory----and it was solved so easily and quickly by a professional, it was almost embarrassing; but I was a happy camper nonetheless.

Ralph Tremaine
 
Baseline

Hi Geezer,
Thanks for the excellent photo. I personally really like project pieces. Gives you a strong feeling of success when you get an antique back “On line”.

Ok, baseline here is to first establish that you have an all matching gun. So, do all the numbers match? Frame, barrel, cylinder? This is very important since there were several models and parts changed.

Also, your photo does not depict a complete set of parts. You are missing several major parts. Is this all the parts you have? If so you still need several in order to assemble a working antique.

The gun has obviously been stripped to frame and partially assembled in the wrong order so let’s get the baseline established
first.

You can compare your parts to the Schematic drawing that I posted. You need all the parts in that drawing.

Murph
 
Last edited:

Latest posts

Back
Top