HomeSmith TrainWreck: Summer of 67

Joined
Jul 25, 2017
Messages
1,229
Reaction score
7,331
Location
Arizona
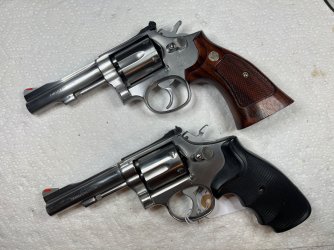
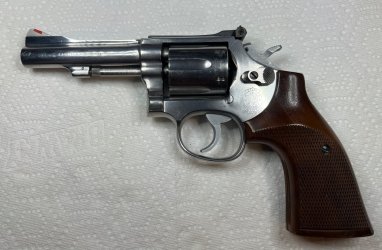
Our next project is bringing back a used-to-be-nice Model 67-1. Once upon a time this one would have been a real beauty. Today she's showing the miles with lots of scratches and dents. In this thread we'll be giving her a facelift by removing all the scratches, hiding a dent, and giving everything a nice polish to bring back the shine - without using power tools.

Sure, it would be easy to just turn on the big dual shaft buffer in the garage, but I really don't want to do that for this kind of work. The fact is that I'm not good enough with the buffer to leave square things square, leave screw holes un-dished, and leave flat things flat. Some day I may practice enough to learn how but right now it's just not a priority. I enjoy doing it the slow way.

Here's our project in as-received condition:
IMG_9015a.jpg
IMG_9016a.jpg

But Coach, you say, that's not a trainwreck! That's a nice gun!

It does look nice.....from a distance. It's a 20-20 gun. 20 yards away at 20 miles an hour it looks great. When you get up close and personal the warts start to show.

Let me splain it to you with pictures.

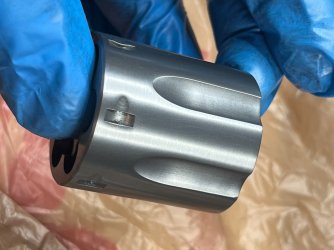
The cylinder appears to have rolled down a gravel hill several times:

IMG_9017a.jpg

IMG_9018a.jpg

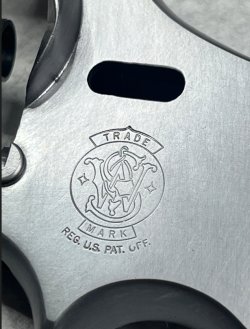
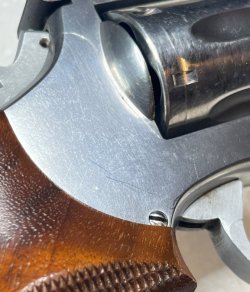
The sideplate has a bazillion tiny scratches and 3 big ones. That dashed line under the cylinder isn't on your monitor - it's a track on the sideplate.
IMG_9019a.jpg

The other side is also covered in scratches and has an interesting vertical line that is perfectly straight.
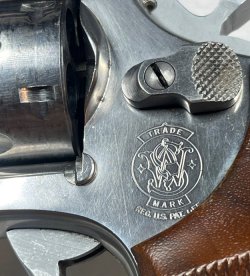
IMG_9020a.jpg

Both sides of the barrel have scratches combined with rub marks...
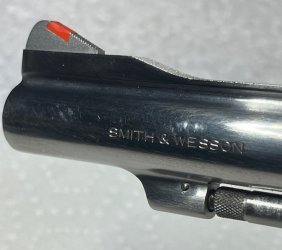
IMG_9021a.jpg

The trigger guard has a nice big scar on it. This is how I imagine the tribal tattoos the young folks are so fond of will look when they're geezers like us.....
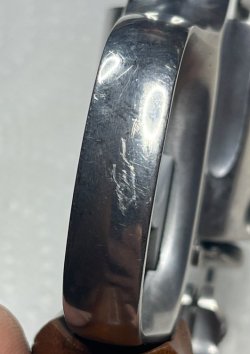
IMG_9022a.jpg

There are some leather rubs behind the hammer...

IMG_9023a.jpg

And the part the really needs fixing the most - it's been dropped. On a corner. Because that's how my life works. The shiny spot isn't a photographic aberration....that's the flat spot from being dropped. As a bonus it looks like it also skidded along the sidewalk for a bit.
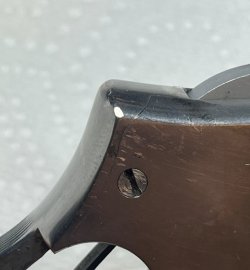
IMG_9027a.jpg


So that's what we'll be fixing, along with an action job and maybe even some new shoes. I like Herrett stocks but I think we can do better.

Next step: functional inspection. Come back tomorrow, same TrainWreck time, same TrainWreck channel.
 
Register to hide this ad
To me, it looks like a revolver with stories to tell. Love those Herrett's Shooting Star stocks, I have a set on my four inch barrel Model 19-3. They feel good when shooting, yet they are not rubber!
 
Here's my inspection checklist and what I found:

  1. Is the gun unloaded? Yes
  2. Is there any live ammo near the workbench? No
  3. Is the serial number present, legible, and matching on all appropriate parts? Yes
  4. Crown condition - good
  5. Does the front sight have an insert? Yes
  6. Color and condition of insert - Red, tight, well fitted
  7. Fixed or adjustable sights? Adjustable
  8. Any damage to sights? Rear sight hold down screw loose
  9. Inspect exterior finish - Detailed in previous post
  10. Cylinder release thumbpiece operation - Works properly, retaining nut loose, thumbpiece flopping around
  11. Does the cylinder spin freely? Yes
  12. Does the ejector rod appear bent? Slight wobble
  13. Does the ejector star have any damage? No
  14. Does the ejector work smoothly? Tight, slightly gritty
  15. Does the center pin extend to the end of the ejector rod? Yes
  16. Does the center pin move freely? Yes
  17. Chamber condition - All dirty, no damage noted
  18. Bore condition - Dirty, rifling good, no bulges or rings, buildup in forcing cone
  19. Headspace/Rear Gauge check - OK
  20. Cylinder gap without wedge - .009" on right side, .007" on left
  21. Cylinder gap with wedge - .006" on right side, .004" on left
  22. Endshake: .003"
  23. Forcing cone damage? No, just dirty and barrel stub not cut square
  24. Timing/Carry Up - correct on all 6 chambers, both DA and SA, 2 chambers slower than others but still within spec
  25. Cylinder stop engagement: good
  26. Double action trigger pull: 8 lbs
  27. Single action trigger pull: 3 1/2 lbs
  28. Hammer tension: 56 ounces
  29. Trigger tension: 56 ounces
  30. Firing pin protrusion - good
  31. Sideplate screws: serviceable, but with worn slots
  32. Yoke alignment: centered
  33. Yoke endshake: .003"

Out of all that, the only part that is really going to require "work" is to fix the unsquare barrel stub and get the endshake set properly.

An unsquare barrel stub is not at all uncommon and I've left quite a few of them "as is" but this one is a bit too far off for me. The unsquareness will also make it more difficult to verify that I have the endshake set properly.

The way I'll fix it is to use a 90 degree cutter on a pull-through rod that has a centering bushing inside the barrel and a cone on the end of the barrel. This will cut the barrel stub perpendicular to the bore. I don't want to enlarge the cylinder gap if I can help it, so I'll stop as soon as the cutter makes contact with the right side of the barrel stub. This will be followed by recutting the forcing cone.

I'll have to get this gunk out before my forcing cone gauge will even fit....

IMG_9029a.jpg

After the forcing cone and barrel stub are fixed, I'll address the slop in the yoke. The yoke barrel flange is supposed to be right up against the frame, but not enough to make it hard to open or close. The .003" of slop is measured here:

IMG_9068a.jpg

Once the barrel stub is square and the yoke is no longer flopping around, we can do the dance and find a good balance between cylinder gap, endshake, and headspace/rear gauge.

We'll get to all of that later...this is just the exterior inspection. We haven't even taken the sideplate off yet.

The trigger pull and hammer tension suggest that when we open it up we'll find an aftermarket hammer spring, while the trigger tension and reset make me think that the rebound spring is original.

Here's what the inside looked like when it was first opened up:

IMG_9076a.jpg


Not great, not terrible. There's some old grease mixed with powder residue partially blocking the hand window, but other than that it's pretty clean....and pretty dry. I'm very happy to see that there are not any drag marks on either the hammer or trigger.

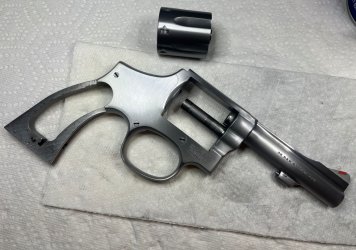
Everything from the inside was moved to the outside and placed into a sealed container labeled with the serial number, leaving us with only the pieces that need finish work.

IMG_9081a.jpg

The rest of the project plan looks like this:

  1. Do the finish work to make the gun look all spiffy and shiny first - I expect this to take several evenings and possibly part of the weekend.
  2. Reassemble the guts of the gun, performing an action job as the pieces go back in.
  3. Square up the barrel stub and recut the forcing cone.
  4. Shim the yoke, then remeasure the cylinder gap, headspace/rear gauge, and endshake. Adjust as needed.
  5. Head out to the range and start turning money into noise.
 
My sweetheart fell asleep on the couch after dinner, so I ended up spending Friday night at the workbench.

The big dent and it's associated scratches were task #1. I began by installing the sideplate with 3 sacrificial flat top screws in place of the normal screws. These are leftover screws with bunged up slots that are initially fully tightened to seat the sideplate then backed out (if necessary) to sit flush with the top of the screwhole. The theory is that by keeping the abrasives skating along the top and not allowing it into the hole, the holes won't be rounded off.

IMG_9090a.jpg

In order to remove the big dent I worked on everything except the dent itself. Using 220 grit sandpaper and a small sanding block, I just started following the contours of the frame over and over again. One very important thing is that I did the same amount of work on the non-dented side as I did on the dented side so that we wouldn't end up with a Quasimodo thing going on with that rear shelf.

The dent just kind of disappeared as the metal around it was worked....

IMG_9093a.jpg

IMG_9098a.jpg

IMG_9101a.jpg

IMG_9103a.jpg

IMG_9116a.jpg

IMG_9118a.jpg

IMG_9119a.jpg

I also took care of the tribal tatoo on the trigger guard while I had the sandpaper in my hand.

IMG_9122a.jpg

As I neared the end of the shaping that needed to be done I switched from 220 grit to 320 grip paper. I didn't do anything specific to blend in the 220 grit scratches - I just kept doing the same thing I had been doing and they blended themselves.

When the work on the frame and trigger guard was done, I moved to the cylinder to make an initial clean-up pass with the 320 grit paper. To keep the edges of the cylinder flutes distinct and sharp, I sanded in one direction only, starting in the middle of the area over the chambers and working towards the flutes. After a few strokes, I rotated the cylinder and moved on to the next chamber. This picture shows the right side (reflecting the light) sanded and the left side as-was before sanding.

IMG_9123a.jpg

When the entire cylinder was half sanded, I flipped it end for end and repeated the process with the cylinder facing the other direction.

IMG_9126a.jpg

At this point I wanted to clean off any leftover abrasive from the sandpaper before I moved on to the scotchbrite. I've always wondered what would happen if..........oh what the heck. Let's try it.

IMG_9130a.jpg

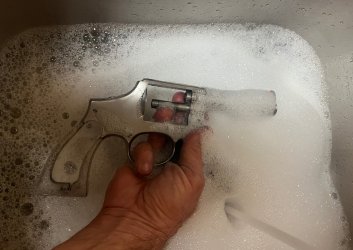
Yes, I actually did that. I stuck the whole thing into a sink full of hot soapy water and scrubbed it down with a piece of maroon scotchbrite. It accomplished the goal of degreasing the gun and removing any sandpaper grit that was hanging around, and it also removed most of the earwax-and-cat-fur mixture that was built up in the forcing cone.

Was it a viable method of metal finishing? No. The scotchbrite broke down too quickly in the soapy water and the visibility was not good....I had to go by feel. The method of using a dry pad lightly lubricated with a drop of WD40 is quite a bit messier but produces results that are vastly better.

It was fun to do though. ;)

Since I live in Phoenix, drying the gun was a simple matter of letting it sit on the back porch for 10 minutes.
 
Our adventure in kitchen sink refinishing did not produce a viable finish, but it did clean up enough of the small scratches to allow me to identify the areas that needed extra attention. Some of these I was able to fix using just sandpaper, but most of them required a small amount of draw filing with a #2 file, followed by sanding with 220 and 320 grit paper. The worst area was near the muzzle on the left side of the barrel. Here are before and after pictures of the icky things that were identified after the bath:

IMG_9143a.jpg

(the swirlies here got removed after I took the picture)

IMG_9155a.jpg

IMG_9141a.jpg

IMG_9159a.jpg

IMG_9142a.jpg

IMG_9160a.jpg


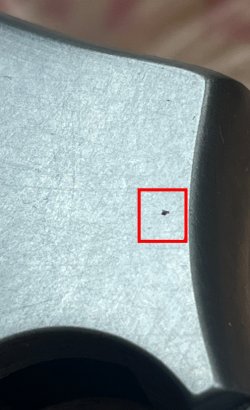
One area that I chose not to fix was this hole on the left side of the frame. It looks almost like there was a slight imperfection in the metal that melted away during the forging process and it's deep. I made the decision to leave it alone because it's covered by the stocks and removing enough metal to make it disappear would change the fit of the left stock panel.

IMG_9165a.jpg

A man's gotta know his limitations.


Using my patent-pending benchtop waterproofing apparatus (two grocery bags) to limit the mess, a small drop of WD40 was placed on the gun and I went to work with a fresh (not kitchen sink) maroon scotchbrite pad.

IMG_9154a.jpg

The first pass was a hard scrub over the entire gun, the second pass was a mild scrub, and the third pass was more of a wipe than a scrub. All were done using the same 4x6 inch piece of maroon scotchbrite. All of this work is done with the yoke in place so that the surface of the yoke is blended with everything else. The cylinder was scrubbed/wiped using the same method described above to always keep the motion going towards the edges.

The WD40 and abrasive residue were wiped off with a clean paper towel frequently, with more WD40 being applied any time I sensed that the scrub residue wasn't "floating" off the surface. Essentially, if I couldn't smear it I added more....but there was never enough for it to drip off.

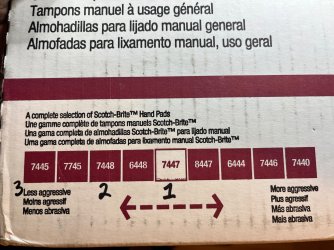
Here's how the gun looks now after 3 passes with scotchbrite #7447 maroon pads. This is where I stopped on the 64.5 that now belongs to 45Smashemflat.

IMG_9166a.jpg

IMG_9170a.jpg

IMG_9172a.jpg

IMG_9173a.jpg

IMG_9174a.jpg


Tomorrow we'll repeat the process (except the kitchen sink thing....let's just not talk about that) with the #7448 gray scotchbrite pads and #7445 white pads. Stay tuned....
 
This is truly a labor of I would love to get good enough at this that I can make some money on the side when I retire.

Fixed it for ya. :cool:

Kidding aside, your statement is true: I do love doing this. It would be cool to make a little extra scratch from it someday but I'm not counting on that as an income stream. (What do a gunsmith and a medium pizza have in common? Neither one can feed a family of four.)

My real goal is to share the knowledge and maybe spark some interest in other people. Protocall_Design and I had a conversation about this earlier in the week. This forum is filled with people who went to high school with Moses and none of us are getting any younger. The thread about heart attacks and knee replacements has 100x more views than this one.

We all have a duty to share what we know so that the knowledge doesn't die with us. These HomeSmith threads are my way of doing that.

And it's fun. :)
 
A few notes on technique:

- I wear latex gloves while I do this so that I don't end up bathing in WD40

- Every time I start a rub cycle (ummmm…phrasing? I need a better way to say that) it begins on a different area of the gun so that one area doesn't get more attention than others

- Taking pictures of the progress really helps because it makes it very obvious when the gloves or wiping rag start leaving residue behind on the surface

- Scratch pads and sandpaper wear out and get clogged up. If you're not getting the result you want, don't just press harder - switch to a different area of the pad/paper or get a new piece

- The 1/4" thick scotchbrite pads are much better than sandpaper for the area where the recoil shield merges with the frame

- To avoid leaving directional sanding marks below the rear sight, finish the sideplate work with long strokes that begin on the side of the top strap, turn the corner onto the sideplate, then turn the corner again and go all the way to the front of the trigger guard. Do this in one continuous motion. A 4x6 pad in a pad holder is needed to make this work.

- Instead of putting the WD40 on the pad, put a few drops on the gun and smear it around onto all the surfaces that will be worked. That way you know it's already there and you're not counting on the pad to spread it.


Here's how things look after a heavy scrub, a medium scrub, and a light wipe with the 7448 pads, along with a helpful graphic from the side of the box.

IMG_9183.jpeg


IMG_9184.jpeg


IMG_9187.jpeg


IMG_9189.jpeg


IMG_9190.jpeg


IMG_9188.jpeg


IMG_9176.jpeg
 
Well, the 7445 finish is done and to be honest I'm not sure that I like it. I think I prefer the way it looked after the previous step.

I'll leave it like this for a few days and see how it looks in natural light at the range. If I still don't like it after I shoot it, I can step it back to the 7448 finish very easily…or go all the way with the glitz and make it a mirror. We'll see.

IMG_9193.jpeg


IMG_9199.jpeg

IMG_9198.jpeg

IMG_9194.jpeg
 
Now that the outside looked good it was time to work on the inside. Before we could move the pieces that should be inside but were outside back to the inside, the inside needed to be cleaned. Not to the point that it looked like the outside, but enough the the inside pieces (that were outside) would be happy being inside instead of being outside looking in.

I wiped it out with a paper towel.
As the pieces that should not be outside were moved inside, the outside surface of the inside pieces were stoned and polished so that the outside of the inside pieces was as smoother than the outside but not as shiny because when the inside pieces that were outside went back inside they can't be seen from the outside.

I slicked it up real good.

Once it was reassembled, it was time to address the unsquare barrel extension. Here's the rig to square up the barrel, recut the forcing cone, and measure the depth of the cone.


IMG_9203.jpeg

And here it is assembled on the gun, ready to add a drop of cutting lubricant and start cutting. You can't see the bushing in this pic because ……

…..wait for it……

It's inside. :sneaky:

IMG_9204.jpeg

We started with .009" on one side and .007" on the other. The first cut brought that to .009" and .008"……the second cut brought it to .009" on both sides. Time to stop.


IMG_9205.jpeg

The forcing cone is cut the same way after relplacing the 90 degree cutter with the 11 degree cutter. The first cut ended up right in the middle of the "good" range.


IMG_9210.jpeg

Now that I could get consistent measurements, the endshake was a tight .003". I decided not to spend an hour chasing a thousandth of an inch and just left it alone.

With 48 ounces of hammer tension, the double action pull was right on 7 pounds and the single action pull was 2 1/4 pounds.


IMG_9214.jpeg

IMG_9215.jpeg

Baby needed new shoes, so I said the proper incantations, ate three purple crayons, laid a dozen roses at the feet of my statue of Roy Jinks…and an almost not bad set of stocks rose to the top of the pile.


IMG_9217.jpeg


IMG_9216.jpeg

Pending a range test tomorrow, I think we can call this one done.

That's a good thing because right behind it in the queue is something that looks rather familiar…..


IMG_9220.jpeg
 
Looks Great!
I use Scotchbrite often in finish polishing. With oil and sometimes just water for a lube.
I've always noticed that the 'white
extremely fine cut scotchbrite doesn't do much for the finl look. It will brighten it up some but it's not abrasive enough to remove all the scratches from the previous grit pad. With that you end up with less than a nice looking polish IMO.

I do the final polish on most SxS bbls with grey or maroon pads if they are going to get a simple rust blue.

Another way to a gloss finish w/o directional grit lines is to use a wire wheel.
A 'fine' wire wheel turning at about the speed you would use a carding wheel at,,or even a carding wheel itself that you are not going to ever use for rust blue carding will work.

The trick if there is one, is to use oil on the surface of the metal.
That WD40 is perfectly fine. I've used Rem-Oil, all sorts of other 'gun-oil, ,3in1, even motor oil.
A thin coating on the metal keeps the wires of the wire wheel from impinging (is that the right word?) into the steel surface and leaving a matted look.
Instead the wires slide across the surface and burnish the metal.
Varying the pressure and going non-directional with the wheel on the parts, there is no grit-line track and the parts end up with a lowluster gloss.
The process will not blur out markings or lettering if kept under control (meaning don't go crazy with it)
Assemble the gun, like the side plate onto the frame, when burnishing the piece.

This isn't a new thing, it was the way most custom 'smiths/rifle builders of the single shot target rifle era (Schuetzen Era) finished the metal parts before rust bluing or browning.
Mostly German and Austrian immigrants, this method was an Old World basic process for finishing.
Still works good today.

Another good thing about it is that IF you missed any previous coarse grit marks in your polishing or failed to completely remove a file mark or two,,this will make those marks show up like a spotlight was on them.
Simply go backover them to elliminate the marks. Take the areas back down to the grit the gun was before the wire/wheel&oil treatment and go over it again to blend things back in.

When you hear some people talk about how some metal parts or frames on certain firearms were 'Burnished' before casecoloring or engraving and such,,this technique is generally what was done to the surfaces.
The Brits simply called them Scratch Brushes and used them dry or with oil depending on the metal being polished and desired effect.
Using the wheel dry will allow a matted effect to the steel and with varying pressure you can impart a quite different look to say a sighting plane or sight ramp with it.

Some early M/Loader furniture especially brass fitting were hand burnished to a degree for smoothness and high polish by drawing a highly polished steel bar or rod across the surfaces.
Sometimes only high edges were done as they allow easy work with this method.

Keep up the excellent work!
 
Back
Top