HomeSmith Tuneup: Spirits of '76

The threaded mainspring strut must have been a fairly common way to adjust spring tension as I got one in a batch of parts I got.

That's interesting....if you get a chance, would you mind posting a picture of it? If yours matches that could be an indication of some kind of aftermarket part that was available way back when. I tried searching the Ruger forums without any success.

On another note, my special shipment of Shively shims showed up today. There won't be any work on those for a few days though. Tomorrow I'm taking several of the widow ladies from church out for Valentines Day dinner. They're giving each other a hard time about "robbing the cradle" because I'm only 55 years old. :D
 
Last edited:
Pig Hunter mentioned side to side play and correcting it with shims earlier in the thread. Tonight I had some time, so I decided to shim-up the 4" Security Six, install the replacement rear sight, and experiment with different spring weights.

There were 3 sloppy areas in this gun: the hammer, the trigger, and the hammer dog. What's a hammer dog? If we were talking about a Smith & Wesson is would be the "double action sear". Ruger calls that piece a "hammer dog". At the Wile E. Coyote School of Gunsmithing we called it "the floppy thing".

Initial measured clearances were:

Hammer: .018"

Trigger: .006"

Hammer Dog: .012"
 

Attachments

  • IMG_9905.jpg
    IMG_9905.jpg
    107.3 KB · Views: 16
  • IMG_9909.jpg
    IMG_9909.jpg
    113.7 KB · Views: 14
  • IMG_9907.jpg
    IMG_9907.jpg
    122.7 KB · Views: 14
The trigger was the deepest inside so I went after that one first.

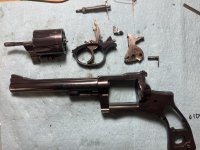
The transfer bar, cylinder pawl, pawl plunger & spring, and the trigger were all removed from the trigger guard housing. I really don't understand why youtube is full of videos telling people not to even try taking apart a Ruger revolver trigger group. The videos show removing the trigger group and then the doom and gloom starts: don't go any farther or you'll have to send it back to Ruger in a bag, normal humans can't do this, it's impossible, just spray some gloop in there and call it good. :rolleyes: The only challenging thing I've found in here is re-installing the trigger return spring, and that is simply a matter of finger strength and arranging your hands in a way that you can push in the hollow pin when the spring is in the right place. I don't know anything though. I'm just an amateur hack working in my garage.

For this operation I didn't have to remove the trigger return spring. The shims fit on either side of the hollow pin so it didn't have to come out. Easy squeezy.

While I had the trigger out I wanted to try my Power Custom sear stoning jig again with the hollow pin installed. (Scroll up for the earlier issues without the pin) The hollow pin fit correctly on the jig adapter, but now the pins were too far apart to set the trigger in place. :( No joy. I'll have to call Power Custom after all. Now I've got pictures of both setups to share with them. (For anyone who is wondering, I did check to be sure I was using the "RDA" adapter)

At least we can put our shims in....

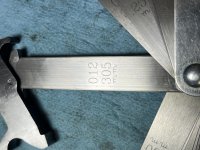
I wanted to leave .002" of clearance around the trigger, which meant that I needed a pair of .002" shims. (.002 left + .002 right + .002 clearance = .006) The shims are color coded with a nice legend on the envelope label. Per the label, I needed two black colored shims.

A tip here: once you've found the shims you want, put all of the other shims back in the envelope and seal it. The only ones out on the bench should be the ones you are going to install...the reasons for that will become clearer later on.

There is a video on the triggershims.com website that recommends stoning the shims prior to installation to remove any edge burrs that were created during the stamping process. It's a quick operation and it is very obvious when the burr is gone. What they don't tell you in the video is that stoning the shims will remove the color codes. :eek:

A dab of grease was put onto each shim to hold it in place, the trigger was reinserted back into the housing.....and there's a shim on the workbench. Grrr Do it again. Line everything up using a punch as a slave pin, reinsert into the housing, and out pops the right side shim. Time to look deeper.

It turned out that the hollow pin that retains the trigger return spring was longer than the trigger was wide, leaving the pin slightly proud of the trigger on one side. The side where the pin was flush with the trigger would allow the shim to be installed but the proud side didn't have room for the shim.

The triggershims website mentions that the left side shim is the most important one for a right handed shooter and that is the one that would go in. I did a trial assembly with just the single shim on the left side and was quite impressed with how smooth the trigger movement instantly became. There was still a tiny bit of slop but it was much better. Since the trigger group was assembled at the moment I decided to leave it as-is and press on with pride.

Some day in the future when I have this trigger group apart again I'll stone that pin down to be flush with the trigger and add the second shim.

The now unmarked leftover shim was re-marked with a black sharpie and put back with its' brethren in the little envelope. Time to move on....
 

Attachments

  • IMG_9912.jpg
    IMG_9912.jpg
    115.3 KB · Views: 15
  • IMG_9913.jpg
    IMG_9913.jpg
    92.9 KB · Views: 16
  • IMG_9914.jpg
    IMG_9914.jpg
    119.3 KB · Views: 15
  • IMG_9910.jpg
    IMG_9910.jpg
    108.5 KB · Views: 14
Last edited:
The piece that I was most concerned about (the hammer dog) turned out to be the easiest part of the entire operation.

The overall design is almost identical to a Smith & Wesson: the dog/sear is held in place by a cross pin and has a plunger and spring assembly beneath it that sits in a small recess in the hammer. Slightly compressing the spring with finger pressure allowed the pin to slide out with just a push from the right sized punch.

Back to our math again: I had .012" of slop to take up, and again wanted to leave .002" of clearance. Therefore, two .005" shims (totaling .010", split between the two sides) were needed.

Unfortunately, .005" shims were colored red and the .006" shims were orange....and I couldn't tell the difference. Out came Mr. Mitutoyo and I measured itty-bitty shims until I had a pair that were both .005".

The hammer dog got a quick fluff and buff on the engagement surfaces while it was out, and the channel in the hammer was cleaned for perhaps the first time this century. Pop the spring and plunger back into place, a dab of grease on each side to hold the shims, cheap Harbor Freight punch as a slave pin to align everything, a little push, a little jiggle, and it's all back together. Yay me.
 

Attachments

  • IMG_9915.jpg
    IMG_9915.jpg
    119.4 KB · Views: 16
  • IMG_9919.jpg
    IMG_9919.jpg
    139.7 KB · Views: 17
  • IMG_9921.jpg
    IMG_9921.jpg
    59.6 KB · Views: 15
  • IMG_9922.jpg
    IMG_9922.jpg
    80.3 KB · Views: 15
"Stop. It's hammer time."

The hammer had .018" of clearance, so my maths told me that after leaving .002" of clearance I would need .016" of shims. Great....just pull two .008" shims out of the envelope.

Nope.

I had .007" and .009", but no .008". I spent almost 3 seconds considering stacking up two .004" shims on each side and then decided to just use the 7's and leave a bit more clearance.

The larger circumference of the hammer shims required a bit more time on the stone to get rid of the edge burr. As before, when the shim goes smooth it is very obvious, both in sound and in feel. The first picture shows a shiny spot at the edge of the shim where the burr was polished away.

Reinstalling the hammer in the correct orientation with shims on both sides required 17 more hands than I had available. In the end it turned out to be easier to just let the shims move around and then align them after the hammer was in the right place. The point of an X-acto knife worked well to reach in through the hammer pin hole and move the shims around until I could use a small punch to do the final alignment.
 

Attachments

  • IMG_9923.jpg
    IMG_9923.jpg
    111.7 KB · Views: 20
  • IMG_9911.jpg
    IMG_9911.jpg
    141.9 KB · Views: 16
Last edited:
I mentioned earlier that I had a difficult time shooting this one because the rear sight notch was too narrow for the front sight blade. Ruger revolver rear sights are ridiculously easy to change: remove the screw, push out the pin, and the sight falls off.

I suppose I could have changed the blade in the existing rear sight but I had a complete replacement assembly in the parts pack. Screw screw, push push, flip, flop, push push, screw screw, done.

The "new" rear sight gives a much improved sight picture with plenty of light on each side of the front blade. The Testors 1127 paint is holding up well and is very visible. (Saying "front sight, front sight!" to the camera still doesn't work)
 

Attachments

  • IMG_9927.jpg
    IMG_9927.jpg
    75 KB · Views: 19
  • IMG_9930a.jpg
    IMG_9930a.jpg
    51.4 KB · Views: 22
Last edited:
Now it was time to play with springs.....

The current generation of Wolff reduced power springs appear to all be "cut to fit" and are much too long for the early Security Six. Posts on other forums indicated that people were using GP100 springs in the Security Six now, so I had a selection of them sent to me from Wolff. I ended up with 9, 10, 11, 12, and 14 lb springs to experiment with.

Baseline measurement with the spring I had been using (14lb Wolff Security Six spring with 3 coils cut off) revealed that the hammer tension had not changed but the double action pull weight had gone up slightly. My theory is that this is due to having much more surface engagement with the shims in place compared to the "here and there" engagement without the shims.

The 14 lb GP100 spring appeared almost identical to my cut spring so I left it in the bag and moved on to the lighter springs.

There will be a live fire reliability test tomorrow and I didn't want to be disassembling the spring strut assembly on the tailgate of my truck if I could avoid it, so I built a variety of assemblies to take with me. The original strut was assembled using the 12 lb spring, the spare strut from the part kit was smoothed up and assembled with the 11 lb spring, and I robbed a strut from one of my other Security Sixes to be assembled with the 10 lb spring.

As a side note, the gun that I stole the strut from was tuned by Nelson Ford a few years ago. The spring that I removed from that strut (and is now taped to the gun in the safe) looks and feels identical to the 10 lb GP100 spring that I installed for the test. Hmmmmm

Hammer tension and pull weights with the various springs are as follows:

Wolff Security Six 14lb spring, 3 coils removed
Hammer tension: 52 ounces
SA pull: 3.5 lbs
DA pull: 10 lbs

Wolff GP100 12 lb spring
Hammer tension: 48 ounces
SA pull: 3.25 lbs
DA pull: 9.25 lbs

Wolff GP100 11 lb spring
Hammer tension: 44 ounces
SA pull: 3 lbs
DA pull: 8.5 lbs

Wolff GP100 10 lb spring
Hammer tension: 40 ounces
SA pull: 2.75 lbs
DA pull: 8 lbs

Fascinating near-linear progression there.....

I noted earlier that the spring with 3 coils cut off had a very noticeable high-low double action pull. Heavy, heavy, light. The high-low pull was greatly reduced with the 12 lb spring and completely absent with the 11 and 10 lb springs. The 10 lb spring feels rather magical if I do say so myself.

The 9 lb spring didn't get tested because we had hit the 40 ounce hammer tension mark with the 10 lb spring. I don't want this to be a "Federal primer only" range toy...it needs to handle magnum primers reliably. The 6" gun came to me with a 40 ounce hammer tension and does just fine with small pistol magnum primers, so that's where I stopped. I may eventually try the 9 lb just to see, but I'm out of extra hammer struts. That experiment will have to wait.

I sent the parts dogs into the gun room to sniff around and they came back with a set of Herrett's Shooting Star grips and a Bianchi 5BHL to dress this old girl up a bit.

Range report to follow tomorrow evening....
 

Attachments

  • IMG_9933.jpg
    IMG_9933.jpg
    167.6 KB · Views: 19
  • IMG_9935.jpg
    IMG_9935.jpg
    178.3 KB · Views: 19
  • IMG_9943.jpg
    IMG_9943.jpg
    129.5 KB · Views: 18
Last edited:
I have to say that the workmanship and documentation is very good, as are the photos. Measuring the hammer tension tells you exactly what the results of any spring mods are, where most are simply guessing. The 40 oz. with 10 lb. spring is probably close to the best you can get on a Ruger, but it's way better than factory. When these 2 are done, you will have 2 of the finest Rugers out there. Cheers.
 
I found out today why the 11 pound spring is the one everyone talks about - it works.

All 3 of the test springs were 100% reliable with every brand of standard small pistol primer that I had available. The 10 lb spring gave me one light strike with CCI small pistol magnum primers though.

Even though it worked on the standard primers, the firing pin indentation from the 10 lb spring was visibly smaller and shallower than the other two springs. The 11 and 12 lb springs both hit the primers hard and worked with everything.

The end result is that the 11 lb spring stayed in the gun and half a dozen more are on the way from Wolff. I'll run through the same series of tests with my other Security Sixes and dial each one in individually. Someday when I'm bored (har har) I'll try shimming the 10 lb spring and find out just how far off it is.

On another note, the new rear sight blade did the trick and now the horizontal stringing is gone.

I'm going to call this one a success for now and move on to setting up the 6" gun. It's going to be difficult to focus on the Ruger when I have a Triple Lock waiting in the safe though....
 
You might try using that strut that's threaded with that 10 lb spring. Then you can measure the hammer tension when you get 100% ignition and the length of the spring. No parts to go flying, Just pop out the strut and tighten the nut.
 
Funny you should mention that.....there are 6 strut/seat pairs on the way from Numrich so that I can experiment with building my own version of the threaded strut for that very reason.

The design bouncing around in my head will have a lock nut added so that the adjustment doesn't wander.

It's also purely a coincidence that my calipers fell onto the workbench and landed on the 10 lb spring, telling me that it is .041" wire gauge with a diameter of .310".

It's also purely a coincidence that when I was walking through my local Ace Hardware one of the bins fell open and part number 540012 fell out....which just happened to be a .041" wire spring with a diameter of .3125".

:D:D:D

The coil spacing on the hardware store spring is wider than the Wolff spring. We'll have to see what happens there...

For $1.29 each I can experiment with quite a few of them for less than the cost of a 6 pack. The actual Wolff springs are only $3.89 a piece after shipping if you buy 6, so there isn't really a substantial savings. I don't know if anything will ever come out of it, but it sounded like something fun to do.
 
Last edited:
The work on the 6" Bicentennial Security Six was interrupted by several unplanned acquisitions. Last night I had a few hours available so it was time to finish that one up.

I still haven't heard back from Power Custom about my issue with the trigger adapter for the Ruger double action trigger, but in retrospect, other than the frame wrench, the trigger sear jig is probably the least used out of all the tools I have. One of the biggest lessons I've learned on this journey is that a revolver's trigger pull is the sum of the parts and not just the sear. I decided to move ahead without the sear jig and see what I ended up with.

The insides were moved to the outside and I started listening to what the pieces would tell me....

The hammer wanted to talk but it was so covered in surface rust that it mumbled. The one clean spot told me that there was a frame rub issue on the left side. The hammer dog (double action sear) was removed by pushing out the pin and the hammer was cleaned up with a sanding block and 600 grit sandpaper. Clearance between the hammer dog and the hammer was measured at .011", so two .004" shims were selected that would leave .003" of clearance after reassembly.
 

Attachments

  • IMG_0706.jpg
    IMG_0706.jpg
    143.2 KB · Views: 11
  • IMG_0706a.jpg
    IMG_0706a.jpg
    283 KB · Views: 13
  • IMG_0707.jpg
    IMG_0707.jpg
    157.9 KB · Views: 11
  • IMG_0709.jpg
    IMG_0709.jpg
    141.9 KB · Views: 10
  • IMG_0711.jpg
    IMG_0711.jpg
    156.9 KB · Views: 10
Last edited:
The hammer dog always sings in a duet with the trigger bevel, so I needed to go listen to what the trigger had to say before I did anything else to the hammer dog.

I still don't understand why the internet is so afraid of taking apart Ruger revolver trigger assemblies. Pulling the trigger with the left side facing down allows the transfer bar to fall onto the bench. While the trigger is being held back, the cylinder pawl can be removed to the right with the thumb positioned to prevent the pawl spring and plunger from going Zing! The pin that retains the trigger in the trigger guard pushes out with a punch, no hammer needed. All that's left at that point is to remove the trigger return spring from the trigger. A parallel clamp applied to the top of the spring will allow the hollow pin to simply fall out on the bench and the tension release can be controlled with the parallel clamp. It takes longer to type it than to do it.

This one still had the original Ruger 10,000 lb trigger return spring installed. To tell at a glance, the originals are flat wire and the Wolff replacements are round wire.

The trigger bevel told me that the engagement with the hammer dog wasn't quite straight (shims will help that), plus the engagement surfaces weren't quite flat to each other and there was a small burr at the end of the bevel.

A rotary tool was used to break the edges of the trigger surface, and then the sides of the trigger were cleaned up using the sanding block and 600 grit sandpaper. The trigger bevel was lightly stoned with a ceramic stone to even out the surface and remove the small burr.

A Wolff reduced power trigger return spring was installed on the trigger by using a punch as a slave pin/guide. The punch was selected to fit inside the hollow pin. Use your thumb to compress the trigger return spring until the punch will fit inside, then slide the hollow pin onto the punch and put everything onto the bench block with the hollow pin on the bottom. Using the block to push against and the punch for leverage, the spring can be lined up and the trigger pushed down onto the hollow pin. If you need a hammer here you're doing it wrong and something isn't lined up. Everything should just push together. Take your time....
 

Attachments

  • IMG_0714.jpg
    IMG_0714.jpg
    86.4 KB · Views: 11
  • IMG_0715.jpg
    IMG_0715.jpg
    127.7 KB · Views: 11
  • IMG_0716.jpg
    IMG_0716.jpg
    182.1 KB · Views: 11
  • IMG_0718.jpg
    IMG_0718.jpg
    71.3 KB · Views: 10
There was a little more to do before reassembly of the full trigger group but not much.

The trigger guard was stoned very lightly where the base of the cylinder pawl rubs against it. The corresponding surface on the cylinder pawl was smoothed out using the sanding block and 600 grit sandpaper.

A rotary tool was used to smooth out all of the sharp edges on the transfer bar so that it would slide smoothly within the frame. The same was done for the cylinder pawl with one exception: the surface that interfaces with the ejector was left sharp.

Side clearance between the trigger and the trigger guard housing was measured before disassembly at .008". The casting on the housing is rather rough and the hollow pin that retains the trigger return spring gets involved with the clearances. The shim pack for the trigger needs to allow for all that. I had good luck only shimming the left side (I'm right handed) of the trigger on the 4" gun so I went with the same technique here. A .004" shim was selected and installed on the left side between the trigger and the trigger guard on final reassembly.

The cylinder pawl plunger and spring were reinstalled with a small dab of grease on the spring, then the pawl itself was slipped into position. Reinstallation of the transfer bar left the trigger assembly ready to be lubed and put back into the frame.
 

Attachments

  • IMG_0719.jpg
    IMG_0719.jpg
    100.6 KB · Views: 9
  • IMG_0720.jpg
    IMG_0720.jpg
    78.8 KB · Views: 8
Last edited:
The cylinder assembly had been taken apart, cleaned, and straightened during the first go-round, so I didn't take it apart this time. With the frame upside down, the cylinder latch was placed into the frame and the cylinder/yoke assembly was lubed and slid into it's home.

A few drops of oil on the bearing surfaces finished up the trigger assembly and it snapped back into place easily. A few test pulls of the trigger showed correct functioning and greatly reduced tension on the trigger return spring.

The hammer dog was placed on a large stone and rubbed back and forth to smooth the side surfaces, then very lightly stoned on the surface that rubs against the trigger bevel. The pressure used during this stoning was measured in fractions of an ounce so that I could feel the action of the stone. There were two small ridges in the hammer dog that went away after just a few strokes. I stopped as soon as everything went smooth.

The hammer dog was reassembled with the hammer along with the two .004" shims, which were also lightly stoned to remove any edge burrs.

I discovered once again that I can't always tell the difference in the color codes on the shims and had to measure the shim thicknesses to select the right pair for the hammer. I had .012" of clearance (slop!) around the hammer so a pair of .005" shims were selected. Once again, a small dab of grease was used to glue the shims to the sides of the hammer and an Xacto knife was used to push the shims into their final positions.

The oddball threaded hammer spring strut was replaced with a new OEM strut that had all of the sharp edges broken with the rotary tool. The new strut was assembled with a Wolff 11 pound GP-100 spring based on the knowledge gained with the 4" gun.
 

Attachments

  • IMG_0722.jpg
    IMG_0722.jpg
    104.1 KB · Views: 7
  • IMG_0723.jpg
    IMG_0723.jpg
    149.9 KB · Views: 6
  • IMG_0725.jpg
    IMG_0725.jpg
    88.2 KB · Views: 7
What did all this get us? The double action pull came out at just under 8 1/2 pounds, and the single action pull is right on 2 1/2 pounds....without ever touching the single action sear.

The double action pull on this one came out smoother than the 4" gun. I think the difference is the attention paid to the trigger bevel and hammer dog, so I'll do a bit more work on the 4" gun the next time it's apart for cleaning.

I managed to acquire a second set of OEM Ruger soft grips to replace the horrendous Ruger wooden target grips and make a matched pair. (of course I got the second set of Ruger soft grips after I put the Herretts onto the 4" gun...c'est la vie)

All that remains for this cycle is to paint the front sight with Testors 1127 and do a range test to verify function. There are still a couple of finish blemishes to clean up and there is the issue of the numbers engraved into the bottom of the frame to be solved. We'll get back to that the next time I do a round of finish work. Time spent on this iteration was just under 90 minutes.

Happy St. Patty's day to all.
 

Attachments

  • IMG_0726.jpg
    IMG_0726.jpg
    76 KB · Views: 5
  • IMG_0728.jpg
    IMG_0728.jpg
    63.9 KB · Views: 5
  • IMG_0730.jpg
    IMG_0730.jpg
    143.7 KB · Views: 11
  • IMG_0732.jpg
    IMG_0732.jpg
    146.2 KB · Views: 11
Last edited:
Floating this one up to the top again due to a new development in my hobby of presenting frustrating questions to my kids, a chance to repair a botched action job, and an opportunity to put up a step by step tutorial in how to do the impossible: the Ruger Security Six trigger group disassembly are reassembly without having to send it back to Ruger.

The pair of blued Bicentennial Security Sixes was originally intended to be Christmas presents for my two kids. However, when I asked them who wanted what, I got the same answer twice: "I want both!" That wasn't really a surprise, so here I am a few months later with an answer to the "get both" request and a new question: Blued or Stainless? :D
 

Attachments

  • IMG_2493a.jpg
    IMG_2493a.jpg
    155.4 KB · Views: 10
  • IMG_2488a.jpg
    IMG_2488a.jpg
    159 KB · Views: 9
Last edited:
The 6" stainless gun was the first of this set to be acquired. It came from a reputable seller with good amounts of positive feedback who described it as functioning correctly. Apparently the person who inspects their firearms and writes the ads was not familiar with how to test for hammer push-off and why it was a bad thing.

It was pretty obvious that someone had already been inside the gun when the double action pull measured at 8 1/2 pounds and the single action pull was a scary 8 ounces !!! I'm not sure if an animated GIF will work here but I'll try uploading one to show the push off. (That turned out to be a no-go because the file size was too big. Trust me on this one...it was scary)

Since I'm an idiot and think fixing things is fun, I went ahead and accepted delivery of the obviously broken and unsafe firearm....and because I'm the TrainWreck guy. It's what I do.

The parts kit that supplied several pieces for the blued guns had a good hammer in it. When I got home the first thing I did was to pull the old hammer out and swap in the one from the kit with no other work....and the push off was immediately corrected. An inspection of the hammer sear revealed that it was badly mangled and only about half there.

To the seller's credit, when I sent a video of the push-off problem and a picture of the mangled hammer they immediately apologized, offered me a full refund and said that they were going to use my video to train their staff. The gun was already fixed at this point so I declined the offer and pressed on.....

With the replacement hammer installed our double action pull was still 8 1/2 pounds and the single action pull had jumped up to 3 3/4 pounds. This was with no fitting of the double action sear (hammer dog in Rugerish) and still using the unknown quality workmanship on the trigger sear.
 

Attachments

  • IMG_2236.jpg
    IMG_2236.jpg
    57.9 KB · Views: 9
  • IMG_2337.jpg
    IMG_2337.jpg
    52.8 KB · Views: 3
  • IMG_2338.jpg
    IMG_2338.jpg
    55.2 KB · Views: 3
Last edited:
Back
Top