How to eliminate clearance of orig. S&W wooden grips?

Siegfired

Member
Joined
Sep 12, 2024
Messages
11
Reaction score
7
Location
Germany, Frankfurt area
Hello to the experts!


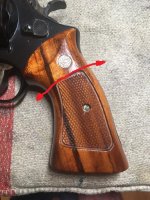
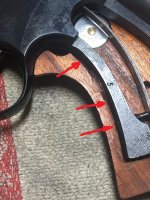
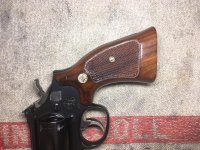
As putting rubber grips on my S&W revolvers is no option, I always have the challenge to get the original wooden grips fastened free of clearance without risking a damage to the thread, the wood or the screw.


Especially with .357 and above they always shake loose after two handful of rounds. I tried filling the gaps between the frame and carved pockets with hotmelt, thin veneer, paper, metal foil etc. but nothing worked satisfying.

Do you have some proven strategy to fix that issue?


Thank you in advance for your support.
 
Register to hide this ad
If you are talking about factory wood stocks you are simply not tightening the stock screw enough. Tighten it 1/4 to 1/2 turn more and they will stay tight.
 
I've never experienced that with a S&W. However, I bought one of the new Colt Pythons last year. After exactly one cylinder of magnum loads, the grips were loose.
 
Can you post a picture of the gap you're describing? It sounds like either the grips don't fit or you aren't tightening them enough.


Hi 413Maxwedge,


I attached 3 pictures. 2 of my 29-2 that a) describe the kind of movement I complain about, b) show the gap that to my opinion is crucial for this and c) the grip of my 586-3 which has the same thing going on and I think the grip is the correct type. Same is for a 3rd one. The only one that's not a problem is my 17-6.


Maybe I'm too pedantic, but the there's always that slight "click-clack" when you put some force to the grip after some rounds. It's only some hundreds of an inch, but it's there.


When it comes to tightening of the screw I'm really asking myself how much is to much?
 

Attachments

  • IMG_1948.jpg
    IMG_1948.jpg
    93.7 KB · Views: 93
  • IMG_1946.jpg
    IMG_1946.jpg
    92.2 KB · Views: 106
  • IMG_1949.jpg
    IMG_1949.jpg
    161.8 KB · Views: 89
Last edited:
Some older wooden stocks tend to shrink from lack of moisture in the wood. Replenishing it with a wood treatment has worked for me. Be careful to not overdo it. I have actually used Ballistol. I last used it on the target stocks of a Colt 357 from 1954. The slight wiggle went away, it did not affect the color of the wood or harm the finish.
 
Last edited:
Hi Siegfired, thanks for the pics. The area you put arrows on is normal and doesn't lead to rocking (in my experience). It's the fit where the 1/2 round (behind the S&W escution plate) fits that matters. If that is not snug it will shift back and forth. The pin at the bottom is the " hinge" and any gap at the top will allow it to rock back n forth. I'm surprised this is happening on original grips... in my limited experience I've only had this on cheap grips.

The plastic magnas that Robertsons Trading sells on ebay look great but shift drastically. In the trash they went. On nice grips like yours I would think some "filler" like a silicone or hot-glue might fill the gap while you position and tighten, then later when it sets up you could trim away any excess and they should fit properly every time.

Hopefully someone with vintage grip experience can weigh in.
***sodacan beat me to it!***
 
Last edited:
Bedding grips to a Revolver

We use epoxy, powdered wood, Ren Wax, naphtha, acetone
and being careful, to bed grips to fit the frame, eliminating
any movement.
Pic of an old version of a bedded inletting and perimeter jig, that we use for our X Frame grips.
Will be fitting a set of Walnut Bullseye grips, from a Smith,
to fit the Sec6, and will bed them.
They'll be used for SNB competition.
Snub Nose Bullseye. :D
Will take pictures along the way, to show what I was taught,
by members of the Air Force smallbore team in the '60s,
for rifle and handguns.

Wood is powdered with files or Kutzall fine carbide burrs.
No sandpaper.
Won't get to start that until tomorrow.
Tile work in shower, comes first.
 

Attachments

  • IMG_3512.jpg
    IMG_3512.jpg
    19.5 KB · Views: 56
  • IMG_4440.jpg
    IMG_4440.jpg
    153.9 KB · Views: 55
Hello 413Maxwedge & sodacan,


thank you for the useful advises. I will check both countermeasures carefully.


I have some fretboard oil for guitars, this is especially designed to prevent the wood from drying out completely. This should do the job perfect.


Thank you Maxwedge for directing me to the correct position for the hotglue-method. Luckily one can remove this conveniently from the wood and apply some to the right place.
 
Another cause of loose grips, happens when the inletting is
a bit wider than the gun's width.
Check side to side movement.
Movement can also cause fractures, mostly along
the backstrap. Too thin to begin with as well.
Silicon has give, and would not be my choice.
 
Last edited:
@Imissedagain


Wow, that seems to be the gold standard to solve the problem. I'm glad beeing not the only person thinking about how to solve this without putting rubber grips on the gun.

But I have to admit that I would only try this out when I can get my hands on some other grips to keep the original ones untouched.


Please post the pictures when you finished the improvement (of the grips, not the tile work ;-).
 
If you are talking about factory wood stocks you are simply not tightening the stock screw enough. Tighten it 1/4 to 1/2 turn more and they will stay tight.

Try this. Only occasionally do I encounter a set of S&W wood stocks that won't stay tight. Usually when I run into trouble the pin hole that indexes with the pin at the bottom of the frame has been distorted and is no longer snug on the pin. You can repair that by epoxy-ing in a tight fitting metal washer. Be sure to push the stocks up into the frame while the epoxy dries. I cut a piece of rubber inner tube to keep pressure in that direction.

It should not be necessary to fill in the gaps you are concerned with, but it shouldn't hurt anything either. The area may need to be carefully drafted so the stocks can be removed without damaging the new bedding.
 
The only thing that needs to be done is to re-bed the grip pin hole in the stock panels.
This is what M29since14 is doing.

The washer on the back of the medallionfits into the half round cutout in the frame. The stock panel is pushed snugly into that half round cut by a close fit of the grip pin into the hole in the stock panel.

If that is loose and panel drops even a few .000" down,,the entire panel can rock back and forth in that half round cut out in the framae.
That is what you are feeling.


I just take the orig blind hole in each panel and enlarge it somewhat.
I do one panel at a time though as I use the other grip panel to tighten the assembly as explained below.

The enlargement of the pin hole doesn't have to be a lot nor does it have to be perfectly round or pretty.
Just a little bigger for some Epoxy Glue to be applied to it and allow the pin to set up in it in a new position that will hold the panel tightly upward against the frame.

Leave the pin in the frame but brush it & the area of the grip strap around it generously with Release Agent.
I like to use common Kiwi paste shoe polish, but others have their favorites as well. Everything from PAM frying pan no-stick spray to paste auto wax seems to work.
Regular auto lube chassis grease doesn't seem to work well with some epoxy glues as in it still sticks together.

I usually do one panel at a time so I can get at the back of each to easily tap it free from the frame when the epoxy is set.

Put a dab of the epoxy into the enlarged hole of the one panel and place it in position on the frame.

Place the other side grip panel into place (no epoxy on this side).
But use the grip screw to tighten the grip panels and at the same time push that repaired panel up into the frame tightly as you tighten the screw.

Also make sure the other edges of the repaired panel are where they should be around the grip strap edges. The panel can move around a bit now that the grip pin hole has been enlarged and nothing is securing it inside there,,just some unset epoxy at this time.

That will position the repaired panel into the correct location, tighten the screw for the final time and give the bottom of the repaired panel a gentle tap upwards into it's seat in the frame. A rubber mallet or a rawhide mallet works good for this. No need to over do it.

Let the epoxy cure. Remove the non-repaired panel. The repaired panel will likely be 'stuck' in place. But a few taps from the inside with a flat faced dowel will un-stick it and it'll drop free.
You may have to clear a bit of epoxy that squeezes out and runs over the edges of the grip strap (remember to put release agent everywhere around the pin).

The panel should be a very tight 'snap fit' now.
Repeat doing the other grip panel.

No real need to fill in those voids in front of the front strap of under the grip butt of the frame.
 
Back
Top