How to Make Good Gun Photos With No Special Equipment

Bullseye 2620

Member
Joined
Dec 12, 2008
Messages
3,443
Reaction score
6,576
Location
Tierra del encantamiento
A lot of us admire the great gun photos that Doc44, Sabre, fyimo, 29-1, and many of the other contributors make to this board. For this quality work, a professional studio lighting set-up, even a simplified one involving a light box, is required.

Many of us don't have the inclination or the skills to emulate the that level of perfection. This post suggests a method that can come close.

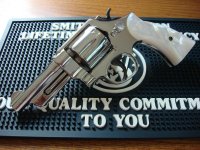
The attached two photos were taken in natural light only, on a desktop. Afternoon light (3 p.m.) from a west-facing window filtered through white mini-blinds three-quarters closed, was used as the main lighting source. This works because the walls in the room were white and reflected back a lot of light, which permitted the soft, diffuse indirect lighting of the front of the gun, although the most intense light source is behind it. Also, there is a north-facing window in front of the gun, behind the photographer, that provides a secondary source of indirect, diffuse illumination.

That's all there is to it! I just took my Sony point-and-shoot, framed and focused the shot, and then tripped the trigger. All hand held, no tripod, although that would help if you have one.

The key, learned from the wonderful light-box photos, is soft indirect lighting of sufficient intensity to illuminate the dark areas of the picture, without over-exposing the highlights and blowing out the bright areas of the picture.

That's my $0.02. Hope this helps.


Bullseye
 

Attachments

  • DSC01250 copy.jpg
    DSC01250 copy.jpg
    76.6 KB · Views: 364
  • DSC01258 copy.jpg
    DSC01258 copy.jpg
    88.5 KB · Views: 429
Register to hide this ad
Nice pics

And on a nickel gun to boot...those are always a bitch to photograph.
 
Nice pics. A trick I picked up along the way (I think from this board) was to photograph outside. Overcast day is perfect, but indirect sunlight works well too. You want enough light to disable the camera flash, but not direct light reflecting off of the gun itself.
 
My photography skills are awful so my little trick is to lay the gun on a scanner.

60-copy.jpg
 
How to Make Good Gun Photos With No Special Equipment

Step 1: Start with a good gun. :D:D;)

(I know, I know, they're all good. But some are better than others. I have a lot of "others".:D)
 
I've tried and tried but I think I have far more camera than it has operator :) Makes me want to just go out and buy a cheapo. They seem to do better anyway.
 
Good tips, and a good link to an easy and inexpensive lightbox. The photo of that chocolate jack-a-lope looked delicious!:p
 
Shadows

We have a patio table with umbrella, there is some shade from trees around but even on an overcast day the light is quite bright. The photos below were taken on a cloudless midday.
I am attaching two photos to show the strengths and weaknesses of this method. It is possible to get very good images this way. I think the holster detail is excellent. In my experience it's difficult to really eliminate the strong shadows in images of larger things. By cropping tightly you can reduce the distraction of the shadows.
The difficulty is that unless you are in an outdoor situation or room where light comes from many directions and is reflected from the walls and ceiling, you will have shadow.
These were taken with a low cost Cannon, I did use a tripod for some of them and a tripod is recommended and is not expensive.
Subject is:1960's Lawrence Holster Set.
holster1.jpg

holster2.jpg
 
Good tips. The trick, I think, is diffused light and a shutter speed fast enough to eliminate hand shake, or a tripod to eliminate that factor altogether.

I use a white countertop sheet, placed under a tree (for shade), for the backdrop. On a sunny day, in the shade is great, but even better is early morning with an overcast sky. It doesn't take a digital SLR to take good pictures, but it helps. My camera (Pentax 200D) allows me to increase or decrease exposure after the shot is taken if something is too dark or too light. I usually take shots at about 1/150th of second using shutter priority, and the camera will do the rest, adjusting the f-stop, usually to about f5.6 or thereabouts. The higher the f-number, the greater your depth of field, and hence sharpness.

Here's a shot taken of a Model 19, using these techniques. Notice the soft shadows resultant from the diffused light provided by overcast or shade outdoors.

MODEL19.jpg
 
HOW does everyone post photos? I saw the instructions about 'Photobucket.' Still unclear to me. I also saw the warning at the end of the instructions regarding picture deletion. For this and other reasons, 'Photobucket' seems unappealing. I know how to "attach" a photo to an e-mail. The only reference on this Reply box is a yellow icon at the top which, when selected, asks for the photo's URL. Huh?

Attempting to post a photo into a personal 'album' generates a message that it 'failed to upload.' The IT man explains the file may be too large. How to "re-size?" And then, how would one see the whole picture? All my camera's pix seem the same size to me.

Hints appreciated.

BILL SHANER #2148
 
And on a nickel gun to boot...those are always a bitch to photograph.


I was going to say the same thing, nickel finish guns are tough to photograph correctly. I've been trying to get a glare free shot of my nickel 36 with less than stellar results. Thanks for the pointers...
 
Wheelgunnut,

Photobucket is a snap once you get used to it. First log in to your account on Photobucket.

To upload a photo to Photobucket, click on the blue "Upload Photos and Images" bar in the upper left corner, once you are logged on. Then select the filenames of the photos you want to upload, i.e. "C:\photos\goodshot.jpg". Click "open." Then the upload will be automatic. You can then title your picture if you wish.

It's a cut and paste operation to get your photo into your post.

If you move your finger-pointer over the photo you wish to use, a list will appear below the picture. Move the pointer down to "IMG CODE" and click on it. The link to its right will turn blue. Right click on the link, and left click "copy". That link will now be in your computer's memory.

Now go to your text as you are typing in your post on this forum. When you want to insert that picture, go one space down from your text, right click where the cursor is, and select "paste". The image link will be inserted there from your computer's memory. Repeat as necessary with new pictures. I find it helpful to have Photobucket in a different window, so it's readily accessible.

Click "Preview Post" below your tentative post to see the results. If successful, your picture will be displayed where you want it. Then go ahead and submit your post.

After a while this will become routine and you don't even have to think about it. Hope this helps.

worthlessthread.gif
 
Paladin,

What's a white countertop sheet?

Very nice photo. Natural indirect light and a digital point 'n shoot or DSLR camera is clearly the best way to capture realistic but flattering images of these great revolvers.

Bullseye
 
Cocked and Locked, those are some nice photos.

My photo of a 3906 and extra slides on page 300 of the SCSW was taken using a scanner. By leaving the lid open, you get a black background.
 
Last edited:
I just took a photo of my new RIA M1911 with its case and box of ammo with no special tricks and just overhead lighting on... It'll be awhile before I get it developed, but I hope it turns out okay.
 
Re: white countertop sheet and reducing picture size

Bullseye:

A countertop sheet is a large sheet of of stiff, smooth white plastic, about 1/16" thick; it's usually employed to inexpensively cover counters or to line drawers. You can get this photo background material at Lowe's, Home Depot, or other home supply stores. It comes in huge sheets, which the store can cut to size for you. I use two sizes, one suitable for handguns, and the other for rifles. It has the advantage of being wipeable, to get rid of small drops of oil or other residue. A dampened rag will clean it easily.

Be careful to use spot metering when you photograph a gun on a pure white background, or your shot will be too dark. You want to expose for the gun, not the background.

With respect to reducing the size of your picture. I use commercially available software known as CompuPic. While it's primarily a viewing and organizing package, it allows you to crop, downsize and alter other parameters of your picture quickly and easily. I also use Photoshop, but it's a bit cumbersome to use. Compupic is available from Photodex, and you can download a trial version. Google 'em on the net.

By the way, I've found that when downsizing a pic, it's not as sharp as the original photo. CompuPic or Photoshop can re-sharpen the image. Check my pics of "Some nice N-frames" in the album section of the forum. They've been cropped, downsized and sharpened with CompuPic.

Hope this helps.

John
 
By the way, I've found that when downsizing a pic, it's not as sharp as the original photo. CompuPic or Photoshop can re-sharpen the image. Check my pics of "Some nice N-frames" in the album section of the forum. They've been cropped, downsized and sharpened with CompuPic.

You can also use MS Paint to resize, or you can download the free open source alternative to Photoshop known as GIMP (yes, it is 100% free).
 
iMac

Paladin,

Thanks for the info. Gotta get me some of that stuff, and give it a shot. Ahem.

I use an iMac and the simple photo editing software that comes with in in the Preview utility, permits adjustments of exposure, brightness, tint, saturation, white balance, size, and so forth. It works fine for these simple applications. The photos I posted at the beginning of this thread were downsized from 5 Mb to about 250 Kb and then uploaded smaller than that. They still look pretty good. The Preview software also has a sharpening algorithm built in.


Bullseye
 
There should be an art supply, craft supply, office supply, or frame shop around most everyone which sells poster board or mat board. You can find it in about any color you want. I like soft green, grey, and blue tints, also green similar to a pool table. White is great for lots of shots but the ability to use colors or matt white often improves the shot.
Sometimes propping a sheet of poster board to reflect the light on the subject helps "kill" the shadows, so you don't have to wait for that perfect bright overcast day.
 
Get your wife or lady friend to hold a square of cardboard covered in aluminum foil to focus light where you need it.

And go for early morning soft light on the north side of your home. (Unless you live in an apartment, in which case, you'll need a light box!)

T-Star
 
great tips. I have a question: I take a picture of a gun with my Samsung camera phone and it is clear and sharp. However, when i upload the picture to my computer, the clearity is still great. When I print a picture of the gun, the picture becomes fuzzy and looks somewhat blurry. What is the problem? It doesn't matter what size I print, the picture is still the same fuzzy distorted look..Need some help.
 
The problem is that the "resolution" of the pic may be fine for the computer monitor, but for printing it needs to be much higher. A 72 dpi photo can look great on a screen, but will look grainy and lack detail in a paper print. Typically you want to have 240 to 300 dpi in the size you are printing - that's a lot of detail for a camera phone to deliver (although I'm not up on camera phones.)
 
I guess Paladin was to modest to link his own thread on taking pics.:) He takes great ones. Also, on the countertop laminate, be careful with the edges as they are very sharp and can slice like a razor. I made some counter tops years ago. We would file the edges after routing them. Use a flat file and file down one way only.

http://smith-wessonforum.com/lounge/133608-tips-making-great-gun-pictures.html
 
Back
Top