New 15-22 charging handle

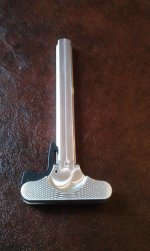
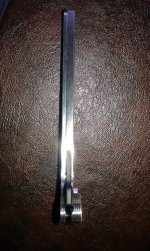
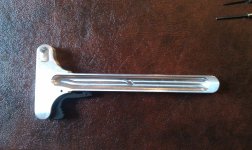
The push pin is being a bitch going in. Think the hole needs to be a tiny bigger. Shouldn't be this hard. I'm afraid to hammer it in add it might break. Have to find a way to make the hole bigger without making it too big.

It's not that hard ...

The pin is a roll pin, not a solid pin. It gives a tiny bit when it is inserted in the hole. The hole is SUPPOSED to be tight! It is NOT a press fit, you DO have to use some force. You want a 6 or 8 ounce tack hammer, not a 18 oz carpenter's hammer or a ball peen hammer. :)
 
It's not that hard ...

The pin is a roll pin, not a solid pin. It gives a tiny bit when it is inserted in the hole. The hole is SUPPOSED to be tight! It is NOT a press fit, you DO have to use some force. You want a 6 or 8 ounce tack hammer, not a 18 oz carpenter's hammer or a ball peen hammer. :)

Mine was the bare metal silver. The pin took a little force with a push pin mini screw driver I had to come out of the stock plastic one. And at when attempting to get it in the tacticool handle I first tried with my finger and that didn't work. Luckily I had a broken drill bit that was small enough to fit in the hole and still had about an 1/8 of inch of the bit left. Put it on the dremel and shaved a tiny bit off the hole. That helped in at least getting it into the hole on the handle. I put it far enough into the metal but not enough to stick out into the latch handle channel. Then the trick was lining up the latch with the spring. Using the push pin driver I was able to get it in enough to catch the latch. Then just lightly tapped it with a hammer (all I had) and used a pair of pliers to squeeze it down flush.

Again, mine was bare metal so i'm assuming this will be an even tighter fit on the anodized ones. Either that or I just got a slightly bigger pin?

Anyways, the action is smooth and looks great. Can't wait to get the other pieces anodized that I have planned. Although the silver might look nice too. But I have my mind set on red.

Here are a few pics.
 

Attachments

  • IMAG1743.jpg
    IMAG1743.jpg
    55.2 KB · Views: 139
  • IMAG1744.jpg
    IMAG1744.jpg
    123.7 KB · Views: 124
  • IMAG1747.jpg
    IMAG1747.jpg
    65.6 KB · Views: 128
  • IMAG1748.jpg
    IMAG1748.jpg
    72.9 KB · Views: 121
  • IMAG1749.jpg
    IMAG1749.jpg
    137.7 KB · Views: 130
Last edited:
And a few more
 

Attachments

  • IMAG1750.jpg
    IMAG1750.jpg
    28.4 KB · Views: 173
  • IMAG1751.jpg
    IMAG1751.jpg
    24 KB · Views: 156
  • IMAG1752.jpg
    IMAG1752.jpg
    67.6 KB · Views: 155
  • IMAG1753.jpg
    IMAG1753.jpg
    64.1 KB · Views: 160
  • IMAG1754.jpg
    IMAG1754.jpg
    54.5 KB · Views: 159
The push pin is being a ***** going in. Think the hole needs to be a tiny bigger. Shouldn't be this hard. I'm afraid to hammer it in add it might break. Have to find a way to make the hole bigger without making it too big.

Like Majorlk said, the pin is a roll pin and will give. The hole was reamed to a certain diameter with the few microns of anodizing being taken into account.
You need 3 hands or a second person to get everything lined up just right. If you very carefully start the pin before you do anything else, it makes it just a tiny bit easier.
I suggest getting another person.
Use a small hammer and whatever kind of metal punch you may have.
 
Just to verify - you have already shipped out the first batch of brown? (question was when the NEXT scheduled shipping date was).

Thanks.

No. No brown has shipped.
We are still working on getting the color just right and they will not ship until that time. I am guessing the week of the 15th, maybe later.
Like I have said earlier, the brown is a royal pain and I will keep you guys up to date as much as I can.
 
The black ones are done and getting laser engraved right now.
No sample pics yet because different computer monitors show colors different. The color I pic at the end will be the final color available.
 
Like Majorlk said, the pin is a roll pin and will give. The hole was reamed to a certain diameter with the few microns of anodizing being taken into account.

Jody, I wonder if people think manufacturers don't take such things into account or think manufacturers deliberately make parts that don't fit correctly? :)

I've put latches from two different manufacturers (PT and NDZ) on handles from three different manufacturers (PT, NDZ and S&W) and all installations (four, in total) took exactly the same amount of effort to insert the pins. All needed the tack hammer and a 0.25" punch to seat the pin flush with the handle.

Methinks there are a lot of folks working on firearms with no prior mechanical skills or experience. :)
 
The black ones are done and getting laser engraved right now.
No sample pics yet because different computer monitors show colors different. The color I pic at the end will be the final color available.

I like the look of the laser engraving on the colored handles. Did the clear/silver get engraved as well??? Mine has shipped buthasnt made it to me yet, getting anxious.
 
Jody, I wonder if people think manufacturers don't take such things into account or think manufacturers deliberately make parts that don't fit correctly? :)

I've put latches from two different manufacturers (PT and NDZ) on handles from three different manufacturers (PT, NDZ and S&W) and all installations (four, in total) took exactly the same amount of effort to insert the pins. All needed the tack hammer and a 0.25" punch to seat the pin flush with the handle.

Methinks there are a lot of folks working on firearms with no prior mechanical skills or experience. :)
In the short time that I've been on this site I've seen that you are knowledgeable in firearms. That being said, I've done various work and mods on my car, sportbikes/regular bikes, a/v equipment, various home remodel projects and computers as well as cell phones. I may not have all the tools needed to have made it much easier but I did get the job done. I also know that I tried putting the pin back on the stock charging handle and it went back in without as much pressure and work. The stock handle is also plastic and i think it's flexibility might have made it easier. That was just MY experience so take it as you will.
 
I like the look of the laser engraving on the colored handles. Did the clear/silver get engraved as well??? Mine has shipped buthasnt made it to me yet, getting anxious.

My silver one didn't but I asked him for a bare one since I will be getting mine anodized with other parts and wanted then to be done at the same time to match.
 
I like the look of the laser engraving on the colored handles. Did the clear/silver get engraved as well??? Mine has shipped buthasnt made it to me yet, getting anxious.

Yes, the silver/clear ones are engraved also.
Here are some pics.
 

Attachments

  • 101_1239.jpg
    101_1239.jpg
    120.3 KB · Views: 118
  • 101_1240.jpg
    101_1240.jpg
    122.6 KB · Views: 133
  • 101_1241.jpg
    101_1241.jpg
    116.5 KB · Views: 119
  • 101_1242.jpg
    101_1242.jpg
    104.6 KB · Views: 167
Just ordered one and got my order confirmation right after. One thing about not being able to buy mags or ammo, at least I'm finally getting time to order and assemble all the parts I've been meaning to get for a while.
 
Got my notification that my black one shipped this evening. Now to decide how bad I need that red one.... Dangit!!
If you are considering red, then you must like the bling factor, so I'd suggest you order a blue one also ... :)

(I was on the fence on getting a red or blue one, and opted to just get the black one for now. But ammo funds are piling up, and I may get to a critical point where I have to order more accessories.)

I just checked email -- mine is on its way. I may not be checking this forum for a awhile -- will be hanging out by the mailboxes anxiously awaiting the delivery ...
 
Last edited:
Awesome! Will definitely be ordering one of these soon. Really glad I finally decided to join this forum. Finding all kinds of good stuff on here already.
 
Mine just arrived in the mail, opened up the package and just smiled at how purty it looked. The punch I used on the original latch went through the hole no problem, but was very tight on the new handle. I worked the punch in the hole making it a smidgen larger and the pin went in with a couple taps. Overall, took about 5 minutes to do everything. Very happy, just need an aluminum latch to match the handle (hint hint SWS :)
 
Got mine today too, although I had no problems with the roll pin. I held it in place with a pair of hemostats, tapped it in to get it started, the latch hole lined up easy, tapped the pin in, took maybe 3 minutes to do the whole job. I don't understand why some of you feel the need to ream the hole bigger. :confused:
 

Attachments

  • PHOTO_20130413_150700.jpg
    PHOTO_20130413_150700.jpg
    72.1 KB · Views: 127
  • PHOTO_20130413_150400.jpg
    PHOTO_20130413_150400.jpg
    68.2 KB · Views: 133
  • PHOTO_20130413_151204.jpg
    PHOTO_20130413_151204.jpg
    70.9 KB · Views: 130
whoa whoa whoa.
ok if you can produce a raptor style ambi handle i have to have it. please provide details! i can wait patiently for that. this current design youre offering looks very high quality, but i prefer to charge with my right hand while bench shooting and an ambi handle is what ive been waiting for! i have seen the plinker in person and have been hoping a better version would be produced :D

Hell yes!! Count me in!!
 
tacticool,by the color brown do you mean the FDE?i am waiting for the FDE version and was wondering if there is a date set yet for shipping?i love the laser engraving you had done on the charging handle,it really sets it off and looks great.
 
I received my Tacticool22 charging handle today. Jody, very nice fit and finish!

As mentioned in the instructions, a helper may be required. The spring makes holding the handle and lever in alignment a bit tricky while trying to insert the tiny roll pin.

My solution was to clamp a tiny pointed awl in a vise pointy end up, and lower the charging handle with spring and lever in place over the awl, to hold everything in alignment. The awl engaged the hole in the lever, and kept it centered in the hole in the charging handle. I then held the roll pin in position with needle nose pliers, and lightly tapped the roll pin into the hole to just get it started. I removed the assemble from the awl in the vise and placed it on a my workbench to seat the pin with a pin punch (1/16").

Since we had a heavy snow storm come thru today, looks like a field test will have to wait a few days. But everything works smoothly, and the aluminum handle is such a great improvement over the stock handle, both in looks and fit and feel.
 
Last edited:
Back
Top