New tool Saturday

Joined
Jul 25, 2017
Messages
1,198
Reaction score
7,188
Location
Arizona
I want to get better at refinishing, so it was time to drop some coin and improve the tools. I lucked upon a sale a week ago and got this little gem for under $400 delivered.

Yes, there is one available for use at "the shop" but that's a 28 mile drive each direction. This one is going into my garage.
 

Attachments

  • IMG_1994a.jpg
    IMG_1994a.jpg
    110.1 KB · Views: 178
Register to hide this ad
Like everything else, there were complications. The mounting head on the toolstand that I had available was 6"x8" and the buffer has a 7"x10" base.

Some digging through the scrap pile turned up a chunk of 1/2" plate that looked suitable after a bit of trimming. Using a plasma cutter is a whole lotta fun.....when it's not 110 degrees outside. Instead of dragging out the plasma cutter, Shooting Buddy and I lit a couple of cigars, poured a couple of beverages, and sat in the shade under a tree while the bandsaw did its' thing.
 

Attachments

  • IMG_1999a.jpg
    IMG_1999a.jpg
    105.8 KB · Views: 98
  • IMG_1996a.jpg
    IMG_1996a.jpg
    74.3 KB · Views: 95
  • IMG_2001a.jpg
    IMG_2001a.jpg
    102.3 KB · Views: 92
Shooting Buddy did a quick clean up on the rough edges left over from a previous experience with the plasma cutter and did a quick smooth on the overall surface. Then it was over to the drill press to shoot a few holes and some quality time with a tap to thread the new mounting plate to fit on the toolstand.
 

Attachments

  • IMG_2004a.jpg
    IMG_2004a.jpg
    96.5 KB · Views: 63
  • IMG_2007a.jpg
    IMG_2007a.jpg
    81.4 KB · Views: 56
  • IMG_2016a.jpg
    IMG_2016a.jpg
    287.3 KB · Views: 59
That's all we had time for yesterday. Today is She Who Must Be Obeyed's birthday so no shop work today. I've got several projects lined up for this guy after the final setup.

The project for the long holiday weekend is to rebuild to the top end of the mill, so probably no progress on any projects for a few weeks. Stay tuned.....
 

Attachments

  • IMG_2011a.jpg
    IMG_2011a.jpg
    110.4 KB · Views: 81
Those are tempting. We already have all the parts to fix up the original….and we’re cheap. :)

Most of the shop is set up to make shiny stabby things. I’m introducing shiny shooty things into the mix. Here’s the latest thing to come out of the shop:
 

Attachments

  • IMG_2837.jpg
    IMG_2837.jpg
    33.6 KB · Views: 60
Last edited:
I want to get better at refinishing, so it was time to drop some coin and improve the tools. I lucked upon a sale a week ago and got this little gem for under $400 delivered.

Yes, there is one available for use at "the shop" but that's a 28 mile drive each direction. This one is going into my garage.

Well......you will not get any argument from me - lol!! I am a big tool nut and will buy, tweak and accessorize my shop and tools to my liking. Seems I am always looking to improve to make life and time in my home workshop more productive and enjoyable.

I do miss the larger workshop I had in my other home up North, but I don't miss "up North" so I am very happy to have made the sacrifice. :)
 
Got a tip for you. Make sure you have the cars/trucks covered before you do any polishing. I'll also note you can get scotchbrite wheels in various grades but you need to remember you only flat side with these wheels. Start polishing thin edges with an edge on approach and you'll destroy a 300 dollar plus wheel in about 5 minutes.
 
Remember, the wider and larger the diameter of HARD polishing head, the easier it is to give a polish without rounding edges or leaving ripples and dished out holes.
Soft, small diameter buffs are used by gun butchers.

The bigger and harder the better.

How Colt used to do it, and how they did it in the 50's......
Pre-war wooden wheels covered in walrus hide.
HdDZZFt.jpg

Post-war metal wheels covered with abrasive bands.
aUai5bU.jpg
 
Those Buffer heads have ruined more guns in refinishing attempts than they've ever ended up producing a good polishing job IMO.

It's the polisher and the (soft) polishing wheels of course. But those soft wheels around today are not the style and type needed for what is done in firearms polishing.
There are hard wheels available, but they are generally a solid felt wheel and you can get them in the different grades of felt softness.
Even the hardest is not as hard as the leather covered wooden wheels that were used for the best grade polishing done on the classic firearms we so admire.
Still better than those loose stitched cloth muslin wheels so often used now. Those and the quick glue grit in a tube that is applied to the spinning wheel to charge it.
An unballanced wheel is almost assured with the stuff and a rippled and uneven polish is the least of your problems.

The shear number of old style hard wood leather covered contoured wheels for even one type of frame and their smaller parts (plus figure one each for each specific grit used),,and you can see the number involved for one firearm.
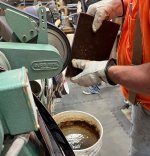
Then there is the talent of hand holding the part and being able run it against the wheel with the correct pressure and then off the wheel so as not to round off edges or dish out flats.

That's why the soft wheel became the aftermarket choice of the gunfinishers. Easy to use, soft glue base contact grit for easy application to the wheel while spinning.
The orig wheels were coated with glue and then rolled in the loose dry grit and left to dry.
Then trimmed while running and balanced for a perfect bounce and chatter free polishing surface. That job was a specialty in itself in the Polishing Room.

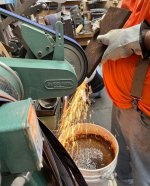
In this day and age, a Belt Grinder with room and access to the belt as a slack belt, a hard platten backed belt and also a hard rubber backed belt (the idler roller usualy works well) is a much more useful choice IMO.
But it still requires a lot of practice and patience to learn how to get a fine polish on one.
You can destroy a part or surface with either very quickly if you don't know what you are doing.
 
Got a tip for you. Make sure you have the cars/trucks covered before you do any polishing. I'll also note you can get scotchbrite wheels in various grades but you need to remember you only flat side with these wheels. Start polishing thin edges with an edge on approach and you'll destroy a 300 dollar plus wheel in about 5 minutes.

Totally agree! I NEVER use a polishing wheel in my garage/workshop anymore - learned my lesson! Terrible for a car's finish! That stuff gets EVERYWHERE and takes me 20 times longer to clean that the polishing itself. I have my polisher clamped to a B&D Workmate (when in use) and take it outside on the lawn - won't even do it on the driveway!

I am actually looking to build or buy a stand for the unit that has locking wheels. I'll just roll it outside to use. While they do work well, they are super messy.
 

Latest posts

Back
Top