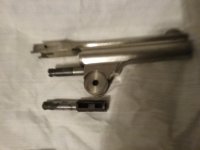
Removing barrel post

Olduy

Member
Joined
Dec 2, 2016
Messages
6
Reaction score
1
I picked up a 38 top break revolver and am in the process of restoring it bur have to replace the barrel post. I have a replacement that I have to remove from another barrel any one know how this is done?
 
I'm not sure what a barrel post is. Can you post a picture or diagram?
 
Are you talking about the post that the cylinder is on? If so let me know because I just removed one a couple of weeks ago.
 
Post on top break

Here is a picture of the old one and the other I need to remove with out damaging
 

Attachments

  • 20170602_192538.jpg
    20170602_192538.jpg
    40.1 KB
And before anyone says just use the barrel it's in the old one is a six inch blued
 
Since I am new to the world of antique S&W's, can your share what is wrong with the old one and perhaps provide a photo of the old and new side by side showing the issue?

Have you looked in David Chicione's book?
 
It appears you are talking about the base pin. (part the cylinder assy rotates on). If so this appears to have threads at the front and screws into the frame below the barrel. You can look at the replacement pin you have to determine the direction of rotation.

Soak it in a good penetrating oil before trying to remove.
 
Welcome to the Forum. That part is called a quill. You did not mention what was wrong with the old part? That barrel assembly looks to be in very good condition, what is wrong with the donor gun?? Also, how did you get the old one out??

Long term soaking in penetrating oil will probably help with removal, but some may never come out. I use a number drill that fits snugly into the hole, so as not to deform the quill, then wrap it with leather and use a vice grip to remove. If that one will not come out, all 38 DA models and 38 Safeties should use the same part. The quill from the 38 SA models should fit as well. Check on ebay for parts as well as gunpartscorp.com

Good luck with your project.
 
The old is in the picture. The old gun gun has a 6 inch barrel and the whole gun was blued. The six inch barrels are next to impossible to find and a three inch looks wrong. History on the gun I can only surmise is someone found it used a wire brush plyers and a hammer to work on it that part was bent beyond repair. I had to take the extractor apart to get the cylinder off. What a waste two hours in the sonic cleaner and everything freed up
 
Welcome to the forums from the Wiregrass! In his repair book, Chicoine (and Numrich) refers to that part as the "base pin." He also does not provide instructions for removing/replacing it. Gary's technique sounds doable if you can get vice grips on the pin and be able to turn it. I would cut the latch off the barrel so to chuck the base pin in a padded bench vice then unscrew it with the barrel. It is probably right hand thread since all the other screws are. You could also put the barrel in a vice and chuck the pin in a drill arbor then use the drill to unscrew the pin.
 
What I did to remove a couple of them was soak them with Kroil penetrating oil for 2 days. I took a very hot blow dryer and heated the pin and frame until it was hard to hold onto. Don't use a torch because if you get the pin too hot you could twist the pin. It is open part of the way down. Put the frame in a padded vise and wrap the end of the pin with leather or a suitable material. I use a pair of vicegrips that have had the teeth ground down but if you are careful wrap tape around the teeth. Start by turning the pin slowly left then right back and forth and then unscrew it to the left. They are right hand threads. Both of the ones I removed came right out.
When you put the new one in be sure to clean out the threads real good and tighten the pin all the way down. Check the window to be sure it is all the way open and you can't see any threads showing. Good luck!!
 
Last edited:
I would also suggest some form of anti seize grease applied to the threads before installation. This will prevent rust and corrosion from freezing the post in place should it ever need to be removed again.
 
I would not use anti-seize, since you cannot always tighten the quill fully. There is a slot, as noted above, where you must align in the barrel/cylinder assembly so the extractor cam will function properly and I would rather use thread-locker to make sure the quill will not rotate over time.
 
Gary is right. This was originally a friction fit and was made to be as tight as possible and have the window lined up properly. By taking it out it will be hard to keep it tight when put back in. A little blue lock tite will help. When you are almost all the way in make sure to look in the window and don't over tighten. You don't want to see threads.
 
Sorry it took so long to reply. Every time I try to sign in it jumps to some advertising. Thanks for all the good advice,
. The reason I have to replace it was because the idiot who found it ( ihave no ideal how hands it passed through before I got it.) Used a hammer on it and bent it badly. I even have to replace the cylinder. Did get the new one in. Thanks again when I'm ready to go back together with it. Now I have to learn how to load black powder cartridges because l just got a lemon squeezer too.
 
No need to load black powder unless you want to clean with soap and water after every outing?? Today's 32 & 38 S&W calibers are loaded light and function in any good condition S&W without problems. I will add that original black powder cartridges were much hotter and almost certainly developed more pressure than today's smokeless loadings for these calibers.
 
is there a comparison chart any where all my loading books say not to use smokeless in a black powder cartridge.
 
Use Trail Boss and you can load them like BP but still low on the pressure. It is made to substitute.

Around 1907 or '09 S&W published a statement in its catalog, IIRC, that said commercial smokeless ammo was ok and they would continue to warranty their guns that were shot with smokeless. In 1972, SAAMI lowered the pressure on all standard ammo but kept the previous standard pressure at the top of the pressure range (+P). So, if you load to current specs you'll have a wide margin over the standard pressure those guns were designed for.
 

Attachments

  • SW1909CatPage.jpg
    SW1909CatPage.jpg
    120.5 KB
I would not use anti-seize, since you cannot always tighten the quill fully. There is a slot, as noted above, where you must align in the barrel/cylinder assembly so the extractor cam will function properly and I would rather use thread-locker to make sure the quill will not rotate over time.

Gary is 100% on the mark. Thread locking compound is a better choice than anti-seize compound. Sometimes, after so many years if the post gets loose you can only hope it is the post that is worn and not the inside the barrel in the threaded area.

If the barrel threads are worn or TOO worn than there are few other options you have to keep it original if it is a collectible or valuable revolver.
 
is there a comparison chart any where all my loading books say not to use smokeless in a black powder cartridge.

Find and use as a bible in reloading,Complete Guide to Handloading by Phillip Sharpe. Printed from the late 1930s to about 1957 as the last revision.

For my first 20 years of collecting I had chosen not to risk firing my old New Model 3s as pristine as the majority of them were.

Enter Tom Blair (RIP), a S&WCA member who became a mentor. A true gentleman shooter. Fortunate for me, he had been a snow bird having a winter residence in nearby Boca Raton, FL as he lived in Wisconsin.

Tom coached me to have fun with my Model 3s. I have one of his regular shooters that is just as sweet as can be. A New Model 3 Target in .44 Russian, with an 8" barrel. For all the years he had owned it (since shortly after WWII to appx 1995 when it came into the fold, it was just gorgeous.

He furthered my reloading skills to include the older black powder to smokeless conversion round, gifting me a set of .45 S&W Schofield and .44 Russian dies along with his "spare" copy of "Complete Guide to Handloading" by Phillip Sharpe. Tom's advice ... follow Phil Sharpe and you can never go wrong.

Many years later, visiting Tom in Wisconsin about 2005 I spent the day with him. His house on one side of this County Road and his extra parcel of property with large barn with all his loading equipment and shooters there directly across the street. The property bordered on a small mountain. He had his own perfect shooting range of his own.

There were horse stables in there that had not seen horses in ages. In each large stall was his stash of different caliber and vintage / type brass all organized. One caliber per stall, all organized by manufacturer and vintage / year of manufacture.

Amazing !! I discovered Tom passed a few months after his death. I could not make it to travel there a few months later when his daughter called me to ask if I wanted any of his loading equipment, brass etc. I just could not get there in the required time so called a few members within a few hundred mile radius of his barn in Wisconsin to contact his daughter.
 
Back
Top