Kiwi cop
Member
Two weeks ago I bought a new 1911 EGW trigger "set". Hammer, sear, disconnector and trigger. Locally I obtained an EZE-LAP fine hone and I ordered an Ed Brown 1911 sear jig and Arkansas stone from Brownells online.
The idea was to see if I could improve on my 1911 triggers, all of which are currently in the 4-6 Ib trigger pull range, without resorting to expensive gunsmithing.
While waiting for the jig and stone to arrive, I used the hone to smooth out the flats on the hammer, disconnector and sear flat sides. I also polished up the trigger bow both inside and out and the angled flats of the disconnector.
On Monday the stone and jig arrived in the post, but I did not have a spare 1911 sear pin, so I ordered one locally and used the stone, hone and jig spacer gauge to work on the hammer hooks. Today the sear pin arrived, so after work I sat down and spent a few minutes on the primary and secondary sear angles, first with the stone followed up with the hone. I made sure not to take too much of the material off, particularly the secondary angle, as I did not want too light a trigger.
After an early dinner I headed out to my shed where I stripped down my Kimber Stainless II 9mm. The original trigger had been set to the gun with the set screw, so rather than change it for the new non-adjustable trigger I spent a bit more time with the hone polishing the trigger bow.
Putting the pistol back together I found that while the trigger weight is a bit heavier than some competition guns I have tried this year, it was certainly a lot lighter than it had been beforehand. I estimate the trigger pull between 3 and 3 1/2 Ib, and very crisp.
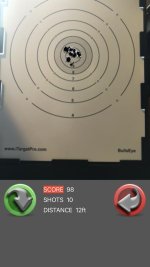
To try it out I then set up my iTarget laser set which had also recently arrived. After a few practice runs I ended up shooting the attached 10 shot string at an "across room" distance of 4 long paces, about 4 meters/12 feet.
These were shot using the "bullseye" (free) setting on the iTarget app. I have purchased the seperate "quick draw" option to the app but I was more interested in evaluating the trigger pull and getting used both the the trigger weight and the iTarget system. The "Quick Draw" option will be explored over the weekend.
98/100 was not too shabby I thought.
Over the next few days I'll polish up the parts I removed from the Kimber, which has fired only about 600-750 rounds from new, and which are destined to go into my Springfield .45. The Springfield parts, except the trigger, were replaced at the beginning of the year, and while they have fired 1500-2000 rounds they will still be good enough to go into my spare Norinco Ranger, which has the worst trigger of the three.
Best off all if I screw up something I will still have the current parts, so no damage done.
The idea was to see if I could improve on my 1911 triggers, all of which are currently in the 4-6 Ib trigger pull range, without resorting to expensive gunsmithing.
While waiting for the jig and stone to arrive, I used the hone to smooth out the flats on the hammer, disconnector and sear flat sides. I also polished up the trigger bow both inside and out and the angled flats of the disconnector.
On Monday the stone and jig arrived in the post, but I did not have a spare 1911 sear pin, so I ordered one locally and used the stone, hone and jig spacer gauge to work on the hammer hooks. Today the sear pin arrived, so after work I sat down and spent a few minutes on the primary and secondary sear angles, first with the stone followed up with the hone. I made sure not to take too much of the material off, particularly the secondary angle, as I did not want too light a trigger.
After an early dinner I headed out to my shed where I stripped down my Kimber Stainless II 9mm. The original trigger had been set to the gun with the set screw, so rather than change it for the new non-adjustable trigger I spent a bit more time with the hone polishing the trigger bow.
Putting the pistol back together I found that while the trigger weight is a bit heavier than some competition guns I have tried this year, it was certainly a lot lighter than it had been beforehand. I estimate the trigger pull between 3 and 3 1/2 Ib, and very crisp.
To try it out I then set up my iTarget laser set which had also recently arrived. After a few practice runs I ended up shooting the attached 10 shot string at an "across room" distance of 4 long paces, about 4 meters/12 feet.
These were shot using the "bullseye" (free) setting on the iTarget app. I have purchased the seperate "quick draw" option to the app but I was more interested in evaluating the trigger pull and getting used both the the trigger weight and the iTarget system. The "Quick Draw" option will be explored over the weekend.
98/100 was not too shabby I thought.
Over the next few days I'll polish up the parts I removed from the Kimber, which has fired only about 600-750 rounds from new, and which are destined to go into my Springfield .45. The Springfield parts, except the trigger, were replaced at the beginning of the year, and while they have fired 1500-2000 rounds they will still be good enough to go into my spare Norinco Ranger, which has the worst trigger of the three.
Best off all if I screw up something I will still have the current parts, so no damage done.
")