Polished internals, now sear gets stuck

You need a new Sear spring, something that should be available at Brownells.

I'll also note that to remove the Sear from the hammer requires using very thin tools such as two Exacto Knife blades to compress the spring into it's guide hole in the hammer. Walk it down 1 coil at a time until it's all the way down, hold it down and the sear will slide right out.

I just checked Brownell's and Midwest Gun Works. The Sear Spring is common to all recent (1950 & later) revolvers, ie. the J, K, L, N, and X frames. Apparently Brownell's isn't as interested in stocking repair parts as they once were, because while it's in the schematic Brownell's no longer carries this part. Midwest Gun Works lists it and it's currently out of stock. Good news is that it is IN STOCK at Numrich Gun Parts and cost is only $ 2.80. See the following link and scroll down to item 50.

Smith & Wesson 10-1 Revolver Parts, Schematics | Numrich Gun Parts
 
Last edited:
You need a new Sear spring, something that should be available at Brownells.

I'll also note that to remove the Sear from the hammer requires using very thin tools such as two Exacto Knife blades to compress the spring into it's guide hole in the hammer. Walk it down 1 coil at a time until it's all the way down, hold it down and the sear will slide right out.

I just checked Brownell's and Midwest Gun Works. The Sear Spring is common to all recent (1950 & later) revolvers, ie. the J, K, L, N, and X frames. Apparently Brownell's isn't as interested in stocking repair parts as they once were, because while it's in the schematic Brownell's no longer carries this part. Midwest Gun Works lists it and it's currently out of stock. Good news is that it is IN STOCK at Numrich Gun Parts and cost is only $ 2.80. See the following link and scroll down to item 50.

Smith & Wesson 10-1 Revolver Parts, Schematics | Numrich Gun Parts
Hi scooter!

Do you mean that a new sear spring will fix the issue with the previous rebound spring?
 
Sir, my point about Bubba Gunsmithing was to imply you need to know the relationship between the two springs before attempting to do a "trigger job"! Having bought the gun used, I would guess the previous owner did not understand this relationship! I'm sorry, if you assume I meant you were the Bubba Gunsmith!
Your picture answers many questions for us! The main spring that has the arch in the center is from Wolf! The flat main spring is probably S&W stock.
NO rebound slide spring should be THAT SHORT! Wolf rebound slide springs are all the same length, but each has a different spring rate. Remove that short-rebound slide spring and trash it!
To reduce the DA trigger pull, you reduce the spring rate of the rebound slide spring to a certain point and then going farther will have negative results. In SA mode this spring is compressed and removed from the trigger pull weight. The Wolf main spring has a lighter spring rate than the stock spring. Making the main spring to light will cause Failure-to-fire rounds because the hammer does not have enough force to fire the primer.
In general, making the trigger pull too light will cause push off of the hammer when cocked for SA mode. That is, when pushing on the hammer when cocked the hammer can be pushed to fire without touching the trigger!
Polishing is a good thing! I use a hard Arkansas stone for all flat surfaces. That is both side of the hammer and trigger, the bottom of the rebound slide, and lightly on the sides of the rebound slide. Using a Dremel tool with polishing compound can cause minute dips in these flat surfaces.
I don't believe you have damage any of the internal parts of your gun!
jcelect

Again, thank you! 😊
 
From jcelect, post 11: "You are learning, as long as you understand on what happened to cause your problem."
I was thinking the same thing. Cleaning is one thing I can do, and minor things like changing stocks or maybe anything that doesn't need more than a screwdriver. I've checked/cleaned the internals on new-to-me preowned revolvers, but thats my limit. Heck it takes me 5-10 minutes sometimes just to get the side plate back on a S&W! I give you credit for trying. Next time will be better, etc.

Well, I feel you: my side plate attacked me twice and cut my fingers! 😉
 
Im glad OP got the gun working.
So Youtube Bubbasmiths. Please know.
NEVER EVER EVER put a dremel to your action parts. Action jobs are done one swipe on a stone at a time. Even then, if you dont know what your are doing, even one errant swipe on a stone can go from action job to unworkable firearm.
If you ever see a gunsmith/armorer take out a dremel, Grab your gun and run.
 
Last edited:
The OP said the gun worked fine for 50 rounds before the polishing. That means it had the short rebound spring in it then. If you watch the video of the action being cycled, you can see that the times it hangs up, the DA sear is coming down out of it's notch at the very top of the sear, thereby not allowing the trigger to get under the sear to reset. A stronger sear spring will hold the sear all the way up in it's pocket in the hammer. Then the shorter rebound spring will work again.

In order to easily replace the sideplate, the hammer block has to stay all the way up until the sideplate is seated. If you raise the grip up off the bench a couple of inches (50mm), leaving the barrel on the bench, gravity will hold the hammer block in place until the sideplate is seated, or mostly seated. Then you can lay the gun back down on the bench and put in the sideplate screws. Make sure the sideplate is seated in the frame before tightening the screws. If you use the screws to pull it down, you can strip out the threads.
 
Last edited:
Have you taken it back apart and reassembled it just to make sure everything is as it should be? And please, dont forget to remember to loosen the strainscrew BEFORE removing the sideplate.
 
The OP said the gun worked fine for 50 rounds before the polishing. That means it had the short rebound spring in it then. If you watch the video of the action being cycled, you can see that the times it hangs up, the DA sear is coming down out of it's notch at the very top of the sear, thereby not allowing the trigger to get under the sear to reset. A stronger sear spring will hold the sear all the way up in it's pocket in the hammer. Then the shorter rebound spring will work again.

In order to easily replace the sideplate, the hammer block has to stay all the way up until the sideplate is seated. If you raise the grip up off the bench a couple of inches (50mm), leaving the barrel on the bench, gravity will hold the hammer block in place until the sideplate is seated, or mostly seated. Then you can lay the gun back down on the bench and put in the sideplate screws. Make sure the sideplate is seated in the frame before tightening the screws. If you use the screws to pull it down, you can strip out the threads.

Thanks a lot Protocall for confirmation.
I will try. Get back asap.
 
Have you taken it back apart and reassembled it just to make sure everything is as it should be? And please, dont forget to remember to loosen the strainscrew BEFORE removing the sideplate.

This I did! And the spring is slacked yes. 😊
 
Reference the sear spring installation......to prevent damage to the spring, the sear spring can be installed on a bobby pin approximately 2 coils from the bottom, as illustrated. The free end of the spring is then placed into the spring cavity at the rear of the sear. With the spring configured this way, it can be compressed slightly using the bobby pin. When compressed to the point where it will fit inside the hammer cavity, the sear and spring can then be inserted into the hammer. (spring, bobby pin still attached and the sear are all inserted into the hammer together)

After complete insertion of the sear into the cavity, the bottom of the spring under the bobby pin will enter the cavity in the hammer....then carefully remove the bobby pin from the spring. This procedure will prevent damage to the spring caused by potential bending during the insertion into the hammer cavity.


Last edited:
Armorer and Protocall l, I think we have a winner.
I reinstalled the previous (lighter) rebound spring and stretched the sear spring a liiiitle bit.
Now it runs like before.
The trigger return is slightly sluggish but still completed. I also now can locate the beautiful sound of the sear repositioning itself. I will let my gunsmith check the spring!
Thank you so much. I’m so happy ��.
Now the tough decision is, shall I use my Model 14 or 686 for military speed shooting in 1 week…

The trigger of my 60ish M14 has a trigger feel that brings smile to one’s face !

Greetings from Sweden! Thank you!

6 januari 2023 - YouTube
 
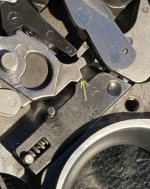
For a more positive trigger return with a light rebound spring, you can radius the top square corner of the rebound slide where it contacts the bottom of the hammer to lift it off the frame.
 
For a more positive trigger return with a light rebound spring, you can radius the top square corner of the rebound slide where it contacts the bottom of the hammer to lift it off the frame.

Do you mean this one marked by yellow arrow?
 

Attachments

  • C0E3B7DA-B6C6-4FB4-9444-193563D46173.jpg
    C0E3B7DA-B6C6-4FB4-9444-193563D46173.jpg
    91.4 KB · Views: 48
Yes. Make a generous polished radius there. Might be time for a Dremel with a rubber abrasive wheel.;) You can radius the mating corner on the hammer some, too. I like to put a drop of oil on each part that slides or pivots on something else.
 
Last edited:
I don't want to pile on here, but I don't think much is gained by polishing MIM parts. One of the benefits of MIM over machined parts is that MIM parts have smooth surfaces, whereas machined parts will often have machining marks. It is machining marks that are polished when tuning the firearm's action.

Just to add this - the internal parts of pretty much any mechanical devise will "polish and wear themselves in" just by operating the mechanism. Once worn in by shooting the revolver, the parts will operate quite well and because they were worn-in in relationship to one another, they will probably be better than trying to do it by removing them and polishing them separately. The ONLY thing that could might need addressing is when you feel a burr in the mechanism. Other than that, a cleaning, light lubrication and any burr removal (only if required) is all that is normally needed. If it ain't broke - don't fix it.
 
Just to add this - the internal parts of pretty much any mechanical devise will "polish and wear themselves in" just by operating the mechanism. Once worn in by shooting the revolver, the parts will operate quite well and because they were worn-in in relationship to one another, they will probably be better than trying to do it by removing them and polishing them separately. The ONLY thing that could might need addressing is when you feel a burr in the mechanism. Other than that, a cleaning, light lubrication and any burr removal (only if required) is all that is normally needed. If it ain't broke - don't fix it.

Hi there,
I generally agree, but in my case this revolver will see use in shooting competition. Hence I need the best conditions from start.
😊
 
Hello!

Got a used 3 year old SW. The seller said there was a different rebound spring.
Shot 50 rounds and worked perfectly.

Then I got the foolish idea to polish the internals. Watched several YouTube videos for different approaches and understandings.

Now I have a trigger that doesn’t always return every 10-15 pull. And this:
5 januari 2023 - YouTube

I have merely lightly polished the internals. No stoning. Left the SA/DA angles untouched.
Specially for the sear: What I did do was to polish the sear on the surface where the trigger drags as it returns.

When I polished the sides of the hammer and sear I removed the sear from it. The sear spring was very slightly bent but straightened out. Before installing it was straight.
Now the sear seems to get stuck and not “fall” into position.
I cleaned all parts and scarcely used weapon ptfe lube (applied and wiped off).

The result is a turning cylinder but no hammer movement.
With the slide plate on and main spring tightened it behaves the same.

The main spring screw is not tightened in the video.

Man do I regret I did this…
Please help…

Disregard- question had been asked and answered
 
Last edited:
Back
Top