HomeSmith Tuneup: Triple Crown

Joined
Jul 25, 2017
Messages
1,228
Reaction score
7,327
Location
Arizona
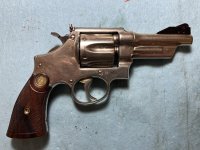
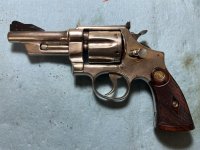
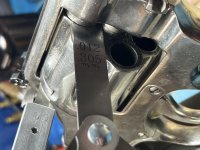
Today we're doing a deep clean and tuneup on a First Model Hand Ejector "Triple Lock" that was shipped in 1911. It was introduced HERE.

Project name: Triple Crown

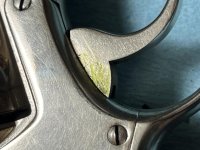
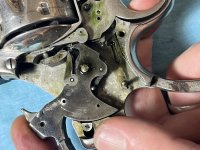
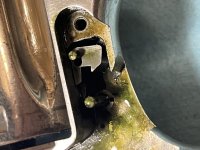
Upon delivery, the action was very smooth but felt sticky and green goo was observed on the trigger.

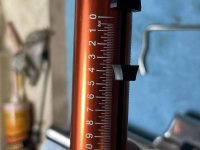
Initial measurement of the trigger pull was 3 1/2 lbs single action and just under 11 lbs double action.
 

Attachments

  • IMG_0263.jpg
    IMG_0263.jpg
    138.2 KB · Views: 52
  • IMG_0264.jpg
    IMG_0264.jpg
    141.4 KB · Views: 48
  • IMG_0010.jpg
    IMG_0010.jpg
    107.5 KB · Views: 36
  • IMG_0275.jpg
    IMG_0275.jpg
    60.5 KB · Views: 33
  • IMG_0276.jpg
    IMG_0276.jpg
    62.7 KB · Views: 30
Register to hide this ad
The cylinder stop timing was within spec but occurred at the very end of the hammer stroke.

Checking the rear gauge and endshake were an adventure: I got to use feeler gauges that I've never had to use before. Maximum cylinder gap with the cylinder pressed towards the hammer was .015". The gap with a wedge between the cylinder and the recoil shield came in at .006" for a whopping .009" of endshake.

I suppose when I'm 113 years old I would be happy to still have any endshake at all. :D:rolleyes:

Using a combination of standard feeler gauges at the cylinder gap and my handy-dandy double ended .060"/.068" gauge at the rear, I determined that a cylinder gap of .012" would leave .003" of endplay and put the rear gauge at a position where the .060" end would enter the gap but the .068" end would not.

Edit to add: Is the feeler gauge to measure the rear gauge a "rear gauge gauge"?
 

Attachments

  • IMG_0271.jpg
    IMG_0271.jpg
    106.8 KB · Views: 18
  • IMG_0272.jpg
    IMG_0272.jpg
    103.8 KB · Views: 17
  • IMG_0273.jpg
    IMG_0273.jpg
    109.4 KB · Views: 15
Last edited:
The sideplate came off easily and was about as nasty as you would expect it to be. The strain screw was backed out prior to removing the sideplate.

The green goo that was observed seeping down the trigger was everywhere inside, but other than that it was really pretty clean in there.

The patent date on the rebound slide is fascinating.

It's a bit different in here than it is inside "modern" Smiths, but you can definitely see the design similarities and how things evolved over the years. One big difference I noticed is that on this design the trigger has to be removed before the hammer will come out. I've been taking the hammer out first on everything else.
 

Attachments

  • IMG_0277.jpg
    IMG_0277.jpg
    166.4 KB · Views: 35
  • IMG_0279.jpg
    IMG_0279.jpg
    141.2 KB · Views: 44
  • IMG_0280.jpg
    IMG_0280.jpg
    132.5 KB · Views: 38
  • IMG_0281.jpg
    IMG_0281.jpg
    145.6 KB · Views: 36
The rebound slide has a fascinating extra doodad on the backside that appears to ride in the dogbone shaped recess in the frame.

This rebound slide is much smoother on top than any others that I've seen. Is this one just worn down from over a century of use? Or were the Triple Lock rebound slides always this swoopy? It certainly makes the trigger reset nice and smooth....
 

Attachments

  • IMG_0282.jpg
    IMG_0282.jpg
    94.3 KB · Views: 39
  • IMG_0300.jpg
    IMG_0300.jpg
    64 KB · Views: 35
  • IMG_0298.jpg
    IMG_0298.jpg
    54.8 KB · Views: 36
  • IMG_0302.jpg
    IMG_0302.jpg
    60.5 KB · Views: 34
The cylinder stop spring and plunger were so gunkified that the spring had to be removed with a dental pick.

Eventually all the insides were on the outside except for the bolt. This one had an extra screw in it that I wasn't sure about so I left it in place.
 

Attachments

  • IMG_0285.jpg
    IMG_0285.jpg
    98.8 KB · Views: 28
  • IMG_0286.jpg
    IMG_0286.jpg
    70 KB · Views: 25
  • IMG_0291.jpg
    IMG_0291.jpg
    153.6 KB · Views: 26
  • IMG_0288.jpg
    IMG_0288.jpg
    149.5 KB · Views: 29
  • IMG_0289.jpg
    IMG_0289.jpg
    123.2 KB · Views: 24
The inside of the frame got an aerosol clean with RemOil (no brake cleaner on this one) and then a good scrubbing with Hoppe's. Whatever the green gunk is left some stains on the interior of the frame that wouldn't come off.

Next up was disassembling the cylinder and giving it a deep clean. There's a good chance that I'm the first person to be behind that ejector star in over 50 years.

Another unusual thing about this guy is that the ejector rod is larger in diameter than current models. I had to use the Ruger portion of the handy dandy ejector rod unscrewer/rescrewer tool to get the rod out. Three empty cases were used to support the ejector star during the unscrewing and rescrewing.

Once everything was clean the pieces were reassembled with the addition of .006" of Power Custom cylinder shims to bring out endshake down to .003".
 

Attachments

  • IMG_0314.jpg
    IMG_0314.jpg
    74.3 KB · Views: 19
  • IMG_0315.jpg
    IMG_0315.jpg
    69.8 KB · Views: 21
  • IMG_0317.jpg
    IMG_0317.jpg
    77.1 KB · Views: 21
  • IMG_0321.jpg
    IMG_0321.jpg
    100.5 KB · Views: 23
  • IMG_0324.jpg
    IMG_0324.jpg
    97.7 KB · Views: 22
A new mainspring and a new rebound spring were installed on reassembly just on general principles. After more than a century they deserved a break. The originals went into a labeled envelope which now resides in the back of the safe.

The Wolff mainspring required fitting the oversized hammer hooks just like it did on Whack Job. Now that I knew what to expect it took just a few minutes with a file and stone. A Wolff 13 lb rebound spring was used.

Everything got a light coat of oil and went back together smoothly. The end result was a cylinder gap of .012", endshake of .003", a single action pull of 2 3/4 lbs, and a double action pull of 8 3/8 lbs.

I don't expect for Triple Crown to get a tremendous amount of range time, but after shooting it I would not feel undergunned in any way if I had to use it for something serious.
 

Attachments

  • IMG_0308.jpg
    IMG_0308.jpg
    115.3 KB · Views: 20
  • IMG_0311.jpg
    IMG_0311.jpg
    178.9 KB · Views: 22
  • IMG_0332.jpg
    IMG_0332.jpg
    64.1 KB · Views: 19
  • IMG_0333.jpg
    IMG_0333.jpg
    65 KB · Views: 19
  • IMG_343a.jpg
    IMG_343a.jpg
    69.3 KB · Views: 27
A new mainspring and a new rebound spring were installed on reassembly just on general principles. After more than a century they deserved a break. The originals went into a labeled envelope which now resides in the back of the safe.

The Wolff mainspring required fitting the oversized hammer hooks just like it did on Whack Job. Now that I knew what to expect it took just a few minutes with a file and stone. A Wolff 13 lb rebound spring was used.

Everything got a light coat of oil and went back together smoothly. The end result was a cylinder gap of .012", endshake of .003", a single action pull of 2 3/4 lbs, and a double action pull of 8 3/8 lbs.

I don't expect for Triple Crown to get a tremendous amount of range time, but after shooting it I would not feel undergunned in any way if I had to use it for something serious.

I'd tote that one and grin when I shot it.
 
I'd tote that one and grin when I shot it.

"An elegant weapon for a more civilized age"

I had a big stupid grin on my face the whole time I was shooting it. I even flagged down the range manager and gave him a chance to shoot it. He's a young vet who was trained as a door-kicker and has only ever shot bottom-feeders. Shooting this one was his first experience with a revolver of any kind. His grin was bigger than mine...especially when he hit the steel swinger with it. I had 6 revolvers with me that day and he burned through all of my remaining .44 Special ammo and put a good dent into my supply of .38 Special before he had to get back to work.

A couple of things that I skipped over before because I didn't want to be late for the fish fry:

Fixing the endshake changed the timing so that now the cylinder stop engages well before the end of the hammer arc. It was ok before but now it's good.

The sideplate talked to me a bit but I chose not to act on most of what it was telling me. Based on the diagram helpfully provided by Armorer951 (taped above my workbench!), there are indications of contact at the rear of the bolt, the sear pin, and the rebound slide. The only action taken was to tap lightly on the sear pin to move it very slightly away from the sideplate. (I believe the technical term for the amount of movement is "a red one") I chose not to do anything about the other contact areas because they appear to have self-clearanced over the last century-plus of use.
 

Attachments

  • IMG_0309a.jpg
    IMG_0309a.jpg
    94.9 KB · Views: 20
  • IMG_0310a.jpg
    IMG_0310a.jpg
    159.9 KB · Views: 24
Last edited:
When you get more experience and get brave enough you can set the barrel back a thread and tighten up the b/c gap. Anyone that had King's work on that classic revolver shot the snot out of it. What a great piece of history.
 
Back
Top