My reloading sanctuary will hopefully be finished this weekend!

smokindog

Member
Joined
Mar 21, 2013
Messages
1,833
Reaction score
1,357
Location
The Great State of Texas
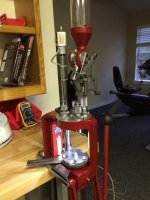
My main ask in this post is about mounting the press, a Hornady LNL AP. However, I thought I'd gloat a bit at my work and planning while I ask :)

====================================

I'll FINALLY finish off the permanent home for my reloading activities this weekend. I took a 700 sq ft space over the bus garage and split it "down the middle" making a 500 sq ft studio for my wife and her crafting habit and a 200 sq ft room for reloading :)

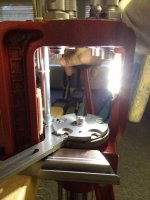
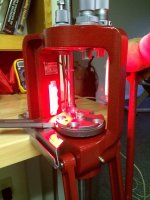
To date, I've been "temporarily" clamping the press to a similar table in the garage.

As I go to make the setup permanent, I'm considering fabricating a "riser mount" like the one inline fabrication makes (don't want to spend $75 on something I can easily make). Make the mount may also call for me making an ergo handle.

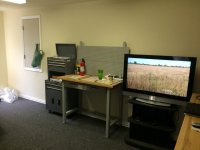
I'll be securing the press to this table which is 38" high.
Ultra Heavy-Duty Workbench - Sam's Club

with one of these roller cabinets that is made to tuck under one side of the table. I'll fill it with dies, tools, parts, ...

Ultra Heavy-Duty 6-Drawer Storage Cabinet - Sam's Club

I'll be using a stool like the one pictured in the attachments.

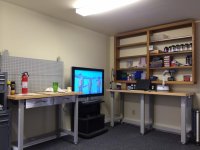
I'll also have this workbench for cleaning and repair operations.

Seville Classics Lighted Hardwood Top Workbench - Sam's Club

http://www.samsclub.com/sams/sevill...dwood-top-workbench/prod3460484.ip?navAction=

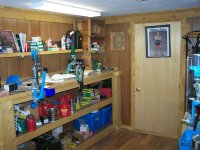
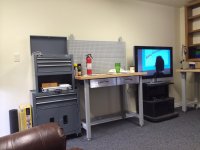
As shown, the table, roller chest and press will go under the shelves in the attached picture with the press to the right. The workbench will go left of the intercom on the wall. I'll be building a pine cabinet with 1.5" thick stock for primers/powders. YES I'll have a "firewall" between the two sections.

During temp use, I've not really felt the table height mount is necessarily too low but I'm looking to get feedback from those that have elevated their presses on the "comfort of use" BEFORE I drill holes in my nice new furniture :)
 

Attachments

  • stool.jpg
    stool.jpg
    71 KB · Views: 607
  • reloading room.jpg
    reloading room.jpg
    59.7 KB · Views: 638
  • sectional reload.jpg
    sectional reload.jpg
    57 KB · Views: 608
  • Craft Studio 1.jpg
    Craft Studio 1.jpg
    50.5 KB · Views: 609
  • Craft Studio 2.jpg
    Craft Studio 2.jpg
    79.2 KB · Views: 728
Last edited:
Register to hide this ad
I fail to see the need for any elaborate press mounts. All my bench equipment is mounted to pieces of 1" oak stair tread which in turn get clamped to edge of reloading bench. Easily moved to any desireable location , next to nothing cost, and completely removeable to store out of the way when bench space is needed. Have had all my bench gear this way for 50 years.
 
Make sure you post photos when you're done. This looks to be one big project! I bought the Strong Mount for my Dillon and am very happy with it. But I prefer to stand when I reload. Maybe you can rig up some blocks or something to mimic the final height and give it a test run first?
 
Last edited:
Several years ago I started a reloading room in my garage. It got side-tracked and turned into a storage space. My Better Half works PT for a big box hardware store and designs kitchen cabinets etc. For Father's Day and my BD she advised she would finish my reloading room. (I think she just wanted my stuff out of the back porch.) At any rate, she finished it about a month ago. I have loaded a couple thousand rounds in there so far and it works great. A good reloading room is the ultimate man cave.
 

Attachments

  • Nov 6, 13 115.jpg
    Nov 6, 13 115.jpg
    119.4 KB · Views: 493
  • Nov 6, 13 116.jpg
    Nov 6, 13 116.jpg
    108.3 KB · Views: 489
You have about the same sq footage as I commandeered in the basement when we built our condo. I went with a "U" shape of inexpensive base cabinets with 2X4 framework supports topped by 3/4" plywood which was topped by 1/4" tempered Masonite and that given a couple coats of clear poly. I divided it into 3 loading stations using two sides and leaving the third side for cleaning and gun repair. It's been 8 years now and I'm still happy with it.

Clean & Repair side.


Load development with single stage turret loader. Primarily for rifle loading.


Dillon 550 loader and MEC 9000 for shotgun.


The back wall that encloses my solid concrete walk in vault. The far back wall is shelving for gun cases etc.
 
Need to mount the press, wait for the TV mount to arrive from Monoprice, and wait for the replacement parts to complete the workbench. Now my wife thinks I won't finish the other half :) Oh ya, also need to pick up the tuck under roller cabinet!!!
 

Attachments

  • photo 1.jpg
    photo 1.jpg
    88.9 KB · Views: 348
  • photo 2.jpg
    photo 2.jpg
    82.4 KB · Views: 333
  • photo 3.jpg
    photo 3.jpg
    82.3 KB · Views: 343
  • photo.jpg
    photo.jpg
    74.5 KB · Views: 320
  • relax.jpg
    relax.jpg
    50.4 KB · Views: 308
Last edited:
I am ACTUALLY a Bit Disappointed smokindog

where is the Fridge... Mini Bar....Keg-O-Rator

and Just 1 TV... Really:rolleyes:

:D

Looks Nice... Great Job
 
Is the mattress for those reloading all-nighters?
 
Thanks to all of you for the pics and ideas.

Getting ready for my winter project and the input helps.

Dave
 
So I've had some interruptions and am still not all set up. This morning's problems I pass on to Hornady. I was leaving to do a host of errands and knew I needed some bolts to secure the press to the table, replacing the temporary clamps. I decided to do the markedly un-manly thing and read the installation instructions rather than go out and measure. The instructions say 5/16" bolts of appropriate length. I purchased said bolts of two different lengths to be sure. After a couple hours of other tasks, I FINALLY get to the last step of mounting the press. Well 5/16 is NOT EVEN CLOSE. Need a 1/2 or possibly even 9/16. I'm not going back out to the store as the anger and frustration led to a beer :) Delayed again!!!!!
 
Last edited:
My LnL AP instructions said 5/16" bolts too. And they were too small too. Went back and got 1/2". They are a good snug fit.
As an aside, I bought the short ergo handle for my press. Lots of good qualities about it but I could never get the handle at exactly 90° so it was kind of awkward seating primers. I went back to the regular handle and just recently added a billiard 8-ball. After about 500/600 rounds I really like it. Very smooth and just a little larger.

 
UPDATE - After exhausting all information I could find on the net about this, I called Hornady again. The gentleman I got this time said I am correct that part 42 on the Case Feeder is the only thing that may share the mounting bolts and the he confirmed there were already 1/2" holes in that bracket. He said they've suggested the instructions be updated a few times!!!! Given I've received multiple responses, I'd still like to know if anyone on this forum can validate the information :)


PS - it does seem like this is a long asked question; Tips for using the Hornady Lock N Load AP (LnL) Progressive Press
===========================================================================================

I called Hornady this morning and they had two reasons for using the 5/16" bolt. First was concern over "some" to properly drilled 1/2" holes aligned properly to the holes in the press. Second had to do with one of the two feeders (sorry it's been a couple hours). He implied that one of them shared the left hand bolt and was drilled to 5/16" with no room to ream it larger. Being "anal" about such things, I downloaded and read both the bullet and case feeder install instructions and did NOT see anything that looked to prevent using the 1/2" bolts. Part 42 on the Case Feeder (bracket to replace original part #13) is the only part that seems to share the bolt holes and it looks to be easily adaptable if it doesn't already have a 1/2" hole. (BTW, the original "complete round" container bracket #13 is already 1/2").

Would someone with a Case Feeder installed comment on the size of the "new bracket" holes or if needed, could they be bored out to 1/2"?
 
Last edited:
Getting closer everyday. Got the press body mounted, working on some "gizmos" before finishing now!

Yeah, I went through the bolt thing with my press as well. And I did size them up one bigger. And I did need to persuade the bolts through the 1-1/2" thick bench with a hammer because I eyeballed it with a drill and got just a scoach off plumb. Not really a problem though. Just a minor adjustment.;)

I like your set up but kept thinking "something's missing". Then it dawned on me - the walls are too bare. you need a watercolor of some ducks, or nekkid women or John Wayne or something, right?

Keep the photos coming. Great job!:cool:
 
Primer alarm and lights

Press is mounted and set up for 9mm. I spent less than $15 to add lighting beneath the dies and a low primer alert. I used a micro switch mounted in a 1/2" PVC coupler on a 1.25 inch piece of schedule 40 that perfectly fits around the primer tube holder atop the primer tube shield. I bought 2 sets of dust/water sealed LEDs, one red, one white. I drilled through a 9mm 115gr bullet and slid it on the primer follower stick and drilled into a 230 gr 45 for a topper. The 9mm is friction held and can be slid up and down the follower for when you want to be warned. It is pointed down and strikes the roller on the micro switch to change from the white light to the red light. The red light is on the wide surface of the press body and mounted low in your direct line of sight. The white LED is on the narrow stem of the press body mounted high to give plenty of light to see inside things. I can provide an exact bill of materials if anyone likes.
 

Attachments

  • micro switch mount.jpg
    micro switch mount.jpg
    58 KB · Views: 193
  • primers in tube.jpg
    primers in tube.jpg
    57.4 KB · Views: 191
  • primers low or out.jpg
    primers low or out.jpg
    63.5 KB · Views: 186
  • primer follower.jpg
    primer follower.jpg
    46.2 KB · Views: 178
  • micro switch assembly.jpg
    micro switch assembly.jpg
    35.5 KB · Views: 166
Last edited:
Four more pics. BTW, these are 12V LEDs but I used a 7.5V wall wart because they were BRIGHT :)
 

Attachments

  • white lights on.jpg
    white lights on.jpg
    40 KB · Views: 123
  • red lights off.jpg
    red lights off.jpg
    57.6 KB · Views: 124
  • Running the wires.jpg
    Running the wires.jpg
    72.6 KB · Views: 136
  • Parts.jpg
    Parts.jpg
    91.6 KB · Views: 138
Last edited:
I used to sit in a chair when reloading
I raised my press and switched to a bar stool
Easy to raise the press, $5 for a scrap piece of I beam and drill a few holes
HornadyPress5.jpg
HornadyPress4.jpg


I have my reloading room well lit, no need to put lights in the press
 
Last edited:
I like it! My primer alarm is the factory unit from Dillon and it is battery powered. And it has the most annoying buzzer I have ever heard. And I worry that if the battery runs down, I don't hear it go off, and before you know it I'm making dummies. Very well thought out accessory that anyone can make. Kudos!

This one's been simmering in your brainpan for awhile, eh? ;)

Press is mount and set up for 9mm. I spent less than $15 to add lighting beneath the dies and a low primer alert. I used a micro switch mounted in a 1/2" PVC coupler on a 1.25 inch piece of schedule 40 that perfectly fits around the primer tube holder atop the primer tube shield. I bought 2 sets of dust/water sealed LEDs, one red, one white. I drilled through a 9mm 115gr bullet and slid it on the primer follower stick and placed drilled into a 230 gr 45 for a topper. The 9mm is friction held and can be slid up and down the follower for when you want to be warned. It is pointed down and strikes the roller on the micro switch to change from the white light to the red light. The red light is on the wide surface of the press body and mounted low in your direct line of sight. The white LED is on the narrow stem of the press body mounted high to give plenty of light to see inside things. I can provide an exact bill of materials if anyone likes.
 

Latest posts

Back
Top