.500 S&W Magnum Custom 6" Barrel

PSD

Member
Joined
Apr 17, 2010
Messages
45
Reaction score
94
Location
Springfield MA
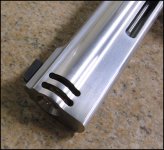
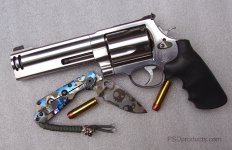
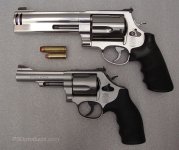
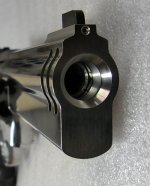
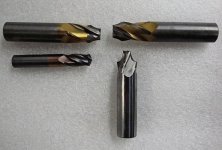
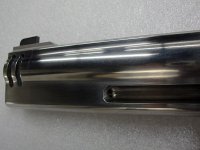
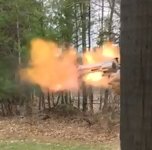
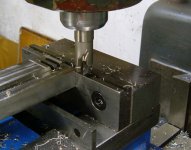
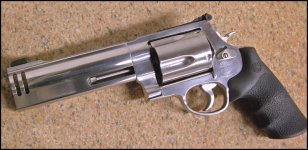
Check out my new barrel on my .500 S&W. This was an 8" barrel. Because the barrel and shroud are seperate, the original barrel was cut down and re-threaded and fitted to a custom shroud. Took me about 50 hours, all cut on a manual milling machine and hand finished. Tamed the recoil a lot, now this thing is so fun to shoot!
 

Attachments

  • SHROUD_WORK.jpg
    SHROUD_WORK.jpg
    70.1 KB · Views: 521
  • 500SW.jpg
    500SW.jpg
    209.2 KB · Views: 402
Last edited:
Register to hide this ad
Certainly seems like you're talented with the machining work. I'm surprised that you indicated that it significantly reduced the recoil. Don
 
  • Like
Reactions: PSD
... I'm surprised that you indicated that it significantly reduced the recoil.

The things that reduce felt recoil are the vents that act as a muzzle brake and the large profile of the barrel which increases weight. Also when I started this project S&W did not offer a 6" .500 I should be doing one in .44 Magnum soon.

I included another picture too. Thanks
 

Attachments

  • 500SW_CLOSE.jpg
    500SW_CLOSE.jpg
    63.9 KB · Views: 454
Very cool.
Did you use a Dan Wesson style nut to hold it all together or the S&W barrel tool?
How did you get it apart in the first place?
 
Did you use a Dan Wesson style nut to hold it all together or the S&W barrel tool? How did you get it apart in the first place?
I made a barrel removal tool out of leaded steel (12L14) and unscrewed the barrel by the rifling. The setup consists of the barrel, the big part of the shroud, the muzzle brake that is the barrel nut. The tricky part was I had to torque the barrel in place by the muzzle brake/nut, then disassemble it and machine a little off, then re-torque it and keep doing that until the end lined up perfectly when tight. For extra safety so the brake cant unscrew under recoil (twist) there is also a pin that goes between the 2 parts and a setscrew that adjusts pin depth but totally inside the heavy lug and not visible. The screw is accessed from inside the ejector rod slot in the shroud. I can add a picture eventually. This is not meant to be changed quickly in the field like a Dan Wesson. Although I can take it apart it is meant to be a more semi-permanent assembly.

I added this picture of it all apart. Bottom left shows the partially machined shroud blank and incomplete muzzle brake.
 

Attachments

  • 500 MAGNUM APART.jpg
    500 MAGNUM APART.jpg
    55.3 KB · Views: 141
Last edited:
Gee-whilikers Batman!
That's sophisticated!
I saw the join line between the brake and shroud body and that explains it.
You could make a decent go of being a gunsmith.

If S&W offered the X Frame in 445 I would have one then turn to you to make a DW style "hunter pack" using John Ross style barrels and shrouds.

I considered getting a BFR in 445 but the 444 cylinders that would be used are kind of obscene they are so long.
For now I am liking the Encore (now by S&W) in 12" and 17" barrels in 445.
The performance in these closed barrels is pretty amazing and makes the 444 irrelevant for anything less than a really large animal.
The recoil is also much more tolerable and I can adjust the weight by putting shot inside the hollow butt-stock.

Thanks for sharing your spectacular machining project.
 
  • Like
Reactions: PSD
It was fun. Will post pictures of the cutters I had made for this too. When I find some personal project time I plan on doing something to the 69 also, probably another heavy barrel.
UPDATE: Model 69 project here: Model 69 44 Magnum Custom Barrel
 
Last edited:
Here is a picture of the end showing the exterior profile and a picture of the 4 carbide end mills I had custom ground to cut it. I also used a small standard corner rounding end mill not pictured.
 

Attachments

  • MUZZLE-PROFILE.jpg
    MUZZLE-PROFILE.jpg
    139.4 KB · Views: 109
  • FORM-CUTTERS.jpg
    FORM-CUTTERS.jpg
    157.6 KB · Views: 97
A few posts back I said: "For extra safety so the brake cant unscrew under recoil (twist) there is also a pin that goes between the 2 parts and a setscrew that adjusts pin depth but totally inside the heavy lug and not visible. The screw is accessed from inside the ejector rod slot in the shroud. I can add a picture eventually." Here is that picture
 

Attachments

  • SHROUD-SCREW-1.jpg
    SHROUD-SCREW-1.jpg
    209.9 KB · Views: 77
Here is a picture of the end showing the exterior profile and a picture of the 4 carbide end mills I had custom ground to cut it. I also used a small standard corner rounding end mill not pictured.

From one machining tradesman to another you did an outstanding job !
Do you custom grind your own endmill profiles ?
 
From one machining tradesman to another you did an outstanding job !
Do you custom grind your own endmill profiles ?
Thank you. I drew up the end mills I wanted with a CAD program called EZ CAM then I submitted the drawings to a local cutter grinder. He was nice enough to grind up my cutters out of some old end mills he had laying around, saving me a few bucks. They are solid carbide and the material for the main shroud is 17-4 stainless so they did get a little bit of chipping by the time I got the depth I needed. The finish milled profile had to have a ton of hand finishing to get the machining lines worked out to where it looked nice.
 
Wow 2 tools in one, you dont need a fire starter if your packin that beast.
That is a really nice looking handgun, cant wait to see the model 69.
I have a 986 and I wish it had a heavier barrel, at least like a 5" 686 or so. Great work. Bob
 
  • Like
Reactions: PSD

Latest posts

Back
Top