More on Rust Bluing

dangt

Member
Joined
Jul 15, 2004
Messages
130
Reaction score
55
Location
Tucson
2152hq,
this question might really be for you since it was you on this forum that led me to try a bottle of Laurel Mountain Barrel Brown and Degreaser and use it in a rust blue treatment. I used it this past summer during our "rainy season" ( I'm in AZ) and thought it worked very well for me on a revolver I had finished with a blasted surface. At least with that gun's particular steel and the blasted surface, the color took really fast, even, and seemed to be more blue-black and much less grey than the Pilkington's solution I had used on several other guns. I attempted to take a digital picture of one blasted gun using Pilkington's and the another using Laurel Mountain but the difference could not really be seen. With the guns in hand, I think the Laurel Mountain looks better in color. Of course, the two guns were not of the same maker and it is most likely the steel is different in the two.

In the Laurel Mountain instructions, it is noted that the polishing can be finished up with 400 to 800 grit. This is markedly different than Pilikington's instructions where it is said to go no finer than 320 grit. I have also read in Chicoine's Gunsmithing book to finish up with 320 grit. I am polishing another S&W right now and intend to use the Laurel Mountain solution. Can you, 2152hq, or anyone else comment on the advisability of going finer than 320 grit? I do intend to use a humidity tent this time as it has dried considerably here.

Dan
 
Register to hide this ad
you can go higher in grade of grit for polishing . but your rusting solution needs something to "bite" into.. the sharp edges of the gun will have trouble holding the solution causing thin spots..
I normally get around this by doing a couple of cycles of rust/ carding then going over just the edges a cycle or two themselves. To make sure the edges have good coverage, then back to normal rust/ carding to even out everything..
You have to remember the rust blueing is actually etching the metal. there for you'll never be able to get the older S&W blue shine.. but it can be brought a level or two or more that the matt finish S&W used.. something along the lines of the 80's polished S&W finish .
as an example here's a 28-2 with a 6 inch that's been rust blued with a high polish , ( I think I did something around 800 grit) along side a 24-3 four inch factory finish ( 80's style )

the blueing on the 28 if I remember, was something around ten cycles of blue/carding to get there..
 
I just did 2 different guns (a 1911 and a 28-2) and used Brownells bluing (Orpho-Blue ?) I used 000 steel wool dipped in (well ) water and got a pretty nice luster on them. It's definitely not a professional finish, but looks a lot better than before (and looks as good as some pro finishes I've seen). You might try rubbing them down with the steel wool and more coats of your bluing to get the look you desire.
 
kritter,

I've always treated edges gently when rust bluing after the first part I blued showed the need to do so. It was whether or not I could get a good even color from higher grit polishing. I probably wont even get to 800 grit as you did on your model 28 but at least wanted to go to 400.

What solution was used on your revolver pictured?

Dan
 
I've posted these pics before but will add them here. The gun was polished with 320 grit before bluing. Six application were used on major components except the sideplate which received eight. Corner wear is the result of use over the last 18 years.


The last pic is of the two sand-blasted (not beadblasted) revolvers finished with the two different solutions.


Dan
 
Dan, I used Radocy express rust blue.. now I'm using stuff I make myself..
and from looking at your photos. I must say, your doing it rather well..
 
I am only part way to the end of re-bluing my 44 HE 2nd Target. The frame with barrel, sideplate, and yoke are finished and I did go to 400 grit in hand polishing. Those parts turned out fine but I had trouble with the cylinder and screws which were done separately with a different humidity chamber. Results are shown in a close up of the cylinder. Far too aggressive rusting took place because , I think, of too high humidity and too long rusting. The peppery pits were not very noticeable until I looked at he surface with magnification.

I have re-polished the cylinder and ALL screw heads and thumbpiece and hopefully, in several days, I'll post some pics of the completed gun in a separate post.


interesting.. I've never seen that much aggressive pitting due to rust bluing before.
how long did you let it rust before the boil?
Here I can get away with anything from a few hours to overnight to get a good coverage.
the rest of the gun looks fantastic...
 
Last edited:
This pitting happened on the first application and it was rusted I think 10 hours. The humidity chamber was , I believe , the real problem. Since it was just the cylinder and screws, I used a much smaller chamber and it must have been too humid for too long, even though the same amount of time on other parts and guns have not resulted in this.

In that first carding I was amazed at the large amount of "black velvet" that came off. It was almost a mess in itself. The red rust before boiling was lots more than usual as well.

The screws are completed and are fine and the cylinder is on its third application rusting and so far, this time the surface looks normal.

Dan
 
You can get a high polish shine blue finish w/rust bluing,,you just have to adjust to rusting times & humidity accordingly so the process doesn't spoil the polish.
A combination of slow rust and quick rust bluing can be used to control the tendency of the process to matte the surface but still get you color.

If it is pitting the surface, it's just plainly allowed to rust too long. The rust doesn't have to be a heavy thick built up coating on the steel before it'll produce a blue color when boiled in water.
(Some applications (restorations,ect) purposely allow it to pit the surface as that is the intended look desired)

I judge the rust coating many times by it's feel rather than what I can see built up on the steel. I lightly run the tips of my fingers over the part(s) and if I can feel the slight roughness of the rust on the surface,,they are ready for the boiling water.
Most times at that point they don't even look 'rusty',,only in either very bright natural light or with a flash light can you see a brown tint to the surface.
That's all the rusting action you need to get a coating of color...
and with that you preserve the steels polished surface.

Another trick is to dilute the rusting soln to use as the process goes on.
Dilute with distilled water. I keep small amts in simple plastic pill bottles.They cap tightly and are uneffected by the soln.
dilute 1:1,,another 2:1,,,3:1 (water to soln)
Use the increasingly weaker solution to coat the parts as you procede in the process. They rust less agressively and have less chance of pitting the surface as you near completion.
No real set program to use them.I use full strength for 2 coats,,then start the diluted ones till I feel I'm done.

Polishing I like to take most surfaces to 320,,then finish up with grey scotch-brite. If a brighter polish, I use maroon colored scotchbrite over a 400 grit finish.
One reason for useing the scotchbrite is that it evens out the surfaces nicely.
The other and the main reason is that many times during the bluing session you get a blemish in the blue like a discolored spot,,a spot that won't blue,,a streak in the finish from something in the water,,ect.
Those problems often meant that the blueing job was scrapped and had to be repolished and started over.
If you had finished polished with scotchbrite,,the problem area can be gone back over with the same grade scotchbrite to remove the blemish.
The blue will be gone too of course but the polish will match nicely due to the nature of the scotchbrite material.
Then go right on with the next coat of rust blue. That next coating will bring the color back up or nearly so to the level of the rest of the part. An additional coat will certainly do it.

Laurel Mtn does have a tendency for after rusting on some steel. Keep a watch on it.
Soakings in Bi-carb soda rinses and the like are the usual fixes given and they work.

The best thing I've found though is after the last slow rustblue coating is carded off and you are satisfied with it,,the part(s) are still warm and the tank is still boiling,,,now apply one coating of hot rust blue using Mark Lee's Rust Blue Soln.
Don't get the parts so hot that the soln sizzles on the surface,,it'll pit.
Just so it drys as it's applied. No runs or drips,,nice thin coat.
Boil that as is usual for a coating of quick rust blue and card.

All done. No after rust and I think it enhances the color to the blue spectrum a bit from what the L/M would be.
 
interesting.. I've never seen that much aggressive pitting due to rust bluing before.

The main concern for me when using rust bluing is the amount of time you leave the solution on the metal in a tented environment. It is quite easy to get heavy pitting and it is better to err on the side of shorter rusting time when using a tent. More cycles of shorter duration should give you the smoothest finish.

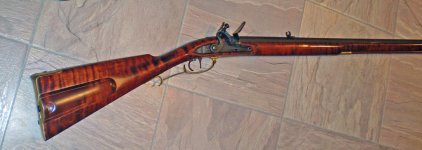
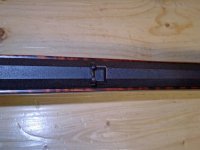
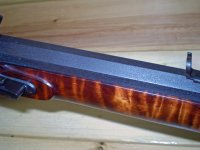
I have built muzzle loaders and always desire a heavy brown to give the metal parts a proper look of a 1700's era finish. Parts are finished with a 320 grit before browning. Leaving parts in a humidity tent for earound 10 hours at a time will impart a really rough finish after about 6 cycles. I do not boil the parts for the effect in the pictures below, but the finish is quite dark and appropriate for this era rifle.
 

Attachments

  • P101003.jpg
    P101003.jpg
    70.1 KB · Views: 131
  • P1010008.jpg
    P1010008.jpg
    103.2 KB · Views: 185
  • P1010004.jpg
    P1010004.jpg
    115.7 KB · Views: 218
Almost completed

I am close enough to the finish of this project to take some pics and post here. Re-polishing the cylinder after the disaster above brought it back to “acceptable.” This gun had more deep pits than I realized before I started it. Again, the gun came to me with a very worn re-blue and I was just not happy with it. I spent the last three months working on this most mornings and took only one week off. I did get sick and tired of it and was eager for the end.

Some of the repairs before polishing was to: eliminate cylinder and yoke end-shake, fit new hammer (did not leave it in, went back to the one I had in before), replace gas ring that had separated into two pieces, build replacement rear sight leaf screw (the tiny one at the front of the leaf), fit new frame lug, Build tools to remove extractor collar, hammer stud, and rebound stud, and square rear of barrel.


Even though side-plate was polished while mounted to frame and received the same finish applications together with the frame, it nonetheless is slightly different in color.


Frame with barrel and side-plate received 10 applications of rust blue and the cylinder got 11. Other smaller parts were given fewer passes.

Pardon the lint and dust in the pics. Have not learned to see these things as I take the pictures>


Dan
 
That is fine as frog's hair. Very very nice.

As I said in my e-mail. The collectors may look down their noses at it, but the other 99% of us will think its mighty fine.
 
Last edited:

Latest posts

Back
Top