Removing Scratches? (Model 66)

JayFramer

Member
Joined
Jul 16, 2013
Messages
4,596
Reaction score
9,334
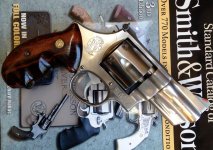
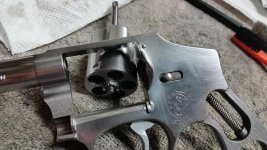
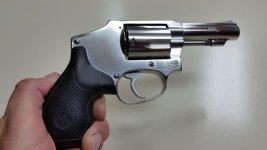
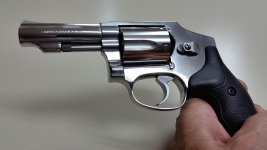
Hello everyone and greetings to you all! I bought a used Model 66 stainless today but it's got scratches. :(

20180105_160248.jpg


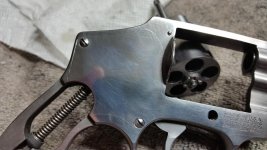
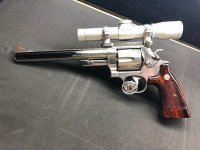
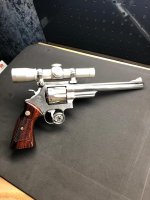
Can I buff these out? They look a lot worse off camera, and "shift" in the light so are pretty noticeable. They don't look deep though, more like scuffs. I do not want to refinish the whole revolver, only remove these scratches and make it blend in with the rest of the gun if possible.

What should I do? (please don't say leave it be, it's bothering me and I want to clean it up).

Thanks! :)

-Jay
 
Last edited:
Register to hide this ad
Scotch Brite pads work well to touch up a BRUSHED or SATIN stainless steel finish.

Scotch Brite pads come in different levels of coarseness.
Light Grey, called Ultra Fine Hand Pad - (600-800) 800 grit.
Green, called Light Duty Hand Pad - (600) 600 grit
Maroon pad, called General Purpose Hand Pad - (320-400) - which is very coarse for removing deeper scratches.

Study your revolver finish and follow the direction of the pattern you see from the factory. STROKE IN ONE DIRECTION ONLY.

Work in a small area with tiny (1" square) piece of pad and stroke in one direction only following the linear polishing direction from the factory. Avoid any surfaces but the brushed stainless surfaces. Start in the most unobtrusive area first to make sure you get a feel for it and like the result. Go slow, literally pushing the pad fairly slowly, and use a light hand. Start with about a pound of pressure. It doesn't take much. Generally the green pad can be used for all applications varying the pressure dependent upon the degree of the scratch you attempting to fix. I think it looks best to finish off with the light grey pad. You might consider viewing You Tube for examples of how to do it.

A dedicated paint store, such as a Sherwin-Williams store, carries a variety of Scotch Brite pads. You may be able to get a variety at Lowes or Home Depot.

Best of luck.

Thank you! So these are "brushed stainless" guns?
 
Thank you! So these are "brushed stainless" guns?

Yes. The finish on your model 66 is referred to as brushed or satin finish.

Other stainless steel finishes are:
Matte, i.e. bead blasted (a dull uniform finish).
Polished, sometimes polished bright enough to be confused with nickel.
 
I took the plunge and redid this 629 with light gray (Ultra-Fine) Scotchbrite I got at Lowe’s.

You’ll want to glue it to something solid. I took a paint stirrer, cut a 4” piece off with wire cutters which only took a second, cut a piece of the Scotchbrite with scissors to fit the cut piece of paint stirrer, and glued the Scotchbrite to the paint stirrer piece by using Super Glue gel on the paint stirrer, then putting the SB on it, pressing it together with my fingers for 30 seconds and it worked like a charm.

Took the grips off the 629 ( this was before I mounted the scope on it) and brushed lengthwise from gripstraps to barrel, in only that direction.

Worked great.

I then used Simichrome on it to give it a little sheen, put the grips back on and this is how it turned out.
 

Attachments

  • 41904A12-F335-4202-8042-ECBC0F2EEB27.jpg
    41904A12-F335-4202-8042-ECBC0F2EEB27.jpg
    73.6 KB · Views: 178
  • 22E14F86-0AA6-4070-BE4F-56E3373FB5AF.jpg
    22E14F86-0AA6-4070-BE4F-56E3373FB5AF.jpg
    64.2 KB · Views: 153
Last edited:
I took the plunge and redid this 629 with light gray (Ultra-Fine) Scotchbrite I got at Lowe’s.

You’ll want to glue it to something solid. I took a paint stirrer, cut a 4” piece off with wire cutters which only took a second, cut a piece of the Scotchbrite with scissors to fit the cut piece of paint stirrer, and glued the Scotchbrite to the paint stirrer piece by using Super Glue gel on the paint stirrer, then putting the SB on it, pressing it together with my fingers for 30 seconds and it worked like a charm.

Took the grips off the 629 ( this was before I mounted the scope on it) and brushed lengthwise from gripstraps to barrel, in only that direction.

Worked great.

I then used Simichrome on it to give it a little sheen, put the grips back on and this is how it turned out.

Where did you get that fancy S&W prop for your nice 629?
 
You can also get Scotchbrite pads in larger sizes from an automotive supply house.
These are used in auto painting.

One trick to even out the finish after using a polishing pad is to very lightly use a metal polish.
You have to go super light to avoid shining the area.

Another trick to even things up requires disassembling the gun, then attaching the side plate on the frame.
Use water and cleansing power mixed to a paste to "scrub" the surface with a toothbrush. This will even it out and dull it just a little so it looks more like the factory grained satin finish.
 
JayFramer, yours doesn't look that bad. Here's my before and after pics of a 3" 940 I have. After removing all the internals I used wet/dry sand paper starting with 800 grit for the deep gouges. Then on to 1000, 1500, 2000 and finishing with 2500. Smoothed out the final sanding marks with Mothers mag polish and Flitz. Then Ren wax.
 

Attachments

  • 20151001_214048 (Copy).jpg
    20151001_214048 (Copy).jpg
    84 KB · Views: 163
  • 20151001_214101 (Copy).jpg
    20151001_214101 (Copy).jpg
    113.6 KB · Views: 147
  • 20151003_000542 (Copy).jpg
    20151003_000542 (Copy).jpg
    55.7 KB · Views: 161
  • 20151003_000613 (Copy).jpg
    20151003_000613 (Copy).jpg
    57.3 KB · Views: 159
Back
Top