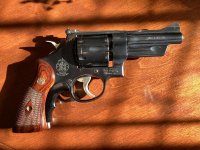
Model 27-9 burn marks

Joined
Jan 7, 2017
Messages
6,210
Reaction score
10,124
Location
Pittsburgh, PA
I've seen a couple You Tube videos showing the burn marks on the cylinder, every chamber, because the front screw that holds the rear sight on is too short and it causes burn marks. The gun is very nice looking and I don't really want to wear the blueing off by cleaning it. I would think a longer screw would fit flush and eliminate that "hole". Does anyone know thread size? Or maybe I just call S&W CS Dept. and ask if they have a replacement? Or is there a cleaner that doesn't harm present-day blueing?
I'm retired, so all my precision-type tools I left in my van (I didn't pay for them.) So, I have no way knowing the length I need. I'm not sure of the TPI, either, but if they just made it about 2 or 3 threads longer, it would be ok
 
Register to hide this ad
My 27-9 has these burn marks as well and I do my best to simply ignore them. You can see two near the front of the cylinder on this photo. I’d be curious as well if anyone has tried this.
 

Attachments

  • EBC75DF9-0911-4A9E-989E-066C51E2F5FC.jpg
    EBC75DF9-0911-4A9E-989E-066C51E2F5FC.jpg
    99.3 KB · Views: 148
I watched some dude on You tube try to use JB Weld to fill the hole. After all the time & everything to smooth out the hole, The next video he showed, I believe it blew right out after the first shot. I'm gonna call CS and see what they recommend. I'll let you know what they say.
Edit to add: They said they will send me a new screw. If that doesn't work she said to take it to a local gunsmith! I told her I'm not the only one with this problem but she didn't seem like she cared. If you call and someone named Sierra hang up and call back; maybe you'll get someone without the attitude of IDGADarn!
 
Last edited:
After firing a Revolver there are carbon and powder residue on the Cylinder face, Cylinder flutes, barrel, etc. IMHO this is really a non-issue! All I do is my (SOP) standard operating procedure after shooting any gun.

Simply carry a "range rag" in a heavy duty zip lock bag. This is simply a 100% cotton flannel rag saturated with your favorite CLP gun oil. Currently I use G96 CLP but have also used Breakfree CLP, RIG CLP, Birchwood Casey etc. - doesn't really matter. After shooting and while the gun is still warm, simply spend 30 seconds wiping off the gun. 95% of the muck will easily come off and when you get home cleaning will be very easy. I have been doing this since 1979 and it has always worked quite well. When the rag gets nasty, throw it away and cut another one. Depending on how often you shoot, a 12 x 16" rag should last about 8 - 12 months, certainly cheap enough to toss when yucky!

HINT: go to your local fabric store that sells by the yard. But yourself a few yards of 100% cotton flannel and cut your rags into 12" x 16" sizes (or whatever size you like). I would suggest buying the flannel in white for several reasons. White has no dies and you can see exactly how dirty your rag really is. Don't wash them - you do NOT want that lead and muck in your washing machine!!

I believe after doing this simple and inexpensive procedure your burn mark issue will become a non-issue.
 
Last edited:
After firing a Revolver there are carbon and powder residue on the Cylinder face, Cylinder flutes, barrel, etc. IMHO this is really a non-issue! All I do is my (SOP) standard operating procedure after shooting any gun.

Simply carry a "range rag" in a heavy duty zip lock bag. This is simply a 100% cotton flannel rag saturated with your favorite CLP gun oil. Currently I use G96 CLP but have also used Breakfree CLP, RIG CLP, Birchwood Casey etc. - doesn't really matter. After shooting and while the gun is still warm, simply spend 30 seconds wiping off the gun. 95% of the muck will easily come off and when you get home cleaning will be very easy. I have been doing this since 1979 and it has always worked quite well. When the rag gets nasty, throw it away and cut another one. depending on how often you shootk, a 12 x 16" rag should last about 8 - 12 months, certainly cheap enough to toss when yucky!

HINT: go to your local fabric store that sells by the yard. But yourself a few yards of 100% cotton flannel and cut your rags into 12" x 16" sizes (or whatever size you like). I would suggest buying the flannel in white for several reasons. White has no dies and you can see exactly how dirty your rag really is. Don't wash them - you do NOT want that lead and muck in your washing machine!!

I believe after doing this simple and inexpensive procedure your burn mark issue will become a non-issue.

Ive always used a soft cotton cloth lightly impregnated with oil or lubricant (any of them, whatever is handy) to wipe down all guns after cleaning. Is this no longer a common practice?
 
>I told her I'm not the only one with this problem but she didn't seem >like she cared.

The reason they don't seem to care is that it is not a problem, but purely cosmetic. Clean your gun.
 
I have found that a flannel patch saturated with MPro7 gun cleaner wipes that carbon away. I've used it on lots of blue guns and it doesn't seem to affect the finish. I think you are going to be disappointed with installing a longer screw. The carbon is still going to be there.
 
I always keep a oily rag, usually part of an old cotton undershirt, most everything wipes right off and I clean the bore, etc., when I get home. I guess I'll just live with it. I already had it sent back twice. This is the only revolver I ever had that leaves carbon, etc., on the outside of the cylinder; right under the screw. Post number 2 shows that. It's just annoying as all git out. Besides the couple J Frames I bought my girls, this is the 1st factory new S&W I bought. I've been looking for a nice holster & belt to carry it, if the situation ever arises, but I'm gonna quit that shopping. But dang is the gun pretty.
Thanks for the tip, StrawHat. We have a few Ace stores around. I'll give them a shot. If it doesn't work, then my loss. I'll clean it up and sell it. I've had enough of this gun's problems. I forgot to tell the CS girl about my stocks are not cut right, but I changed them.
Thanks guys! Jeff
 
>I told her I'm not the only one with this problem but she didn't seem >like she cared.

The reason they don't seem to care is that it is not a problem, but purely cosmetic. Clean your gun.

It most certainly is a problem.A vortex in created of burning gas in that hole in the frame. The bluing is actually being removed. This has been well documented for some time now and the factory is well aware of it.
 
This minor issue is easily corrected. Order a ten-pack of Forster Slotted Oval .200" Diameter Head Screws 6-48, Blue from MidwayUSA, $6.39. Product #590604 forster-slotted-oval-200-diameter-head-screws-6-48-blue. Remove the existing S&W rear sight screw. The head of the Forster screw is slightly larger than the S&W screw. Spin the screw in a drill chuck and turn down and shape the head with a small file to match the S&W screw. Trim the screw length to fit the end flush to the inside surface of the frame top strap. Trimming and trying the length of the screw is easier if the cylinder is removed. Remove the yoke retaining screw with a fitted screwdriver and the cylinder/yoke assembly will slide out. Polish the screw head with 400 grit sand paper. Get yourself a screw gizzy from Brownells or make one yourself. Heat the screw in an open flame of a propane torch or gas stove a few seconds for it to turn blue. Coat the screw with gun oil and assemble the rear sight. Install the cylinder/yoke assembly. You are done.
 
Last edited:
Thank you so much, DwayneV! The screw on the gun is soaking in Aero-Kroil right now. I need a correct screwdriver, too. (You can imagine! Thank God they're sending me a new screw!) I'll order those screws and see if I can get a good set of screw drivers for this. And hope I don't have to take it to a real gunsmith. All the warnings about using correct screwdrivers I've read here and did I listen? I quit trying after the first try. I swear that thing is glued in with Loctite or whatever. Stupid me, but I didn't scratch the gun.
Edit to add: Screws and screwdrivers ordered.
 
Last edited:
If your sight is the old style with the front of the tang square and a single screw, the screw size is 3x56! The new style sight where the tang is round, and there are three screws then the screw size is 6x48, the same as most rifle sight and scope mount screws. Your 27-9 should be the new style sight. 3x56 will be a problem, but any gun shop that mounts scopes will have plenty of 6x48 screws of various lengths and likely will give you one. It only needs to be about 1/2 thread longer to solve the problem. It should not be so long that the end contacts the barrel shank.
 
Last edited:
Okay, I got delivery of the screws and drivers. So, first thing I did was remove the cylinder. They used red Loctite on it. WTH? So, I tried the sight screw. Nothing. Their website says using heat will loosen it up by “ melting” the red stuff. I’m really not up to hitting it with Mapp gas torch. My only alternative heat source I have is an electric solder gun and put it on the screw head and let the heat transfer through the screw. I believe the Loctite video said it melts at 500 deg. F. I’m going to let the gun sit with penetrating oil on it overnight. In the meantime I’m going to swear a little and wait until morning. Geez!
Oh, by the way, Grace screwdrivers are junk. I’m probably going to send them back and try to find an alternative. I saw some others on Midway.
I’ll try tomorrow before I really mess this small chore up.
 
Oh, by the way, Grace screwdrivers are junk. I’m probably going to send them back and try to find an alternative. I saw some others on Midway.

A note here on screwdrivers,,
ALL good screwdrivers are "JUNK"

Absolutely, you want the screwdriver to fail before the screw fails.
PLUS, you want the screwdriver to be soft enough to be easily filed for a custom fit to the specific screw.

Think about it,, which is easier to acquire??
Do you really want a screwdriver so strong that it can break a screw that is in your gun??

If the screw does not come out easily, you need to use a different technique.

You are not hanging curtains in the bathroom,, these screws are not wall anchors,,,

There are a half dozen methods to remove a screw,,
That gunsmith should know those 6 ways,, and maybe a few more,,,
 
Yes, that makes sense. I talked with S&W Service this morning. They didn't use Loctite, they painted each screw to color-code them so the assemblers know where to put them. I'm just going to give up on it and take it to a local smith. Or, shoot it as is and don't worry about the burn marks, which seems to be the easiest remedy.
I appreciate all the suggestions and comments.
Thank you, Jeff

There is such a thing as manual impact screwdrivers. I use them with old sewing machines, usually on larger screws. Careful application might be all it takes. Below is an example, not a recommendation. I can't recall the exact set I have.

[ame]https://www.amazon.com/KAIFNT-Manual-Impact-Driver-24-Piece/dp/B08LYSHNCW/[/ame]
 
Last edited:
Back
Top