PowerSurge
Member
Ok, I know the Apex stuff is nothing new, but people still seem to have the same 3 issues with the install of the spring kit and the trigger upgrade. I was one who had all three issues.
So I'm going to do my part to contribute to the forum here. Hopefully my post will help future SDVE owners with the Apex install.
The first problem people seem to run into, is the metal pin that is supposed to just pop out to the left using the Apex slave pin. For some, it pops right out. For others, I've heard of people having to hammer it out, go the other direction, etc, etc. I ran into this issue as well. The reason it is so hard to get out sometimes, is because the slide release lever and spring, lock into the groove in the pin. The hole in the slide release lever has to be the same size as the pin so the pin can go through it. Then once the pin is in place, the slide lever drops into the groove machined into the pin. Well in order to now remove the pin, you have to get the hole in the slide lever lined back up with the outer diameter of the pin. If you are one of the people having a hard time getting the pin to pop out, do what I did.... Keep pressure to the left with the Apex slave pin like you are supposed to, but also move the slide lever around with your finger till it all lines up and she pops right out") .
.
The second issue is the notorious "filing" of the Apex replacement trigger. Yes I had this problem too. And yes it seems like I had to take off way more material than I expected to. Now, I knew about this issue ahead of time. So here's what I did...
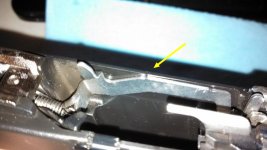
Before you take ANYTHING apart trigger wise, pull the stock trigger back. While holding it there, make yourself a reference notch of where the trigger lever on the right side of the gun stops. I simply used my fingernail to make a tiny notch in the case, right where the first angle of the trigger rod has a sharp corner. See the pic below:

One more angle...notice the notch I made in the case lined up with the sharp corner of the trigger lever.

With this simple notch, you now know exactly where the stock trigger stopped. This takes all the guesswork out of how much you need to file off the Apex trigger. Just keep going till the Apex trigger brings you back to your reference notch, and your gun will fire every time.
The third issue, is the safety blade hanging up or feeling very notchy when the trigger is pulled. I have seen people post that they removed the Apex trigger just because of this complaint alone, and trust me, it bothered me too. In my opinion, this problem is because the spring for the trigger is actually lighter than the spring for the safety blade. So the trigger moves before the safety blade releases, which makes the blade hit the case of the gun and have to be "forced" out of the way to pull the trigger back.
What I did to solve this, was use a small file (try a nail file if you don't have a small file) to gently remove a bit of the safety notch, as well as round the very bottom of it slightly. This will give you less "ramp" to overcome when the blade hits the case, and if you shape it right it will be a nice smooth transition. Remove just enough material until you no longer have the "snap" to overcome when pulling the trigger back. There will still be plenty of safety blade left to stop the trigger from going back accidentally if nobody is pressing the safety blade back in.
See the pic below of my finished trigger and safety blade:

So hopefully this post helps anyone doing the Apex install. I can honestly say I LOVE my Apex trigger and spring kit the way I've got it setup. The pull is super smooth and light and very easy to control.
Happy shooting!
So I'm going to do my part to contribute to the forum here. Hopefully my post will help future SDVE owners with the Apex install.
The first problem people seem to run into, is the metal pin that is supposed to just pop out to the left using the Apex slave pin. For some, it pops right out. For others, I've heard of people having to hammer it out, go the other direction, etc, etc. I ran into this issue as well. The reason it is so hard to get out sometimes, is because the slide release lever and spring, lock into the groove in the pin. The hole in the slide release lever has to be the same size as the pin so the pin can go through it. Then once the pin is in place, the slide lever drops into the groove machined into the pin. Well in order to now remove the pin, you have to get the hole in the slide lever lined back up with the outer diameter of the pin. If you are one of the people having a hard time getting the pin to pop out, do what I did.... Keep pressure to the left with the Apex slave pin like you are supposed to, but also move the slide lever around with your finger till it all lines up and she pops right out
.The second issue is the notorious "filing" of the Apex replacement trigger. Yes I had this problem too. And yes it seems like I had to take off way more material than I expected to. Now, I knew about this issue ahead of time. So here's what I did...
Before you take ANYTHING apart trigger wise, pull the stock trigger back. While holding it there, make yourself a reference notch of where the trigger lever on the right side of the gun stops. I simply used my fingernail to make a tiny notch in the case, right where the first angle of the trigger rod has a sharp corner. See the pic below:
One more angle...notice the notch I made in the case lined up with the sharp corner of the trigger lever.
With this simple notch, you now know exactly where the stock trigger stopped. This takes all the guesswork out of how much you need to file off the Apex trigger. Just keep going till the Apex trigger brings you back to your reference notch, and your gun will fire every time.
The third issue, is the safety blade hanging up or feeling very notchy when the trigger is pulled. I have seen people post that they removed the Apex trigger just because of this complaint alone, and trust me, it bothered me too. In my opinion, this problem is because the spring for the trigger is actually lighter than the spring for the safety blade. So the trigger moves before the safety blade releases, which makes the blade hit the case of the gun and have to be "forced" out of the way to pull the trigger back.
What I did to solve this, was use a small file (try a nail file if you don't have a small file) to gently remove a bit of the safety notch, as well as round the very bottom of it slightly. This will give you less "ramp" to overcome when the blade hits the case, and if you shape it right it will be a nice smooth transition. Remove just enough material until you no longer have the "snap" to overcome when pulling the trigger back. There will still be plenty of safety blade left to stop the trigger from going back accidentally if nobody is pressing the safety blade back in.
See the pic below of my finished trigger and safety blade:
So hopefully this post helps anyone doing the Apex install. I can honestly say I LOVE my Apex trigger and spring kit the way I've got it setup. The pull is super smooth and light and very easy to control.
Happy shooting!