Ahoy there Gents...
I have this fellows 5906 here and among other things to do he was pretty insistent on adding forward slide serrations. Not a problem says I but... I haven't done this operation before and a mistake here is quite difficult to un-do. So, I took a good deal of time to crunch the numbers, work out the fixturing and do a bunch of test cuts.
I figured the information I compiled would be useful to share here. Should any of you gents want similar work done on one of your pieces just take these details to a machinist or gunsmith and you should be golden...
The Recipe
Cutter or Mill head angle 22° towards muzzle
Vise rotated 14°
Depth of cut 0.025"
Advance workpiece 0.060" per cut
And it's 15 cuts (assuming you want the front to match the rear)
Here I'm running a bunch of test cuts on a block of 6061 Aluminum. That slide there will be the first victim...

Used my Starrett #359 to capture the 14° angle and transfer it up front...

A couple things to note here. Many of these slide are tapered. The slide is taller in the rear than up front so, you must register the angle of the cut off the bottom of the slide rails.
Observe how the slide is clamped in the vise. The bottom is against the vise jaw and the top is cushioned with some soft aluminum bar to allow for the taper.
Both sides of the slide are dyed and a staring scribe line marked. You cant see the line in the pic but it's there. Before spinning up the tool, I run the table in & out the verify the cutter is following my scribe line precisely...

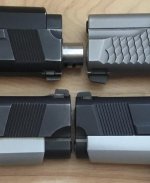
Right side done...

And the left...

Turned out quite nice if'n I do say so muhself")
This one gets a bit of a de-burring then wipe the flats, media blast and off to H&M for Isonite QPQ.
While the mill is still set up properly I looked about for other stuff to do...

The #71 gun got an impromptu spa treatment with a bit of machine work

I'm considering doing something to the #40 gun too
Cheers
Bill
I have this fellows 5906 here and among other things to do he was pretty insistent on adding forward slide serrations. Not a problem says I but... I haven't done this operation before and a mistake here is quite difficult to un-do. So, I took a good deal of time to crunch the numbers, work out the fixturing and do a bunch of test cuts.
I figured the information I compiled would be useful to share here. Should any of you gents want similar work done on one of your pieces just take these details to a machinist or gunsmith and you should be golden...
The Recipe
Cutter or Mill head angle 22° towards muzzle
Vise rotated 14°
Depth of cut 0.025"
Advance workpiece 0.060" per cut
And it's 15 cuts (assuming you want the front to match the rear)
Here I'm running a bunch of test cuts on a block of 6061 Aluminum. That slide there will be the first victim...
Used my Starrett #359 to capture the 14° angle and transfer it up front...
A couple things to note here. Many of these slide are tapered. The slide is taller in the rear than up front so, you must register the angle of the cut off the bottom of the slide rails.
Observe how the slide is clamped in the vise. The bottom is against the vise jaw and the top is cushioned with some soft aluminum bar to allow for the taper.
Both sides of the slide are dyed and a staring scribe line marked. You cant see the line in the pic but it's there. Before spinning up the tool, I run the table in & out the verify the cutter is following my scribe line precisely...
Right side done...
And the left...
Turned out quite nice if'n I do say so muhself
This one gets a bit of a de-burring then wipe the flats, media blast and off to H&M for Isonite QPQ.
While the mill is still set up properly I looked about for other stuff to do...
The #71 gun got an impromptu spa treatment with a bit of machine work
I'm considering doing something to the #40 gun too
Cheers
Bill

")