Faulkner
Member
Although I own three 1911A1's and I enjoy shooting them, I don't really consider myself a "1911 guy", so this is being written by basically a 1911 newbie. If I don't use the correct terminology you real 1911 guys can go ahead and make fun of me, it won't hurt my feelings.
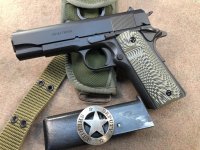
After a few hundred rounds through my recently purchased commander sized Tisas 1911 I have been very pleased with it, and not a single malfunction of any kind. I decided, though, I wanted to tinker with it and replace the trigger with an aluminum black anodized lightened tactical trigger similar to the one on my Springfield Fully Loaded 1911A1. I noted that when I bought the replacement trigger that "some fitting may be required".
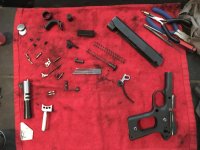
In all the years I've owned a 1911 I have never detail stripped one but figured how hard could it be. Actually, it wasn't all that hard, but then again I don't have problems field stripping a Ruger MKII and MKIII, so maybe I just have adequate motor skills for such things.
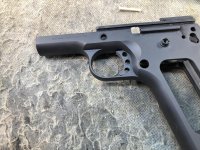
Now, to the "some fitting may be required" note on the new trigger. Wow, that was an understatement. Once I got the 1911 disassembled, the new trigger would just would not fit. I started off with some buffing on the bottom of the trigger, and then could tell it was dragging on the left side as well so did some buffing there. In the end, I had to fetch the Dremel tool and search through a few YouTube videos to get instructions. Eventually I had to use the Dremel to stone off a good bit off the bottom and left side as well as a bit on the right side before the trigger would easily fit and work effortlessly in the channel. Once I got it "trimmed" out so it fit properly I had to refinish the trigger. After about a three hour investment in time I got the new trigger working quite smoothly.
It was additional learning experience to get the 1911 reassembled, but now I know how it's done. Problem is, the new trigger was NOT to my liking. I just didn't like it. I even took it out and fired a few magazines through it and decided I liked the original trigger better, so back to the work bench we went and repeated the disassembly process, put the factory trigger back in, and reassembled it. The second go 'round was much faster since I knew what to expect. I took it back out and ran a couple more magazines through it and decided, yeah, the factory trigger was just fine.
I really enjoyed learning more about 1911's with this project even though the new trigger didn't work to my liking. I have to admit, though, after 25 years of working with Glocks, they are so much simpler.


After a few hundred rounds through my recently purchased commander sized Tisas 1911 I have been very pleased with it, and not a single malfunction of any kind. I decided, though, I wanted to tinker with it and replace the trigger with an aluminum black anodized lightened tactical trigger similar to the one on my Springfield Fully Loaded 1911A1. I noted that when I bought the replacement trigger that "some fitting may be required".
In all the years I've owned a 1911 I have never detail stripped one but figured how hard could it be. Actually, it wasn't all that hard, but then again I don't have problems field stripping a Ruger MKII and MKIII, so maybe I just have adequate motor skills for such things.
Now, to the "some fitting may be required" note on the new trigger. Wow, that was an understatement. Once I got the 1911 disassembled, the new trigger would just would not fit. I started off with some buffing on the bottom of the trigger, and then could tell it was dragging on the left side as well so did some buffing there. In the end, I had to fetch the Dremel tool and search through a few YouTube videos to get instructions. Eventually I had to use the Dremel to stone off a good bit off the bottom and left side as well as a bit on the right side before the trigger would easily fit and work effortlessly in the channel. Once I got it "trimmed" out so it fit properly I had to refinish the trigger. After about a three hour investment in time I got the new trigger working quite smoothly.
It was additional learning experience to get the 1911 reassembled, but now I know how it's done. Problem is, the new trigger was NOT to my liking. I just didn't like it. I even took it out and fired a few magazines through it and decided I liked the original trigger better, so back to the work bench we went and repeated the disassembly process, put the factory trigger back in, and reassembled it. The second go 'round was much faster since I knew what to expect. I took it back out and ran a couple more magazines through it and decided, yeah, the factory trigger was just fine.
I really enjoyed learning more about 1911's with this project even though the new trigger didn't work to my liking. I have to admit, though, after 25 years of working with Glocks, they are so much simpler.

")