.38 Single Action

Tinker Pearce

Member
Joined
Dec 29, 2011
Messages
124
Reaction score
307
Location
Seattle, WA.
I just purchased this remotely from an out-of state shop. It's reported to be in good order, but I was told the cylinder free-rotates when the hammer is down, but locks up tight when the gun is cocked. Is this normal for this model?

LNqNA8y.jpg

VGpDEQ7.jpg


I'm getting the gun regardless at that price; if need be I can sort it out, but I am curious.
 
Register to hide this ad
Tinker, the cylinder stop is trigger actuated. If either the trigger sear or the hammer sear has been messed with (I.e. filed or chipped, etc.) that moves the trigger up in the front which causes the cylinder stop to drop out of battery. Since I don't see the sideplate screw (nor have X-ray vision) I will speculate that the hammer notches have been altered and a new hammer is in your future. Pull the sideplate and give us another photo and we can assess the problem. Check Gun Parts Corporation as there were 100,000 of this model made and parts are available.
 
There may be no problem. This model's cylinder was designed to spin freely when the hammer is at half-cock. You first have to make sure your hammer is against the frame before testing. The term half-cock is not very accurate when it comes to old top-break S&Ws. Some to many hammers lock into half-cock when only pulled back a fraction of an inch. If you cock and let the hammer down slowly, it will stop at the half-cock notch and the cylinder will spin. Hold the trigger back while letting the hammer down until it reaches the frame and then test again. The cylinder should be locked in that position.

Some later models had a rebounding hammer, so after the shot, the hammer aucomtaically went to half-cock, but not the 38 SA 1st & 2nd models. The 3rd Model had a rebounding lock.
 
Last edited:
I think it is a .38 Single Action 2nd model, with a modified front sight. There is currently another thread asking about another one, or possibly a foreign copy?
 
Thanks Glowe, I'll certainly check that carefully when I put hands on the gun. It should be arriving tues. or weds.

As for the model, I am no expert but it appears to be a .38 Single Action 2nd Model.
 
Safety Notch

These Single Action Top-breaks be it the Model 1 or 2 required only two hammer settings. The first "click" is actually the "Safety notch". Sole purpose is to keep the hammer firing pin "off" the loaded cartridge primer. Thereby avoiding the typical "shooting one self in the leg" in the Old West. Pretty common occurrence unfortunately.
The second setting is full cock or battery locking the hammer all the way back while at the same time rotating the cylinder to lockup. The term "half cock" is not applicable to this model since this model is a top break. "half cock" refers to those models both single action and double action that have a loading gate and require a half cock setting to load and unload the gun. This single action Smith is a top break so loading and unloading requires the gun be opened "after you place the action on the safety notch".
Now to the issue. there could be half a dozen issues with this smith. All guesses on our part.
I recommend when you get the gun "AVOID" the temptation to blast right into working the action 50 times!
First thing!!!! Make sure it was shipped unloaded!!! Oil the gun !!! You'll probably hear the gun in a low tone scream: "Thank you Jesus"!!! since it hasn't been oiled in about 75 years! So Oil the gun first. Drop some oil down into the bolt , hammer, extractor. Maybe even remove the cylinder and a few drops on the base pin maybe?

"Then lets evaluate"

I also noticed that the sideplate is missing the screw. Is it sheared off inside the hammer stud? or is it just missing? The sideplate actually can play a major roll with hammer action by holding the hammer stud steady. without that screw the sideplate is removed from the mix and the stud can wobble(exaggerated to allow visual understanding) and prevent the hammer from staying all the way down against the recoil shield. So, lot's of issues are possible on this gun. Including bolt spring is weak, cracked,bent. Hammer notches are worn. Trigger is chipped. Main spring out of adjustment. Hammer stud is not screwed in tight to the frame. That sideplate screw is sheared off inside the stud. Etc.

Murph
 
Last edited:
. . . The term "half cock" is not applicable to this model since this model is a top break. "half cock" refers to those models both single action and double action that have a loading gate and require a half cock setting to load and unload the gun . . .

Half-cock goes back to muzzleloading at least 250 years. As far as I am concerned, half cock is a safety feature on all revolvers and rifles that I have ever operated. You cannot pull the trigger when in half cock on a flintlock, Rolling Block rifle, or a S&W 38 SA. Call it what you want, but the intent on all firearms is to provide a safe mode for a firearm.
 
Last edited:
The gun has arrived, and it's better than I thought! The cylinder does in fact lock when the hammer is down, and only free-rotates when the hammer is in the safety/half cock position.

The only bad news is that the hammer-stud screw is broken off in the hammer stud, but I can get a new stud pretty cheaply, so it's all good!

Serial number is 54855. Can anyone give me an idea when this might have been made?
 
Get the hammer stud and the screw if possible. S&W had proprietary screw threads so finding a matching screw can be problematic. I'm glad to know that it functions properly.
 
Good for you Tinker Pearce ,
I don't have an exact production date for your Smith & Wesson Model 2 Single Action .38 but records indicate they were manufactured from 1877 until 1891. Total production is listed at 108,255. So plugging your serial number into the mix suggests a production date of about 1884.
You can repair that hammer stud with a drill and tap procedure if you'd like. Or search for the parts. Your call.

Mike is correct in that the side plate screw is not a standard thread. However, back then there simply was no standard thread for any gun maker or bolt/screw manufacturer.
The standard in the industry was not introduced until 1898. Representing the first attempt to standardize screws and threads in the industry both in the US and Europe. Long story but an interesting read.
So basically each gun, tool, lock, etc of that era was manufactured with unique threaded screws that won't fit on any other manufacturers design. Very primitive Era.

Murph
 
Last edited:
Thank you gentlemen! I'm first going to try to repair this one, but failing that I at least know where to get the stud.
 
Morning Tinker Pearce,
Good For You! I'd like to suggest a safe, quick and productive procedure to follow, to repair that original factory stud. Antique firearm metal is relatively soft. Unlike modern firearms. They rate consistently on a scale of hardness, about a 4. Comparing that to bolt hardness that is basically less than a grade 5 hardened steel bolt. Which is pretty soft.

Modern firearms rate consistently at about an 8/9. That's about the same as a main bearing bolt and head bolts for a V8 engine. Which is very hard tempered steel and impossible for the backyard gunsmith to work on or in this case "drill" on. That's what makes antiques so much fun to work on. The metal is soft.

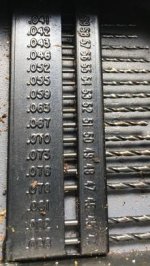
So, take a look at the photo's. The best procedure is to begin with the proper type high carbon drill bit. These are not that expensive. The proper size for a Smith 1 1/2 stud is seen in the photo.(example). So you would begin with an undersized bit of .003 thousandths under size to center your boss (drill hole). Then gradually increase the hole to the proper size.
Once you have drilled out the stud you have a lot of options here. Especially since the metal is very soft. You can obtain a couple modern hardened screws that fit the boss and basically force them to tap out the boss. Discarding the screw after accomplishing the task and using one of the others as the final product. I've done this many times with modern screws and it works well.

Murph
 

Attachments

  • 0054A9EE-D0FF-4F65-9074-44BA02361AFB.jpg
    0054A9EE-D0FF-4F65-9074-44BA02361AFB.jpg
    92.2 KB · Views: 35
  • F98284B4-14DC-43E8-8790-61E54C1C1810.jpg
    F98284B4-14DC-43E8-8790-61E54C1C1810.jpg
    22.7 KB · Views: 36
  • B4EEFBCE-C397-46BD-9D10-141CE6279260.jpg
    B4EEFBCE-C397-46BD-9D10-141CE6279260.jpg
    54.6 KB · Views: 41
Last edited:
Thanks Murph! I don't see the photos, but this is pretty much the procedure I intended to follow, with the exception of tapping a new hole with a tap. I also have a selection of cobalt bits that ought to work nicely for this purpose.

I'll let you know how it goes.
 
photo's posted

You can use a tap if you want but taps are very hard metal and taping a dead end boss is kinda tricky. Usually it won't tap deep enough. Modern screws are cheap, they are easy to find hardened and will cut threads in that antique stud just like a tap would only deeper and will match perfectly the identical screw for the final product. Those colbolt bits are perfect....Go easy!

Murph
 
Last edited:
I was thinking of that actually, though I do have a bottom-tap in an appropriate size. But then I thought, "What am I more likely to break off in the hole- a tap or a hardened machine screw?"

On my errands this morning I stopped and bought appropriate screws.
 
Back
Top