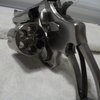
My cylinder got hard to open and it turned out the ejector rod had come unscrewed. I tightened it up and it keeps happening. I usually get about 70 rounds before I need to tighten it up again.
I don't use a tool but just tighten it with my fingers. It is not a big deal to check it frequently but is it possible this is a sign of a serious problem?
I don't use a tool but just tighten it with my fingers. It is not a big deal to check it frequently but is it possible this is a sign of a serious problem?
")
")