Factory work has many common denominators.
An even tone
Concentric circles and patterns( perfectly drawn)
No obvious mistakes
Often it looks like a painting.
Photo 1 depics a very even tone throughout, perfect execution, no obvious mistakes in the engraving and notice also the cut is very even in depth?
More specifically mistakes are errors in depth of the cut(unevenness, out of round terminus, not perfectly drawn.)
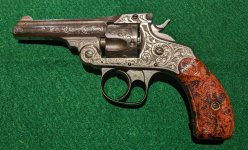
Photo 2 &3 is the OP's gun. First let me say I am not in any way trashing this gun! So many take offense. This is an honest appraisal. The gun was definitely period engraved and looks very nicely done.
Notice in photo 2&3 the cuts are not even. Deep then shallow and the terminus is not perfectly done. It has almost a cartoon look to it. Same with photo 3. This is typical of the so called New York engraved guns performed by apprentices.
Photo 4&5 is Gustave Young. Notice the perfect execution, perfect circle patterns and terminus. Also the cut is perfect. Very even depth.
That's what I look for when evaluating the quality of gun engraving.
Some folks can't tell the difference between a square and a rectangle. I can see the difference so I can see a double action Russian as compared to a DA Frontier. To me it's obvious I don't need to measure the cylinder but I guess some can't see it.
Murph
#1 isn't perfectly drawn,,the scrolls are out of round.
Turn your head or the pic 90* and look again. The scrolls are flattened out to fit the spaces.
Even depth of cut isn't something very often try to do when engraving scroll work, not matter what the style is.
Depth plus line width gives the pattern elements life. Otherwise they end up looking like the pics in #4 & #5.
4&5 look like a line drawing and if that's the best Gus Young could do, it certainly must have been a bad Monday morning for him.
No shading, no bright cuts, thick/thin lines,,,no life to it.
Maybe the pics aren't showing the work well. But that there is plainly lifeless, poorly drawn & cut scroll as it appears in the pics.
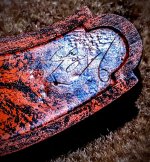
2&3 you are looking at scroll work that has been buffed over at least once and then re-plated. So it's lost some of it's orig detailing.
Yes the engraver was in a hurry to cut the pattern and should have done a better job at a lot of the finer details like finishing up the scroll ends as pointed out.
There are some out of round scrolls and the internal details lack finishing cuts as well.
Some of that comes from the position the engraver works in and the type of vise they use.
To complete the very small tightly wound scroll ends, it takes either the engraver moving around the work (as in standing while working), or the engraver moving the work as the cut is progressed.
An engraver who works while sitting and has the piece in a vise before them has to stop and turn the vise w/the work piece in it and then continue to cut till your wrists and arms reach the limit.
Then stop and turn the work again and repeat.
Many just work as far as they can reach while sitting and call it good,,,and that's what you see. An incomplete final cut.
One way a sitting engraver gets by that problem is to have the vise w/work piece mounted on a potters wheel type of setup in front of them.
Then a continuous cut can be done w/o stopping to turn the work piece.
Stopping/and starting to turn the work is also the cause of the out of shape some larger scrolls get as the cut begins anew where the old one just stopped. It doesn't always make a perfect arc with the old cut and you can get the so-call elbow & knee look to the arc of the scroll.
Most European engravers are taught to stand while engraving and walk around the work that is fixed in a vise on a sturdy post. That way it avoids these problems.
Tough on the back though! Even more so if you have to bend over to see better because of bad eyesite.
I'd call #2&3 a hurry-up type of cutting but with a decent overall look to the finished job.
Some decent shadding done both single point tool and the use of liners which was quite popular with those patterns.
LDN liked to use both at times.
I think way too much work is 'attributed' to a very few engravers.
Looking at some work and then saying 'this is the work of Mr. XYZ' is just too easy. Plus it is usually followed up with experts opinions involving the shape of graver cuts and hammer facet appearances, etc. Things like that.
That's all easy to see, but it has little to do with pinning down who did what.
Gravers are rountinely reharpened when working. Most engravers free hand sharpened their tools,,no jigs or fixtures, and there were no HS tools around.
Constant change in the micro shape and face of the tool through and entire career, even through a day of work,,,and someone will still tell you they can ID a piece of work done at any point in the career.
I doubt that.
Engravers styles change, their hand strength change, they have injurys and weaknesses that interupt their careers. It all changes the look of the work. They start out,,then get better,,then get much better,,then plateau,,then start to decline.
We all do. That's life.
Our work doesn't look the same from beginning of career to the end.
Some cut pre layed out patterns. Others are true artists that could/can draw most any thing they wanted to on paper and then make it come to life on metal. Most can not.