HomeSmith Custom Shop: The Faux Pinto Thread

I have a nickel 29-2 cylinder and 4" barrel that I have an eye out for the right donor frame. I'd really like a model 58 for a fixed sight 4" pinto but can't find one in the right price range yet!
I'm in the same boat but find an N frame donor ain't easy. It would make a very unusual Pinto. Performance Center version!
 

Attachments

  • IMG_3672.webp
    IMG_3672.webp
    254.8 KB · Views: 0
Last edited:
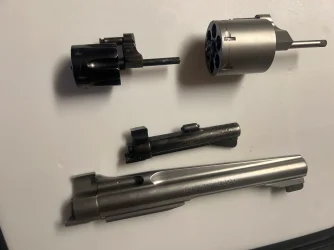
After the pin was out, the MGW barrel taker offer was attached and the barrel magically fell off.

View attachment 786897

With the barrel off, the next step was to figure out what stainless barrel should be used. I can (and have) fit barrels to frames but it's sooooo much easier and faster to just walk over to the rack, grab a few barrels, and see which one fits. Yes, there's a comma in the price tag of a rack of barrels, but how much is your time worth?

My method of barrel matching starts with threading the original barrel on until it's hand snug and making a reference mark on the frame with a pencil.


View attachment 786898

If the replacement barrel matches up with the mark it will clock properly with no fitting.

The first one did not, but was close.


View attachment 786899

The second one was better but still not quite there.


View attachment 786900

The third one wasn't even close.


View attachment 786901

Number 4 matched up perfectly.


View attachment 786902

That 4th one was a snubby barrel and I still had some 4" barrels to try. #5 matched up as well…


View attachment 786903

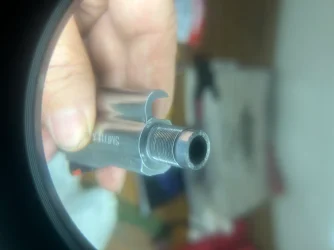
So now I had a choice between a 4" and a 2 3/4" barrel. I knew I had the correct length ejector rod available…the deciding factor was going to be the rear sight. Snubby model 19's and 66's use a longer rear sight that bridges dat gap between the frame and the sight base on the snubby barrel. Did I have the right rear sight to do this properly?

I've shared the incantations I use to summon stock sets out of the pile, but I'm afraid that the rare rear sight ritual phrases are only available to members of the HomeSmith Inner Circle. All I'm allowed to share publicly is that it involves cutting one leg off of the horse on the top of a bottle of Blantons while wearing a paper hat made from the pages of the 1986 Kansas City phone book.

The Gods of the Copybook Headings smiled upon me and the pile belched forth not one but several of the appropriate rear sights. I set the best one aside for another project that I have coming up and picked one that just needed a good cleaning for the faux pinto.

We were in business….a snubby it shall be.


View attachment 786904
Great write-up on matching barrels. The more I goof around with this the less mystifying it is.

I would add one thing for the folks in the back row - take a really good look at the mating surfaces on the frame and the barrel. I had a take-off that was gritty and galling bad. It would thread easy then seize. Marked the surfaces up with a sharpie to find the high spots then a bit of veeerrry careful file work gained another hour on the clocking, if that makes sense. You can see the galling here.
 

Attachments

  • IMG_3293.webp
    IMG_3293.webp
    127.6 KB · Views: 0
  • IMG_3292.webp
    IMG_3292.webp
    123.2 KB · Views: 0
Today I'm rust bluing a 10-8 that is getting converted from a 4" .38 to a 3" .357 and had some time to work on the 19-3.

I started by stripping it down and using my new barrel pin punches from @-BTM- Custom Punch Works to remove the barrel pin. The punches worked slicker than snot on a doorknob.


View attachment 786861
I made these to deal with a serious bubba problem that had bent several commercial & DIY punches. The starter punch is a game changer.
 
Sharp-eyed readers of the Rustbucket thread noticed that there was a second frame that went along for the ride during the metal finishing and bluing process. The second frame was another homely Model 15-3 that needed a facelift.

I've done a few two-tone projects but most of those kind of "ended up" that way. This time we have a plan and a purpose....

Welcome to the Faux Pinto thread.

Our soon-to-be-pinto was stripped down to the frame, yoke, and sideplate, and was treated to the same metal prep and bathroom rust bluing that was done to Rustbucket. There are lots of details about that in the other thread. Here are a few pics of the two frames as they went through the process.
Here is a model 10 my pops did shoots good looks Nice to me IMG_20250623_162757417.webp
 
I haven't forgotten about you guys….this project is on temporary hold because another project went south. The other gun I'm working on got through rust cycle #8 beautifully, then rust cycle #9 with a 25% acid solution somehow got contaminated during the boil and produced a haze on the frame and sideplate. While I was sanding to back-step the hazy pieces in order to re-do that part of the bluing, I discovered a divot in the backstrap that I had missed the first time….so that entire frame is being stripped down to bare metal for a do-over.

And I leave for a week long business trip on Monday. 🤬

So….the snubby 19 pinto is safely tucked away until I get the other things sorted out. I should be able to get back to it over Labor Day weekend.
 
As an interesting part of this little side trip, I have discovered how to artificially age a gun…

Another interesting thing (to me) is that it's quite a bit more difficult to take off my rust blue than it is to take off the original finish. After being scrubbed with 5 different grades of scotch brite there was still some finish remaining.


IMG_9629.webp

I didn't think to take pictures along the way to show the progression because it didn't really sink in on me what was happening until I was on the 3rd grit.

This tells me that for someone who does not want their classic gun to appear refinished but also want the dents and scratches to go away, the method would be to take dozens of photos of the original finish, strip it, do the metal work, blue everything, then strategically remove the new finish to "put it back" to the original appearance.

I have a 4" K38 with a fish hook hammer and two proud pins in the front sight base that needs restoration. That might be a good candidate for this technique. My complete blue job does not match the original, but the partially removed reblue sure looks like a worn original.

Hmmmmm
 
Busy weekend at the bench…the 10-8 conversion to .357 got done, the 65-3 refinish and trigger job got done, and the 19 frame had the metal work done (I thought), 2 rust cycles, was stripped down to bare metal again to fix a scratch that didn't really show until the bluing started to come up, and is now resting overnight after the second rust cycle of the second try at bluing.

Oh yeah…and along the way my son and his wife acquired a miniature human. His name is Ashton and he is grandson #5.

IMG_6242.webp

I was busy enough that I forgot to take pictures, but I did get one of the 19 frame before it went into the bluing cycle.


IMG_9668.webp

And here are the other two that got done:


IMG_9736.webp

Tomorrow I should be able to get back on track with this project.
 
The boring part is done and the blued pieces are resting in an oil bath, so tonight work began on the barrel.

When I first started working with metal I would have just attacked this thing with a big stack of sandpaper….that was before I discovered good files.

For this part of the project I used a set of Grobet files in a #6 cut…extremely fine. So fine that a piece of #8447 scotchbrite would remove the file marks. Following the file work with the scotchbrite really helps with visibility because as the imperfection starts to go away the file marks can sometimes cover it up.

Here are all of the tools I used on the barrel:


IMG_9906.webp

Instead of trying to type out a description of every fix, I'll just show the before and after pics…


IMG_9909.webp


IMG_9922.webp


IMG_9913.webp

IMG_9923.webp


IMG_9914.webp

Two in this pic: under the "Wesson" and the bottom of the shroud.


IMG_9885.webp


IMG_9919.webp

There were several others but you get the idea.

I also noticed an interesting machining mistake on the rib when viewed from the muzzle…compare the left and right sides where the rib transitions to the barrel:


IMG_9912.webp

Total time for file work on the barrel was just over an hour. Tomorrow we'll do the cylinder, and then both pieces will get a sequence of scotchbrite buffs and a final burnish before assembly.
 
The cylinder turned out to be in much better shape than the barrel. There was only one spot that required file work and that was minor. After that scratch was cleaned up it was just a matter of finding which grit would remove the spiderweb of fine scratches that covered the cylinder.


IMG_9929.webp

I worked through 6 different grits of scotchbrite going around the outer circumference of the cylinder. Each grit made two scrubbing passes with the cylinder turned 180 degrees in between. Everything was wiped clean and lubricated with WD40 before each pass.


IMG_9934.webp

IMG_9933.webp

The barrel and ejector rod received exactly the same treatment.

The last step was to swap out the new carding wheel for an old one and burnishing the pieces. Total time for this step was 1 hour and 5 minutes.

On Saturday we'll put it all together…


IMG_9941.webp


IMG_9948.webp
 
Today's first step was a reminder about order of operations. If I had chased the threads on the barrel and in the frame before I blued everything, the repeated boilings and degreasings would have cleaned the tap oil out of the threads. I did it today because I enjoy spending 10 minutes with a Q-tip cleaning threads. :rolleyes:

IMG_9960.webp

When the threads were finally clean and dry, the new rear sight was installed to provide a straightness reference point, the barrel taker-offer was switched to putter-onner mode, and we visited the big vise in the garage.


IMG_9961.webp


IMG_9962.webp


IMG_9963.webp

The Gods Of The Workbench smiled upon me today because the assembly of a cylinder, barrel, and frame from 3 different guns ended up with the rear gauge in spec and a .006" cylinder gap with no adjustments required.


IMG_9966.webp

I did a trigger job on this gun when I was testing it with the 4" barrel, so the final putting together was just a matter of moving the stuff that was outside back to the inside. More time was spent choosing an appropriate set of stocks from the pile than assembling.

A quick rub down with renaissance wax, some clicky-clicky function tests to verify that we still had a 7lb DA pull and a 2 1/2lb SA pull, and we're ready for a range trip tomorrow.


IMG_9967.webp


IMG_9969.webp
 
What a Beauty!! You never fail to amaze me with your work! I have read many posts, but I have a question about the polish on the cylinder. What do you do, or not do, to the flutes on the cylinder to get the contrasting look? I am going to attempt polish on my model 64, and would like to have that look when finished.
 
Hey! You got lucky again! Quality work and attention to detail always seems to make a feller lucky. Can't figure that one out... Oh well, another beautiful gun to shoot with. Who doesn't want that?
 
You guessed correctly that it's mostly not doing.

I use a backing block with the scotchbrite pads and cut them to be just slightly larger than the block.


IMG_9986.webp

With a 7446 pad, I use the corner of the pad to polish along the length of the flutes…..and then I never touch them again.


IMG_9988.webp

The rest of the cylinder is polished around the circumference. The flat backing pad keeps the scotchbrite from falling into the flutes.


IMG_9989.webp

The circumference of the cylinder gets polished with 7446, 6444, 8447, 7447, 6448, and 7448 in that order. The flutes stop at 7446.


IMG_9990.webp

When it's time to burnish, the cylinder is held so that the brush motion follows the circumference AND only half of the area between the flutes is burnished at one time so that the brushes are always slipping off the edge and never impacting the edge. The cylinder gets flipped over to burnish the other half and keep the brush only sliding off the edge. It's easier to do than to explain…

IMG_9992.webp

IMG_9991.webp

I hope that helped…
 
Back
Top