HomeSmith QuickFix: Mini Me

Joined
Jul 25, 2017
Messages
1,228
Reaction score
7,327
Location
Arizona
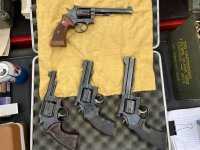
Today we're doing a quickie fix on another new acquisition. You met BullShooter here as part of the TrainWreck series. A few weeks ago, a miniature version showed up at a local auction.

Project name: Mini Me

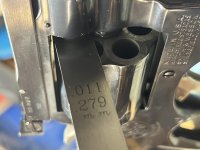
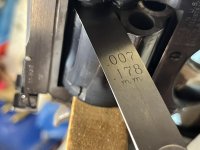
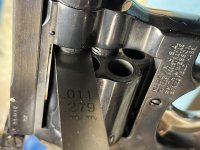
Mini Me is a 10-6 from around 1976-77 and started life as a fixed sight, heavy barrel, square butt .38 with a D925xxx serial number.

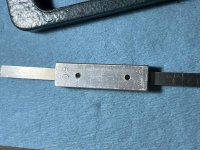
Somewhere along the way a Bomar cover up rib was applied over the existing sights and the action was slicked up. Mini Me arrived wearing a hacked up set of Hogue grips. I could have lived with the modifications to the finger grooves but the hack job on the right side was embarrassing. I can understand wanting to show the Smith & Wesson logo but let's at least make the cuts straight, ok?

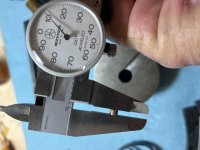
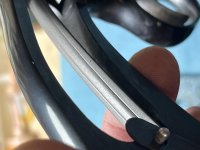
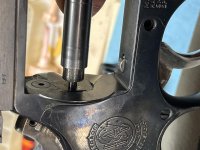
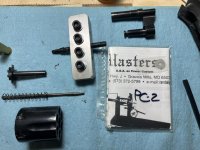
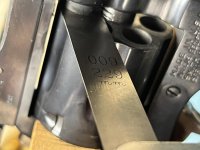
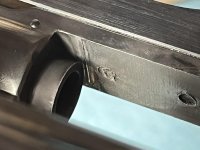
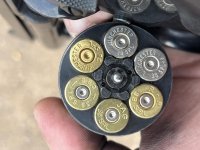
Mini Me has a wonderfully light and smooth trigger pull, however on the first range trip an issue popped up: I had a light primer strike. It was just one out of 18 shots but that's more than I will put up with. Guns should go bang when you pull the trigger.
 

Attachments

  • IMG_0076.jpg
    IMG_0076.jpg
    131.6 KB · Views: 47
  • IMG_0077.jpg
    IMG_0077.jpg
    132 KB · Views: 40
  • IMG_9885.jpg
    IMG_9885.jpg
    66.8 KB · Views: 36
  • IMG_9886.jpg
    IMG_9886.jpg
    72.1 KB · Views: 33
Last edited:
Register to hide this ad
Mini Me has 38 ounces of hammer tension which is a bit on the light side according to my test history. My first thought was to do the used-primer-as-a-shim test on the strain screw to see if that would fix my issue. Luckily, I have a used primer manufacturing facility just to the right of my 'smithing workbench. Mine happens to be blue, but the red and green ones work just as well for filling coffee cans full of used primers.

I removed the anvil from my used primer, knocked the firing pin indentation flat with a punch, and measured the thickness of my potential shim. My calipers and a few maths gave me a number of .018" which would be equal to roughly half a turn on the strain screw. Let's get those nasty Hogue things off and pop this baby in....

Whoops.

Mini Me already had a Wolff "power rib" mainspring installed. The strain screw sits inside of the rib in the spring and my primer-shim thing was wider than the rib. I was going to be adding way more than the equivalent of half a turn. Time to ponder for a bit.
 

Attachments

  • IMG_0083.jpg
    IMG_0083.jpg
    86.6 KB · Views: 19
  • IMG_0084.jpg
    IMG_0084.jpg
    71.4 KB · Views: 17
  • IMG_0086.jpg
    IMG_0086.jpg
    80.2 KB · Views: 17
  • IMG_0087.jpg
    IMG_0087.jpg
    152.1 KB · Views: 17
  • IMG_0079.jpg
    IMG_0079.jpg
    73.6 KB · Views: 19
I've found that my best pondering happens when I don't try to ponder. I just set the thought in my head and let it rattle around for a bit while I do other things.

As long as I had Mini Me on the bench I decided to move ahead with the other "new purchase" inspection checks.

Timing: good with the lockup happening right at the end of the hammer stroke. Within spec but right at the edge of being late. We'll have to watch that one.

Ejector rod: straight within .002". Don't mess with what isn't broken.

Yoke alignment: good, no adjustment needed.

Rear gauge: within spec, but towards the large end.

Cylinder gap and endplay: Hmmmm. Found something here.

Gap without wedge: .011"
Gap with wedge: .007"
Endplay: .004"

The pondering bell started going off inside my head, but I decided to just let things keep rattling around inside there for a bit.
 

Attachments

  • IMG_0093.jpg
    IMG_0093.jpg
    108 KB · Views: 17
  • IMG_0092.jpg
    IMG_0092.jpg
    103.6 KB · Views: 16
  • IMG_0090.jpg
    IMG_0090.jpg
    81.3 KB · Views: 15
  • IMG_0089.jpg
    IMG_0089.jpg
    74.9 KB · Views: 15
  • IMG_0091.jpg
    IMG_0091.jpg
    146 KB · Views: 16
I used my handy-dandy Power Custom ejector rod loosener-upper to take apart the cylinder assembly and cleaned everything while it was all from together. A .002" shim (also from the gents at Power Custom) went in as part of reassembly.

This brought the with and without wedge cylinder gap measurements down to .011" and .009", and also tightened up the rear gauge.......and made the cylinder stop timing happen earlier in the hammer stroke.

Moving the cylinder around does neat stuff.

This is when I finally listened to the results of my pondering: would reducing the rear gauge by .002" correct my light strike issues? It's not much but little things matter. I decided to leave the strain screw and mainspring as they were and force myself to make another range trip. The things I do for you people. :rolleyes:

While it had Mini Me apart I also fixed a burr that was left over from installing the rib and installed a set of rubber Uncle Mikes grips from the pile. These fit my hand better than Pachmayrs and showed the logo without any hacking.

Our sharp-eyed readers will probably notice the spot where the hammer appears to be rubbing on the sideplate. I haven't taken the sideplate off of Mini Me yet - that will be addressed when the sideplate comes off for a thorough cleaning.
 

Attachments

  • IMG_0095.jpg
    IMG_0095.jpg
    130.4 KB · Views: 20
  • IMG_0096.jpg
    IMG_0096.jpg
    98.7 KB · Views: 20
  • IMG_0097.jpg
    IMG_0097.jpg
    73.8 KB · Views: 20
  • IMG_0098.jpg
    IMG_0098.jpg
    83.1 KB · Views: 20
  • IMG_0100.jpg
    IMG_0100.jpg
    133.6 KB · Views: 26
Last edited:
The range trip was a resounding success. I burned through over 100 rounds of mixed brass, mixed primer reloads without a single light strike.

The take-away from this one is simple: fix your endshake first.

Shooting the 4" heavy barrel with the BoMar rib is interesting. The sight picture is wonderful and the extra weight changes the recoil impulse to somewhere in between a 6" K-frame and a 4" N-frame. This one will get lots of range time. The target is 24 shots as fast as I could go and keep everything in the black at 7 yards. I'll have to work on the consistency of my grip after reloads...the poi shifted a few times during the string. I guess that means I'll have to go to the range again.
 

Attachments

  • IMG_0157.jpg
    IMG_0157.jpg
    137.6 KB · Views: 17
  • IMG_0156.jpg
    IMG_0156.jpg
    110.7 KB · Views: 16
  • IMG_0161a.jpg
    IMG_0161a.jpg
    41.6 KB · Views: 18
Last edited:
...the poi shifted a few times during the string. I guess that means I'll have to go to the range again.

Years ago, when I was competing, I used rubber grips. They were the cause of my revolver printing two overlapping groups that were vertically strung. Replacing the rubber grips with a set of wood stocks corrected the problem.

Kevin
 
Back
Top