HomeSmith: Sticky Situation - Adventures in rimfire reaming

Joined
Jul 25, 2017
Messages
1,075
Reaction score
6,353
Location
Arizona
I'm recovering from an unplanned rapid weight loss courtesy of the e. coli diet and was looking for something to do, so I started thinking about my stable of K-frame rimfires and how picky they are.

For the purposes of this exercise, we're only focusing on .22 LR revolvers. I have a 48-2 in .22 mag (A Little Harry) but that one ejects everything I put into it just fine as long as I keep the chambers clean. The .22 LR guns are the picky ones....or at least 3 of them are.

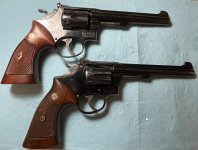
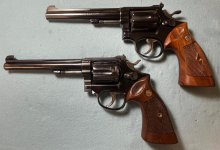
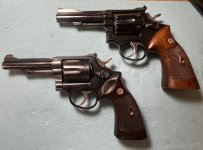
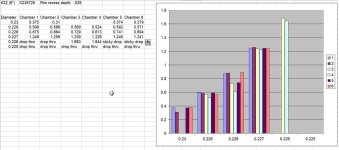
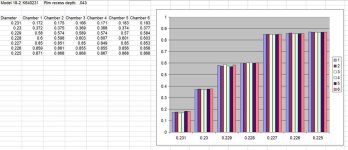
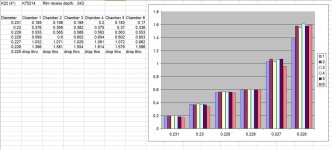
Our subjects today are a 6" 17-2 from 1963, a 6" K22 from 1955, a 4" 18-2 from 1965, and a 4" K22 from 1949.

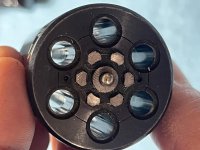
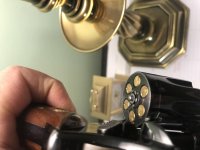
The 17-2 is the only one that will chamber, fire, and eject all brands of .22 LR ammo. The pair of 4" guns work fine with Federal and Remington ammo, but Winchester and CCI ammo sticks badly on ejection. By "badly" I mean poke them out individually with a cleaning rod being struck by a screwdriver handle. The 6" K22 is by far the pickiest one of the bunch. It will only eject Remington ammo and then only if the temperature is below 80 degrees.
 

Attachments

  • IMG_1729A.jpg
    IMG_1729A.jpg
    116 KB · Views: 18
  • IMG_1730A.jpg
    IMG_1730A.jpg
    104.3 KB · Views: 16
  • IMG_1731A.jpg
    IMG_1731A.jpg
    108.1 KB · Views: 21
  • IMG_1732A.jpg
    IMG_1732A.jpg
    113.7 KB · Views: 17
Register to hide this ad
I've read just about every thread on the various forums about sticky .22 LR ejection, and they all pretty much recommend the same sequence of steps:

1. Clean the chambers
2. Polish the chambers
3. Ream the chambers

There also appears to be a universal rule that states the following: "Every thread that mentions sticky rimfire ejection must contain at least 4 reminders to clean under the ejector star." I'm counting on the rest of you to fulfill your obligation to the above rule.

After reading the Manson vs Clymer vs PTG reamer threads, I ordered a solid pilot .22 LR sporting chamber finishing reamer from Manson earlier this morning. I also ordered the big jug of their recommended cutting oil and a .44 special chamber finishing reamer for another project (you'll just have to wait for that one).

I've had lots of time to sit and think during my unplanned weight loss extravaganza, and I decided that I wanted to know just exactly what was going on inside those chambers that wouldn't eject certain brands of ammo. So I came up with a plan....

I would start by cleaning all of the chambers, then use a set of pin gauges to measure the inside diameter of the chambers. The SAAMI specs say to expect a 5 degree taper from .2307" at the chamber mouth to .227" at the beginning of the throat. My plan to deal with the taper was to use progressively smaller pin gauges and measure the depth that the gauge stopped. A few maths to find the difference between the overall length of the gauge and the amount sticking out of the chamber would give me "diameter X at depth Y" and then I could graph it all out for a visual aid.

My first problem popped up with the pin gauges themselves: they have beveled ends. It's not much of a bevel but it's there. This means that all of my measurements of "diameter at depth" are going to be off by the amount of the bevel. Someday I may spend the time to square off the ends on the mill, but for now we just have to remember that all measurements are off the same amount. We're looking for chamber-to-chamber variations here and not trying to create specs to duplicate the chambers, so it should be ok.
 

Attachments

  • IMG_1733.jpg
    IMG_1733.jpg
    93.2 KB · Views: 71
  • IMG_1734.jpg
    IMG_1734.jpg
    163.2 KB · Views: 71
  • IMG_1735A.jpg
    IMG_1735A.jpg
    64 KB · Views: 81
  • IMG_1741A.jpg
    IMG_1741A.jpg
    62.6 KB · Views: 79
  • SAAMI 22LR dimensions.jpg
    SAAMI 22LR dimensions.jpg
    160.9 KB · Views: 93
Last edited:
I wanted to start with the one that worked as a baseline to compare the others against, so the cylinder came out of the 17-2 and went into the bench vise.

The first set of measurements came out with the attached chart for chamber #1 (arbitrarily chosen). The "stick out" measurement is just that: how much of the gauge was sticking out above the cylinder face. The "raw" depth is the length of the gauge minus the stick out. The "corrected" depth is the raw depth minus the depth of the rim recess in the cylinder which was .041 on this gun. I realized after I had measured, recorded, and graphed everything that my "corrected" values were not needed because SAAMI measures the chamber depth from the breechface. That works out for the best anyway, because I also realized that I had only measured the rim depth on one chamber and re-used that value instead of measuring each one individually.

Every depth measurement from here on will be the "raw" depth measured from the cylinder face.
 

Attachments

  • 17-2 chamber 1.jpg
    17-2 chamber 1.jpg
    99.2 KB · Views: 44
So what did we end up with? The chambers in this cylinder appear to be about halfway between the SAAMI "sporting" chamber and the "match" chamber.

Chamber #5 is consistently the largest at any given depth up until we get to the throat, but all of them are smaller the specs.

Chamber #1 seems to be the most linear of the bunch. Several chambers appear to have a decrease in taper as the depth increases.

Not what I was expecting, but there it is.
 

Attachments

  • 17-2 cylinder graph.jpg
    17-2 cylinder graph.jpg
    62.6 KB · Views: 42
Discussion point: Does anyone know what the tooling used by S&W to ream chambers looks like? It appears from the data that there are 6 individual reamers that wear at different rates and not one reamer used 6 times, causing it to wear progressively.
 
Moving from the best to the worst, I repeated the measurements on the 6" K22...the really picky one.

The first surprise was that the .230" gauge that would not fit into any chambers on the 17-2 dropped right into 4 of the chambers in this cylinder. The .225" gauge that appears to designate the beginning of the throat in the 17-2 cylinder would drop right through every chamber. Two chambers stopped the .226" gauge but they were really deep.

What jumps out at me other than the fact that everything is bigger is the variance in depth for the .228" gauge (which is probably closer to .227" because of that bevel). Chamber 4 stopped the .228" gauge at a depth of .613" but chamber 6 didn't stop the same gauge until a depth of .894".

This leads me to think that for this one, the issue is not so much the size but the taper and where the taper ends.

I should also note that there are 3 chambers that eject easier than the others....and that we have 3 chambers that show a wild variation on that .228 gauge.
 

Attachments

  • K22 6in cylinder graph.jpg
    K22 6in cylinder graph.jpg
    59.9 KB · Views: 22
Moving on to the 18-2 that works fine with Federal and Remington but doesn't like Winchester or CCI, I got to use a new pin and also find out how large the bevel on the pins is.

Chamber 6 stopped the .224 pin at the very end with the beveled portion sticking out. That allowed me to measure the depth of the bevel at .009". That would mean that every depth measurement (assuming a consistent bevel) is .009" longer than the actual depth. On this one, that might make a difference.

The 17-2 had a somewhat ragged but mostly linear progression. The 6" K22 was all over the place. The 18-2 was amazingly consistent. I'm somewhat stumped on this one unless case length differences between brands is what's causing the difficult extraction. Once this one gets to the throat it's at the throat.
 

Attachments

  • IMG_1742a.jpg
    IMG_1742a.jpg
    48 KB · Views: 21
  • IMG_1744a.jpg
    IMG_1744a.jpg
    64 KB · Views: 19
  • 18-2 cylinder graph.jpg
    18-2 cylinder graph.jpg
    67 KB · Views: 18
Rounding out the evening is our 4" K22. This one is similar to the 18-2 but with a bit more variation in the throat. Once again, if all I had to go on were these measurements and the SAAMI chamber drawing I would say that it should be ok.

Next up is to check the other variable: the ammo.

What have we learned so far? I'm not really sure yet. When the reamer gets here I'll give it a try and see how much it changes the starting dimensions. Then we'll know something.

Time to queue up Please Mr. Postman and the old Heinz ketchup song about anticipation...
 

Attachments

  • K22 4in cylinder graph.jpg
    K22 4in cylinder graph.jpg
    62.4 KB · Views: 5
I have never measured them quite a way, but between reaming cylinders and making inserts to convert a model 19 357 cylinder into a 22lr cylinder for a model 53 22 jet, checking chamber and throat size with pin gauges I have found that S&W chambers are far from uniform and usually each cylinder will have variations from one chamber to the next.
 
Forty some years ago I read-but don't remember where-that S&W allegedly reamed all the chambers in one pass on a special machine. No clue if it's fact, but prior to CNC machining, would make sense as re-indexing the cylinder (or reamer head) to do one at a time would eat time like crazy. Obviously, not all reamers wear at the same rate.

I once had a .357 in the shop for hard extraction. IIRC, 3 chambers in a clover leaf pattern weren't finish reamed. Reams 3 at once? Only need to re-index once.

About the same time also bought my younger son a Remington .22 rifle and found it's chamber wasn't finish reamed. (Did I ream this barrel before break? Piece work pay rates can result in some oversight or outright "let QC catch it" or "Ol Ralph is QC today, he's easy." practices.)
 
Wonderful information. I'm anxious to see pics of the chamber reaming process. My 17-2 is a little ammo fussy. My brother and I took his recently obtained 17-4 to the range and had to use a wooden mallet to extract the fired shells. A real bummer for sure.
 
I had a Ruger Single Six that would not eject empty cases without a lot of effort . I found a stainless steel bore brush and used it to scrub out the cylinder . Problem solved . And before anybody brings it up , I would never use that brush to clean the barrel . I don't even know where I got it but it worked for me .
 
I messed up a 10 rd 617 cylinder by being in a hurry. I was using a ream that successfully did my pre-18, an 8 rd 63-5 and a different 617-6. This time though the throats were tight and the ream galled and bound in the throat section of the cylinder. Undeterred I galled a few more chambers before going WTH? So now I need to bore the throats to .224 on this cylinder and then start over. Fortunately it was a spare.

Moral of the story, go slow and don’t force it!
 
I have run into tight throats myself. A New 44 mag cylinder I was going to ream to 45 colt. Reamer with .429 pilot wouldn't go and upon inspection a couple chambers were .428 and one wouldn't even let a .428 pin gauge go.

You can find .224 chucking reamers on ebay for under $20
 
Last edited:
My son and I have two S&W 22lr wheelguns--a 17-1 and a 63. The 63 is quite a bit stickier but for some shells they are both hard to eject. We did find that the use of CCI and Federal shells made a big difference and now we brush the chambers after 6-8 cylinders and for us the problem is adequately solved. My son has also put a copper brush into an electric drill and cleaned out the chambers which was a huge help.
 
The Manson Cylinder (chamber) Reamer works like a charm with no accuracy loss what so ever. It will make a S&W 22LR a joy to shoot. It is a simple and easy project that won't cost an arm and a leg and as long as one uses plenty of cutting oil and cleans the Reamer between charge holes, it is fairly fool proof. I would just get a 5 ounce can of Tap Magic for steel (not the one for aluminum) and the handle for the Reamer if you don't have a small tap handle and you are good to go. Remove the cylinder from the revolver while doing the job. After all the holes are done, clean the cylinder and charge holes thoroughly and go shoot the revolver.

I have a bunch of Colt 22 revolvers and their charge holes are not tight like S&W's. The Colt revolvers shell ejection works effortlessly. I have no clue as to why S&W has not increased the size of theirs.
 
Manson reamer- do em all - once & done!

Didn't even look back, researched the problem, confirmed all on this Forum many moons ago..bought the reamer, had the Tap Magic (remember...the stinky kind...for steel), chucked the cylinder assembly up in soft jaw vise and went to work. Pic of vise not bolted was only for clean pic...vise normal bench location too grubby for pic:D

Like said...SLOW and easy, in one direction ONLY (clockwise) and DON'T FORGET: leave the ejector star in place, otherwise the reamer large face will only kiss cut the cylinder, and NOT the star so the ammo rims will still be off!

On all of mine 17-3, K22's, Model 34's & 2 for buddies they have all come out fine.

Remember also that you are NOT "machining" as in getting metal chips removed...at best you should see some fine cuttings, look more like "dust" called angel hair by some. Cleaning the reamer faithfully is a must. Like said I've done several S&W 22's now and the reamer remains as sharp as it was new, so a very good investment for 22 wheelgun fans as even the wife and kids like shooting them again, after years of frustration after 1 cylinder at the range then have to have Dad call cold and come over with bamboo chop stick and mallet.:(
 

Attachments

  • 34-1 1975.jpg
    34-1 1975.jpg
    45.3 KB · Views: 61
  • 34-1 after reaming 1.jpg
    34-1 after reaming 1.jpg
    62.6 KB · Views: 64
  • Manson 22 LR Reamer.jpg
    Manson 22 LR Reamer.jpg
    82.3 KB · Views: 61
  • reamer in tap handle.jpg
    reamer in tap handle.jpg
    78.7 KB · Views: 58
  • vise with soft jaws.jpg
    vise with soft jaws.jpg
    74.6 KB · Views: 60
Back
Top