HomeSmith Trainwreck #5 "Bullshooter"

Thank you Sir - I do appreciate the correction. Words do matter. AR-15's use pins and I mixed the terminology. I think there's even a thread about that in another section of the forum….

To all, feel free to call me out on stuff like this. The other one that I know I have issues with is "grips" vs "stocks".
 
You can definitely find them on Gunbroker — usually a company that is in charge of de-milling seized guns. They disassemble as much as they can, collect all the parts, then torch or cut the frame so it is "legally destroyed."

They sometimes appear at gun shows, but Gunbroker has them often. And as they are legally NOT a firearm, you don't need the assistance of an FFL to receive them.

All of Sevens statements are 100% true and correct.

FWIW, "parts kits" for common guns can also be found on eBay.

It's worth doing a search on both eBay and GunBroker when you're looking for inexpensive parts to salvage a "basket case" gun.

JMO and YMMV.
 
Last edited:
It will likely be a good shooter once you get all the parts in it. Hope it works out for you.


tgZk3Pb.jpg
 
Bullshooter got test fired today and passed with flying colors. 100% reliable and a joy to shoot.

The sights were apparently set for 7 yards so the first shots were pretty high. This was my first experience with a Bo-Mar rib and I really enjoyed it. Easy to see and easy to adjust.

That great big barrel makes for a very steady hold and rimfire level recoil, but I really have to pay attention to the front sight. Any lapse of concentration and the muzzle drops fast. It will certainly help build wrist and forearm strength. ;)

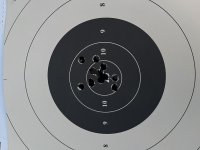
I didn't have any wadcutter ammo loaded so I used 158 grain lead semi-wadcuters. Bullshooter liked them just fine. Two-handed single action slow fire put every shot into the X ring at 15 yards (previous post). My shooting buddy was practicing controlled pairs from a low ready, so I did the same for 12 shots with Bullshooter. Recovery time for the second shot was very similar to shooting a K-22 thanks to the massive barrel. I'm not quite as fast (yet) with a revolver as I am with a 1911, so now I have a new goal. I will say, though, that controlled pairs with Bullshooter are more accurate - probably due to the extra weight, lower recoil, and the extra split second for sight picture while I crank the trigger. Sometime this spring I'll run some back to back tests with a timer.

Overall, Bullshooter is the most pleasant centerfire handgun I've ever shot. I'm really glad that I started this journey.

Next up is some additional work on the face of the trigger. I like the narrow trigger but the sharp serrations have to go. We'll see how close I can get to a mirror polish using just hand tools and sandpaper. I know a dremel would be faster but we're supposed to be learning the old ways here.

As we were packing up my shooting buddy asked what powder I was using. All I had to do was hold up my hand and he knew....

Edit: Grrr...another sideways picture. The flyers went high, not left.
 

Attachments

  • IMG_9187.jpg
    IMG_9187.jpg
    42.8 KB · Views: 46
  • IMG_9188.jpg
    IMG_9188.jpg
    83.5 KB · Views: 48
  • IMG_9185.jpg
    IMG_9185.jpg
    56.2 KB · Views: 49
Last edited:
I also loathe the serrated trigger and the only thing worse than a serrated trigger on an excellent double action S&W revolver is the super wide, gangly serrated "target trigger" on my favorite double action S&W revolvers.

No custom PPC build I've seen comes with a bloated and serrated trigger. That's because it's the wrong trigger for smooth double action shooting.
 
Shotgun Coach,
Keep doing what you are doing! I find these posts very informative and worthwhile. I can't go out and get the tricked out revolvers so I have to get the ones that need work. Thank you again for the step by step process in restoring your revolvers. Del
 
Bullshooter now has a smooth trigger....

I learn something every time I open one of these up. Today's lesson was that if you want a smooth trigger it's much easier to start with one that is already smooth and make it smoother.

I griped about the time spent smoothing out the edges of the trigger on Short & Sweet, but that was nothing compared to removing the serrations on the trigger in Bullshooter.

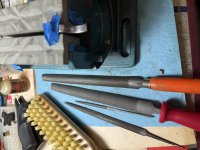
Pig Hunter and Protocall Design gave some good advice in the other thread. I started with an itty bitty half round Swiss pattern file and quickly realized that I needed something much more aggressive to get the serrations out.

The bigger files knocked down the serrations but it still took time, going slowly and carding the files often. When the serrations were about 90% gone I switched to a sanding drum on the rotary tool to complete the removal.

A scotch-brite wheel was up next, followed by working through the various textures of Cratex tips in their "777" kit.

It still needs to be hit with a polishing wheel for the final finish, and the pictures showed me a spot that I missed when I was smoothing out the cuts. I'm going to shoot if for a while like this and make sure that I got the shape I want before it gets the last fluff and buff. That will probably happen when I boil and card the rest of the gun.

......and this time it went back together with a few drops of oil on the studs instead of being pumped full of grease. :rolleyes:
 

Attachments

  • IMG_9329.jpg
    IMG_9329.jpg
    74.2 KB · Views: 28
  • IMG_9336.jpg
    IMG_9336.jpg
    130.3 KB · Views: 29
  • IMG_9345a.jpg
    IMG_9345a.jpg
    89.8 KB · Views: 30
Bullshooter now has a smooth trigger....

I learn something every time I open one of these up. Today's lesson was that if you want a smooth trigger it's much easier to start with one that is already smooth and make it smoother.

I griped about the time spent smoothing out the edges of the trigger on Short & Sweet, but that was nothing compared to removing the serrations on the trigger in Bullshooter.

Pig Hunter and Protocall Design gave some good advice in the other thread. I started with an itty bitty half round Swiss pattern file and quickly realized that I needed something much more aggressive to get the serrations out.

The bigger files knocked down the serrations but it still took time, going slowly and carding the files often. When the serrations were about 90% gone I switched to a sanding drum on the rotary tool to complete the removal.

A scotch-brite wheel was up next, followed by working through the various textures of Cratex tips in their "777" kit.

It still needs to be hit with a polishing wheel for the final finish, and the pictures showed me a spot that I missed when I was smoothing out the cuts. I'm going to shoot if for a while like this and make sure that I got the shape I want before it gets the last fluff and buff. That will probably happen when I boil and card the rest of the gun.

......and this time it went back together with a few drops of oil on the studs instead of being pumped full of grease. :rolleyes:

Said that in Post #50. I am cheap, If I can make something instead of buying new, then I am all for it. Being retired got plenty of time.
 
Bullshooter's newly shaped and smoothed trigger works like a charm. I only fired a few shots from him today, but 6 shots in 5 seconds, two hands, double action, from 15 yards all fit into the X-ring. :D

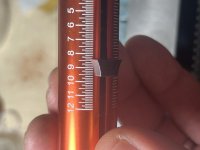
We came out with 48 ounces of hammer tension, and 8.5 lb double action pull, and a 2.5 lb single action pull.

Bullshooter has officially graduated from "Trainwreck" to "a heck of a lot of fun". So much fun that now I'm shopping for a set of used PPC gear just so I can use him for what he was built for.

You may see Bullshooter again as I start my journey into refinishing but for now he's out of the shop and into the regular range rotation. We'll have to see which one of my children/grandchildren calls dibs on him first.
 

Attachments

  • IMG_9434.jpg
    IMG_9434.jpg
    51.7 KB · Views: 11
  • IMG_9433.jpg
    IMG_9433.jpg
    56.4 KB · Views: 10
  • IMG_9453.jpg
    IMG_9453.jpg
    44.5 KB · Views: 14
Back
Top