How would you fix this?

ezb57

Member
Joined
Nov 25, 2008
Messages
282
Reaction score
281
Location
California Central Coast
These grips are pretty close in serial number to a Model 15 I have and I thought I would refinish them. They have been stripped now, but this little missing chunk is still a problem. Its really small but quite noticeable. I have some sawdust and was thinking about some sort of glue/shellac patch and was also interested in the Mohawk putty sticks. Wadda ya think?
 

Attachments

  • IMG_5810.jpg
    IMG_5810.jpg
    84.2 KB · Views: 183
  • IMG_6869.jpg
    IMG_6869.jpg
    74.6 KB · Views: 160
  • IMG_5812.jpg
    IMG_5812.jpg
    96.3 KB · Views: 170
Last edited:
Register to hide this ad
What's the barrel length of your Model 15?

I ask because those are PC Magna Stocks, which came on the 2" version. The 4" version came with standard Magna's and those wouldn't be correct.
 
I've used sawdut and epoxy to fill in small missing chunks of old rifle stocks. Brownell's sells (or used to) little packets of dye for their bedding epoxy. Best to mix a little batch first, and see how it matches after it cures. Afraid I don't have any experience with the Mohawk putty.
 
I just recently repaired a set of Target stocks that had a chunk missing from the corner of the grip panel. First I cleaned and roughed up the damaged area to remove oil, dirt and dust. Then I used saw dust that I sanded off of similar color board I had in the workshop. I mixed the sawdust with Titebond glue, applied it a bit proud to allow for shrinkage and let it dry for a few days. After it was thoroughly dried I used sandpaper, a single edge razor blade and a very fine wood file to shape it. The color matched somewhat close and I added some black ink to simulate the grain that is throughout the grip panel. After that I used a high gloss polyurethane, sanded it lightly after it dried and put on another coat. After drying I lightly buffed it with a microfiber cloth and that was that. They came out very well.

Some people have good luck with Super glue and sawdust but I do not like how rapidly it cures - no appreciable work time.
 
...After it was thoroughly dried I used sandpaper, a single edge razor blade and a very fine wood file to shape it...
Lee Valley Tools has a really nice carbide scraper tool for fine fitting. It's pricey, mostly because of the handle, but the blades are available separately for about $12 and could be mounted in a suitable handle with a threaded tube set into it and a machine bolt.

50K6601-detail-hand-scraper-f-0359.jpg
 
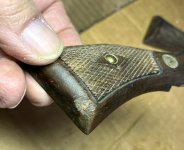
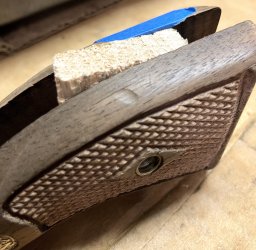
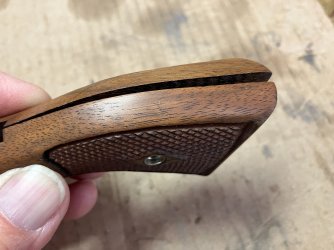
Do you have a piece or pieces missing from the ear of that panel? I think I see that in the pics.

Sometimes I glue in a piece of wood and file and sand to shape.
A shallow chip like this can often be done with a very thin wood repair piece that is pressed hard into the damage and glued in place.
I like super glue for this as it dries quickly, a few seconds to a minute.
It'll look crude when you you release the pressure however applied (tip of a screwdriver, old file surface, hammer face,,ect)
But now you can use the over hanging wood from the repair chip as filler for the remaining missing wood.
To do this, first clip any real long pieces of repair chip off.
Then place super glue onto the surface of the damage around the repair.
Then quickly sand the extra wood down to create a dust that will be packed into the remaining voids with that glue.

Use a coarse sand paper like 150grit or 180.
The glue and dust will set up FAST,,a few seconds and load the sand paper as well.

You will probably have a few voids to fill.
More glue and sand again. Quickly and aggressivly to create wood dust, that's why you use the coarse grit paper.
Use a garnet or even a flint paper. Anything other than one of the colored sand papers which will dump that color into the repair and glue.

If you have some voids that you can pack a wood chip into, do that instead of letting the glue & dust mixture fill the entire void. Then glue and ssand over those chips. They can add some grain and more varied color to the repair.
It only matters visually what's on the surface of the repair.

Keep going, using a new area on the sand paper of course as each time it will be loaded with dried glue and wood dust.

When done it should be a slightly higher mound of hardened wood, wood chip(s) and glue.
Now with med and fine cut files, shape it down to where it needs to be. The sand the surface to finish it up smooth. Back the sanding process with a hard surface, I always wrap the sandpaper around a file. But most any flat wooden or metal piece will do.
Sometimes on curved surfaces a rubber erasure works well to conform to those areas and not leave shatter marks.

The completed repair will likely be somewhat darker than the bare wood around it.But carefull staining and some faux graining with stains and acrylic or even oil based artists paints can make the repair disappear.

Then 'fix' your art work with a spray coating of a clear poly or laq.
I sometimes use thinned shellac applied with a tiny wad of paper towel very carefull. Just enough to protect the staining and coloring from the final finish being applied. Apply this quickly and in one stroke. Don't go back and forth over it if you use a brush or tuft of cloth to apply.
 
I use sawdust mixed with 2-part epoxy to do fills around inlays. Maybe you could generate some matching sawdust off the inside of the grips?
 
If you are sanding a similar color wood to create sawdust, why not just glue a piece of wood in place? Clean up the break with a sharp chisel or knife to create a smooth surface. Wipe a drop of glue across the surfaces and press together. Clamp for 24 hours. Shape to match the surrounding area. If necessary stain everything and then apply the finish of your choice.

We are out of town on business but when we get home I will post some images of repairs I have made. They look much better than dust and glue.

Kevin
 
I just recently repaired a set of Target stocks that had a chunk missing from the corner of the grip panel. First I cleaned and roughed up the damaged area to remove oil, dirt and dust. Then I used saw dust that I sanded off of similar color board I had in the workshop. I mixed the sawdust with Titebond glue, applied it a bit proud to allow for shrinkage and let it dry for a few days. After it was thoroughly dried I used sandpaper, a single edge razor blade and a very fine wood file to shape it. The color matched somewhat close and I added some black ink to simulate the grain that is throughout the grip panel. After that I used a high gloss polyurethane, sanded it lightly after it dried and put on another coat. After drying I lightly buffed it with a microfiber cloth and that was that. They came out very well.

Some people have good luck with Super glue and sawdust but I do not like how rapidly it cures - no appreciable work time.

This^^^^^^^^ you’d be surprised what you can do with magic markers from the dollar store.
 
If you are sanding a similar color wood to create sawdust, why not just glue a piece of wood in place? Clean up the break with a sharp chisel or knife to create a smooth surface. Wipe a drop of glue across the surfaces and press together. Clamp for 24 hours. Shape to match the surrounding area. If necessary stain everything and then apply the finish of your choice.

We are out of town on business but when we get home I will post some images of repairs I have made. They look much better than dust and glue.

Kevin

The way the chip was on my particular grip panel it would not have worked unless I squared it off and evened out the affected area to an even larger area. I actually did try gluing a piece in but it was just too ragged and irregular to get a good bond. Aside from which it is easier to color match the saw dust / glue mix than a piece of wood. The saw dust and Titebond glue mix can be formed into any irregular shape and actually develops a better bond. The mix I used was a bit funky to sand as glue doesn't sand easily - but I did get'er done - it just took a little time. Came out really nice and is quite strong too!
 
I wanted to update my original post. This first image is the damaged right stock. After the discussion here I bought a set of really bad stocks of a similar age and carved out a tiny chip. It was seemingly impossible to make a clean cut into the stock I wanted to repair, wood fibers were always loose so I just worked with the surface I had. After I had a micro chip ready, I made a thick mixture of wood glue and fine sanding dust and applied that to the new chip and the divot carefully keeping glue to a minimum. I also steamed out a dent on the back of the left stock. Once setup, I trimmed the chip close then finished with sandpaper. I also pointed up the checkering. The factory work was not exactly impressive. Finished it off with Tru-Oil. Im pretty pleased with my first attempt.
IMG_5809.JPG
 

Attachments

  • IMG_9427.JPG
    IMG_9427.JPG
    1.3 MB · Views: 0
  • IMG_7970.JPG
    IMG_7970.JPG
    1.9 MB · Views: 1
  • IMG_9422.JPG
    IMG_9422.JPG
    972.6 KB · Views: 1
Back
Top