Faulkner
Member
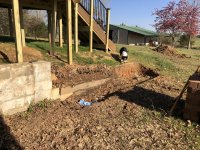
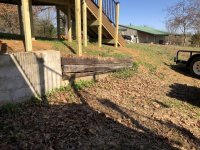
In a previous post I wrote about a deck rebuilding project I'd put off for four years that we finally completed about six weeks ago. Phase 2 of the overall project was to redo a 30 year old retaining wall made partly from cinder blocks and partly from railroad ties. Mrs. Faulkner advised me she was okay with the block part of the wall, but "those railroad ties have got to go!"
This project I decided to tackle alone. I must preface that I'm not a construction guy, my technical background is electronics/electrical. If it wasn't for YouTube University I would not have attempted this project on my own, but the information I gleaned from watching retaining wall training on YouTube was awesome.

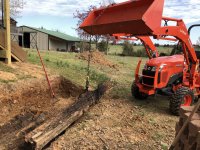
The new wall extension is 15 ft long and 3 ft high. I did all the digging by hand and had to be very careful about one of the supports on the new deck and made sure I shored it up just in case I dug too close to it. My initial estimate was that I would probably excavate about two loads of dirt into the front end loader bucket of my tractor. I needed to get at least six inches deep so I could put in a solid gravel base, and I wanted to dig out behind the wall about 14 inches to backfill with gravel as well. Well, I grossly miscalculated how much dirt I would excavate, instead of two tractor bucket loads I ended up digging out 15 bucket loads. All by hand and shovel.

Once I had dug out around the old railroad ties I was able to hook up to each railroad tie individually and gently pull them out so as not cause a cave in the undisturbed ground where the deck supports were. In retrospect, I probably should have rebuilt the retaining wall last summer well before we did the deck, but hindsight is always 20/20 on these things.
Once I pulled out the railroad ties I was able to dig out some more and square up and level the ground where the gravel base and drain pipe was going to be laid.

Once the ground was prepared and leveled I placed a ground mat down. I also wrapped the 4 inch PVC drain pipe with the ground mat then put it in place and shoveled in six inches of gravel on top. Once I raked the gravel base level I pounded it down with a 9 lb steel tamper, then I sprayed it down with water and let it sit overnight. Next morning I pounded it again confirmed it was all still level.
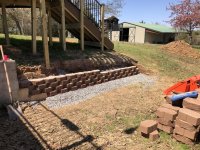
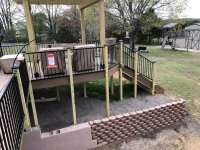
Now would be a good place to mention that I calculated I'd need 142 blocks for the wall. That's 142 blocks that a young fellow from the local Farmer's Co-Op helped me load on my trailer. The same 142 blocks that I unloaded from my trailer to the work sight, and 142 blocks that then had to be stacked, leveled, wiggled, and tapped into place. Because of the weird interface with the block wall, I also learned how to split the blocks with a block chisel and hammer.

As I completed a row of blocks I came back and shoveled in the gravel behind it. Since I had removed 15 tractor bucket loads of dirt from the area, it naturally took about the same number of bucket loads of gravel to fill it back in.
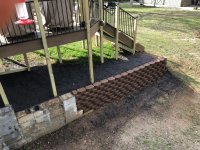
After I got all but the last row of blocks installed and leveled, I opened a tube of silicon caulk/glue for the caulk gun. All of the blocks so far would eventually be under pressure from the backfill, but I wanted to glue the top layer down so that they wouldn't accidentally get kicked off, specifically by a 6 year old grandchild. I let that glue set overnight, and the next morning I brought in the top soil to cover the gravel and seeded it with turf builder.

After I finished up and was putting away all my tools, I came back and hosed it all down to settle the dust. Mrs. Faulkner came out to inspect the project.
"Looks good honey, I like it" she said.
"Good deal," I replied. "It was a bigger job than I'd planned for."
"When are you going to paint the old block wall?" she asked.
I looked over at the block wall . . . "I wasn't planning to paint them."
.
This project I decided to tackle alone. I must preface that I'm not a construction guy, my technical background is electronics/electrical. If it wasn't for YouTube University I would not have attempted this project on my own, but the information I gleaned from watching retaining wall training on YouTube was awesome.
The new wall extension is 15 ft long and 3 ft high. I did all the digging by hand and had to be very careful about one of the supports on the new deck and made sure I shored it up just in case I dug too close to it. My initial estimate was that I would probably excavate about two loads of dirt into the front end loader bucket of my tractor. I needed to get at least six inches deep so I could put in a solid gravel base, and I wanted to dig out behind the wall about 14 inches to backfill with gravel as well. Well, I grossly miscalculated how much dirt I would excavate, instead of two tractor bucket loads I ended up digging out 15 bucket loads. All by hand and shovel.
Once I had dug out around the old railroad ties I was able to hook up to each railroad tie individually and gently pull them out so as not cause a cave in the undisturbed ground where the deck supports were. In retrospect, I probably should have rebuilt the retaining wall last summer well before we did the deck, but hindsight is always 20/20 on these things.
Once I pulled out the railroad ties I was able to dig out some more and square up and level the ground where the gravel base and drain pipe was going to be laid.
Once the ground was prepared and leveled I placed a ground mat down. I also wrapped the 4 inch PVC drain pipe with the ground mat then put it in place and shoveled in six inches of gravel on top. Once I raked the gravel base level I pounded it down with a 9 lb steel tamper, then I sprayed it down with water and let it sit overnight. Next morning I pounded it again confirmed it was all still level.
Now would be a good place to mention that I calculated I'd need 142 blocks for the wall. That's 142 blocks that a young fellow from the local Farmer's Co-Op helped me load on my trailer. The same 142 blocks that I unloaded from my trailer to the work sight, and 142 blocks that then had to be stacked, leveled, wiggled, and tapped into place. Because of the weird interface with the block wall, I also learned how to split the blocks with a block chisel and hammer.
As I completed a row of blocks I came back and shoveled in the gravel behind it. Since I had removed 15 tractor bucket loads of dirt from the area, it naturally took about the same number of bucket loads of gravel to fill it back in.
After I got all but the last row of blocks installed and leveled, I opened a tube of silicon caulk/glue for the caulk gun. All of the blocks so far would eventually be under pressure from the backfill, but I wanted to glue the top layer down so that they wouldn't accidentally get kicked off, specifically by a 6 year old grandchild. I let that glue set overnight, and the next morning I brought in the top soil to cover the gravel and seeded it with turf builder.
After I finished up and was putting away all my tools, I came back and hosed it all down to settle the dust. Mrs. Faulkner came out to inspect the project.
"Looks good honey, I like it" she said.
"Good deal," I replied. "It was a bigger job than I'd planned for."
"When are you going to paint the old block wall?" she asked.
I looked over at the block wall . . . "I wasn't planning to paint them."
.
Attachments
Last edited:
")


