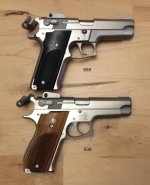
Installing ambi safety/decocker on 39-2 ?

bobmitchum

Member
Joined
Jun 30, 2017
Messages
10
Reaction score
12
I am getting a nice 39-2 shortly, and being a lefty wanted to know if it was possible to install a safety/decocking lever on the right side of the slide (I really hope so ...)
I believe I have already located the part/lever, but didn't know if it was a major or complicated job to install ....
Appreciate any advice and counsel, as always.
 
Register to hide this ad
There is no way to attach a right side lever to a single-sided safety body. You must replace the entire safety body with an ambi version and make some provision for lever clearance to the right side grip.
 
Yep, a right side lever cannot simply be attached to the single-sided safety of the Model 39-2, but a second or third generation ambidextrous safety can be fitted to the 39-2.
 
OK!!
Thank you all for responding - as long as I know I can install
an ambi from a Gen2/Gen3, that's the important thing !!
 
It can be a DIY project, just make sure it functions correctly, don't want it to drop the hammer before the firing pin is retracted and adequately blocked. :eek:
 
Appreciate the follow up - however, knowing "me" I would not
make this a DIY project (!!) however I will seek out a seasoned
Smith "smithy" who can perform this operation.
Again, thank you. Cordially,
 
Just one additional piece of advice, based on painful experience; I suggest you look for a Gen 3 ambi safety. The Gen 2 and aftermarket units I’ve seen are/were held together by a screw securing the right side lever. It will back out and fall off, allowing the lever to be lost too. :mad: can you guess how I know? :(

The Gen 3 version cures this problem with a spring and plunger arrangement that is much more secure. It may be a little harder to find one of these, but you’ll only have to find it once. ;)

Froggie

PS If you are at all handy, this is one of the easiest DIY jobs you can do on a S&W auto pistol.
 
You probably know already that the right grip panel will have to be modified for the right side lever. Another option is find 2nd Gen grips that were originally for the ambi.

Jim
 

Attachments

  • IMG_1275.jpg
    IMG_1275.jpg
    52.2 KB · Views: 26
FWIW, when the factory stopped teaching armorers to 'eyeball' the proper decocking timing, they gave armorers the numbers of 3 metal drill bits, using the non-cutting end of the bits as 'gauges' to check for Go & No-Go tolerances. The numbered metal bits were 0.078", 0.045" and 0.025". A friend of mine (senior armorer at that time) made me some pins of the proper sizes and installed them in short aluminum stock handles. I inherited his set when he passed, later.


This reminded me of an earlier time with an armorer instructor showed us how to use a couple of the original S&W cup-end pin punches to get in the right ballpark when fitting a new sear release lever on 69XX guns. It was shown because the old 'eyeball' way of checking fit/function involved pulling back on the already decocked spurred hammers and letting them snap forward (once or twice).

If the lever was within proper spec, letting the decocked hammer snap forward would make the already partly lowered safety/decock lever drop the rest of the way down. If it didn't make it finish lowering, then the sear release lever had to be removed and filed a bit more, and the test repeated (until it did).

It was naturally difficult to grasp the decocked spurless hammers to perform that test, although the oldest of the 69XX guns had flash chromed hammers with serrations on the top of the spurs, and those serrations could be grabbed with the edge of the supplied maple wedge so they could be pulled back the rest of the way to let drop. It was easier just to use the right sized pin gauges, positioned underneath the bottom rear corner of the L/S decocking lever, within the machined recess in the slide. (See the excellent pics in the first link in my previous post.)

Hence, using the properly sized pins/drill bits as gauges was an easier thing to teach armorers.

Bottom line, getting the decocking timing within the proper spec is critical for safety. Especially in the 1st gen guns, since they didn't have firing pin safety plungers. The release of the hammer needs to happen in the right 'timing' during decocking, so not only inner machined shoulders of the manual safety/decocking body can grab the corresponding shoulders of the firing pin, but the rear of the firing pin is also covered (and protected from impact) by the steel safety body as the assembly rotates.
 
Last edited:
First of all - thanks to all for the really comprehensive replies.
Given the possible complexities, safety issues due to 1st Gen,
I think I need to find a capable and competent smithy to do this work - I am in the SF Bay Area but if anyone has a recommend
(I am very patient customer, not double parked to get this done) for someone who knows the territory here, I'd welcome hearing about it.
Again, thanks to all for contributing and helping me to understand
this firearm, and this process, better.
Cordially,
 
Work done, got it back, VERY pleased !!!

Folks --
I sent my 39-2 (above) down to Bill Weir (BMCM) in Natchez, MS.
He is excellent, both to work with as well as his finished product.
Great communication, photos of in progress work, etc ... AND
when you get your item back - it's like opening a gift on Christmas morning.

It's carefully wrapped up in anti rust paper, old parts in a baggie, etc ... and better then what you expected.

I now have ambi levers on my 39-2, both sets of grips EXPERTLY altered to clear the right side lever, and he corrected some things I didn't even notice - a sign of a true gunsmith.

And - he seems like a pretty nice guy, too !


Bruce
 
Back
Top