Interesting info on cyanoacrylate glues

I was always bummed that after one use, the tube would harden or the cap would be stuck on the Super Glue tube.

Found out if you put the tube in a little zip lock bag and store it in the fridge, it lasts a long time. Been using the same tube over a year now.
One of the articles I read- maybe the one in link from my original post from our local tool store - also said to tap the bottle onto a solid surface to force the glue out of the nozzle and back into the bottle. Also good practice with wood glues, which always gum up the spout if not cleared.

Edit: Here's the blurb from my local tool store (KMS Tools):
Care & Keeping Of Cyanoacrylates

Although we provide a fresh product with a guaranteed two year shelf life, there are several things you can do to get the most from your KMS Cyanoacrylate Adhesives. Heat and moisture will decrease shelf life, so store your CAs away from accelerators and in a cool place that’s not exposed to direct sunlight. Unopened and well-sealed bottles can be stored in the fridge or freezer to maintain freshness. Make sure you let it warm to room temperature before you use it though.

When you first open a bottle of KMS CA adhesive, loosen the cap and retighten to relieve any air pressure that might be inside. This will decrease the chance of any leaking out when you open the tip.
Hold the bottle upright against a near vertical surface and cut off the top 1/32″ with a knife or razor blade. Avoid squeezing the bottle.

To prevent clogging, don’t let the tip of the nozzle touch a surface that INSTA-SET™, our CA Accelerator has been applied to. Before replacing the cap, or squeezing it to blow air up to clear the nozzle, rap the bottle down hard to move the CA remaining in the tip back down into the bottle. Now you can clear the tip and replace the cap.
 
Last edited:
SG makes a great poor mans LocTite as well.
But you have to screw the fastener(s) together quickly and don't hesitate as you do so when aaaembling them with the SG on the threads.
If you do the SG will freeze the parts right there most times and will take some heat to break the bond to get them apart.

Clear the surfaces of dirt and oil, Run the screw or nut on quickly and it will be pretty much a permanet assembly from then on.
Even a loose wood screw will tighten up nicely once replaced with a drop or two of the stuff on the threads and the screw put back in place.
But again, it won't come back out easily!

Using baking soda as an accelerant to cure it is quite handy.
I use it to repair broken out spots in checkering, building up the area. Then re-cutting the checkering thru it.
It has a milky white appearance in it's solid state and is as stated,,rock hard.
It will take some solvent stains and other coloring so can be blended into the surounding wood color.

It's an instant hardening of the SG when you sprinkle the baking soda onto the liquid SG. Add more SG and BSoda on to of what just hardened if it needs more building up.
File it, sand it, checker it , etc to shape.

Fill cracks in wood quickly with it by sqeezing the SG right into the crack, Then go right over it while still liquid with a piece of coarse grit clean sandpaper lightly to scuff up some surounding wood dust.
The dust will pack itself into the crack along with the still liquid glue and then the whole thing will harden in a few seconds while still sanding from the friction heat of the hand sanding.

Add more SG and repeat if more filler is needed.

The glue and sanding dust will also pack the surface of that sandpaper, but you are using a very small area of a piece and sanding only for a few seconds before the glue hardens with the wood dust packed into it.
Tear that off or move to a clean area on the sheet of sand paper when repeating the process.

Use a sandpaper that has a natural wood type appearance to the grit like a garnet or even a flint paper.
If you use one of the circus colored grit papers or even a black wet-or-dry type, that color will often end up in the finished repair as the SG will sometimes pull the color w/the grit off of the paper during the process.
 
Last edited:
If you are looking for something to use to glue gunsights onto a barrel I suggest you get a tube of fast cure black 5200. Works like a champ.
 
As I've gotten older my fingernails have gotten more brittle and now have ridges that grow up and down the length of the nail. The ridges are thinner than the rest of the nail and will splt, usually because of dinging the edge of the nail.

We use Loctite Super Glue Gel Control at work to bond accelerometers to parts for vibration testing. I bought some and applied a couple of thin coats to the ridges and splits on my nails. I apply it, wait a minute, and gently wipe it with a tissue, then re-apply. It stopped the nails from splitting.
 
If you are looking for something to use to glue gunsights onto a barrel I suggest you get a tube of fast cure black 5200. Works like a champ.
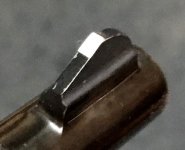
In a "shadetree gunsmithing" project I used it to attach two thin strips of metal to the narrow front sight on a replacement barrel for a Model 10 in order to widen it, then added a strip of Scotchlite reflective white tape.

(This pic was taken before blackening the edges)
attachment.php

CA Escapee said:
I bought some and applied a couple of thin coats to the ridges and splits on my nails. I apply it, wait a minute, and gently wipe it with a tissue, then re-apply. It stopped the nails from splitting
Brilliant. Now that's something duct tape CAN'T do.
 

Attachments

  • IMG_6432.jpg
    IMG_6432.jpg
    56.7 KB · Views: 152
re brittle ridges on fingernails

As I've gotten older my fingernails have gotten more brittle and now have ridges that grow up and down the length of the nail. The ridges are thinner than the rest of the nail and will splt, usually because of dinging the edge of the nail.

We use Loctite Super Glue Gel Control at work to bond accelerometers to parts for vibration testing. I bought some and applied a couple of thin coats to the ridges and splits on my nails. I apply it, wait a minute, and gently wipe it with a tissue, then re-apply. It stopped the nails from splitting.
There's a CA glue from BSI (Bob Smith Industries) that has a brush applicator :)

plastic_cure.jpg


Plastic-Cure™ is a gap-filling formulation of CA that works best on plastics. It is packaged in a bottle with a brush built into its top, which in many cases is an easier way to apply the CA...

Plastic-Cure is superior for the application of false nails and wraps on fingernails, where its brush is the preferred method of application.
 
Used a lot of it when I was building rc planes. One night and in a lazy mood, I was watching the tube while gluing up fiberglass inside an engine cowl and managed to spill a mess of thin ca all over my hairy thighs.I don’t know how anyone could endure a bikini wax [emoji15][emoji23]
 
Last edited:
Another use. I have applied it to new pistol geips as a finish.Wearung nitriail rubber surgical gloves ( CA wont stick to them)you can spread and work the CA on the wood . then sand ,and apply another coat spread and sand when dry until a smooth glass like finish is made. Very durable finish
Get the gloves at Harbor Freight
 
FASCINATING!!!!!

Thanks. I never knew the origin of the stuff or when it was invented. I just remember when it started being advertised in the 70s. 'They' said it was advertised on TV in the 60s but I don't remember that.
 
Back
Top