K-22 project

Joined
Jun 23, 2004
Messages
7,097
Reaction score
8,112
Location
Independence, OH, USA
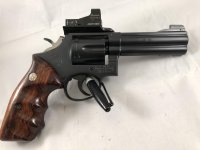
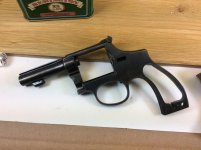
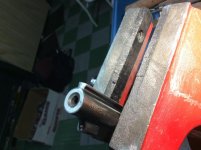
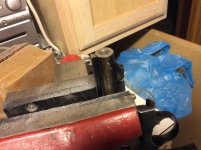
Found a Pre-17 with a bulged barrel and wanted a handy .22 for carrying when I hunt. Wanted to do a project to fill time in the day being retired. Some of you have done some cool projects over the years and figured it’s my turn. Should have started this a month ago when I had the barrel cut. A retired machinist bandsaw’d the Barrel at 3” and put it on a mill to square it off. The only tools I have are a vise, some files, drill, a Dremel, very basic hand tools. Worked on the muzzle with a safe file and filed the rib back some. Used a brass screw and grinding compound from the hardware to do the center of the muzzle and will file the outside edge with a file to make it look somewhat factory. Andy Horvath does a great looking factory muzzle.

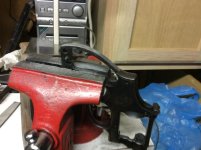
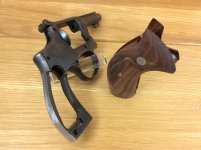
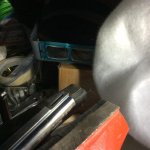
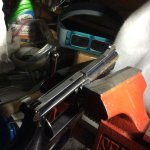
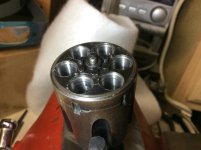
Had to fit an ejector I had to the cylinder, the timing was way off. Today the butt got rounded with a hack saw and some files. So far the grips fit the frame pretty nicely. The grips were salvaged from a set of hacked N frame sq and made to K round. It’s coming along.

Question for the experts. I want to put the serrations back where I filled the butt round, BGRAFSR lent me some metal checkering files. How do I set up a guide to keep the lines straight?? The checkering files sure seem to want to wander when I try freehand. I did body work for a living so I have some knowledge forming lines. Larry
 

Attachments

  • 625228A2-A7C9-4C5A-A581-5195EA489A71.jpg
    625228A2-A7C9-4C5A-A581-5195EA489A71.jpg
    58.3 KB · Views: 290
  • B9B1E7FC-7B4E-4CF0-9A59-C6301545A3A7.jpg
    B9B1E7FC-7B4E-4CF0-9A59-C6301545A3A7.jpg
    63.2 KB · Views: 296
  • FC318C13-4CCD-4F78-978E-FFE08D76AA73.jpg
    FC318C13-4CCD-4F78-978E-FFE08D76AA73.jpg
    55.1 KB · Views: 340
Last edited:
Register to hide this ad
Clamp a piece of wood or metal to one side of the grip frame for a file guide. You could use a dovetail front sight for an easy way to replace that.
It's looking good. Your bodywork experience will help a lot on this project.
 
Looks like you're off to a great start.

When you set up your guide for filing the grip strap grooves you'll want them centered on the grip strap. So you may have to use a thin spacer between the file guide and the grip frame to adjust where the grooves are located. Do you have a checkering file of the correct lines per inch to match the original grooves?


For the front sight, if you want to use the factory front sight and a factory look:

Was the sight blade and base pinned to the barrel thru a tab (tenon) under the sight base?

If so, your friend can mill a slot (mortise) in the barrel rib to reinstall the original sight.

If the front sight base was integral with the barrel, hack saw the original sight and base out of the barrel stub. Leave the full thickness of the barrel under the sight base. Your friend can mill the underside of the base to leave a half moon shaped tenon from the barrel material left under the sight base. This is when you'll leave the base a little taller to raise the front sight to compensate for a shorter barrel.

Then mill the barrel rib grooves off the front end of the barrel rib to create a 'shelf' for the bottom of the sight base to nest. Mill the mortise, and pin the base in place thru the tenon.

Hope that helps,
 
I have the old Patridge front sight & base and will probably re-use it. This will be a Gun for close range pheasants if the shotgun doesn’t do what is needed. The barrel looks not square so will go to another closer retired machinist soon. May have to redo the crown. Will see if he has something to mill a slot for the sight. Can’t remember where I put the pin for the sight.

The gun will be cold blued with Nu Blue, will use the heat gun from the body work days to heat it up when blueing. Trying to keep the cost down on this gun, if it falls in the mud or snow I won’t be mad.

The metal files are single groove so each groove will have to be close. Will have to think it out and find something as a guide. Larry
 

Attachments

  • 35F40DCD-AAA4-42AD-84FD-872B0F6778E5.jpg
    35F40DCD-AAA4-42AD-84FD-872B0F6778E5.jpg
    63.6 KB · Views: 158
  • D5740CF5-BC14-4F13-910B-C878F1621CA3.jpg
    D5740CF5-BC14-4F13-910B-C878F1621CA3.jpg
    68.3 KB · Views: 157
I have the old Patridge front sight & base and will probably re-use it. This will be a Gun for close range pheasants if the shotgun doesn’t do what is needed. The barrel looks not square so will go to another closer retired machinist soon. May have to redo the crown. Will see if he has something to mill a slot for the sight. Can’t remember where I put the pin for the sight.

The gun will be cold blued with Nu Blue, will use the heat gun from the body work days to heat it up when blueing. Trying to keep the cost down on this gun, if it falls in the mud or snow I won’t be mad.

The metal files are single groove so each groove will have to be close. Will have to think it out and find something as a guide. Larry
If you can't find the barrel/sight pin, IIRC, you can adapt a #54 drill bit (.055" dia) using a Dremel cutoff to the correct length, then round the ends and leave the pin/drill a little proud of the sight base.
If you have to machine a slot for a keyed sight, be sure to clamp the barrel and frame very securely to avoid chatter which will mess up the slot or maybe break a cutter.
Same for drilling the hole for the pin. Use a carbide bit and peck the hole, or the bit might leade off or break.
Get some soft vise jaws too, or just clamp or rubber glue some soft aluminum strips or leather between the jaws of the vise and the gun.
Have fun and show us the final result!
 
To extend the back strap grooves,,polish the reshaped area to a final finish. That is, remove any file marks and heavy grit marks. You want them gone so you don't have to try and polish them away after the lines are re-cut.

Lightly cross polish the strap, with something like 600 or 800 or even a scotchbrite pad. Normally the finish polish will be length wise,,but for the next step you want to lightly go cross wise on the strap. Don't overdo it and round edges. Just put a light polish on it.

Next take a dividers,,the compass type instrument that you can drag down the backstrap and score the lines into the metal that will be the extensions of the orig serrations.
Do this carefully and don't be lightweight about it. Score them in deeply.
That cross-polished surface will show up the scored lines very nicely no matter how the light hits it while working on it.
The scored lines have a tendency to hide in the lengthwise polished surface.

Now carefully trace and cut each of those lines with a single edge file.
Start where the orig line leaves off and file towards the butt of the pistol.
Don't try to start at the bottom and make your new line catch the old one,,that's asking for trouble.

A nice file to use is a simple triangle file with one of the flats ground completely smooth. That leaves you with a knife like edge with file teeth on it to trace and cut a very fine line. It is easy to keep and hold in your orig cut as you retrace it.
It will widen the cut if tilted one way as it still has teeth on one side,,only one flat was ground 'safe'.

No need to go very deep this first round. Just get them all cut and spaced well. should go easy as they are on a convex surface of the backstrap. The concave surfaces require special curved tools.

Once they are all cut, even and spaced to your satisfaction, you can go back over them and widen and deepen to match the original serrations on the grip.
As a final touch up, run over the entire surface with a motorized wire wheel to even up the newly filed surfaces with the orig cuts. Then give the entire backstrap a very light lengthwise polishing with 600 backed with a block to brighten it up a bit.

As far as the muzzle is concerned,,you can chase the squareness of those around and around all day long if you are using a machinists square. All that you accomplish is cutting the bbl shorter. The bbl is very slightly tapered so the square will always show you that some matl needs to be filed off of the opposing edge no matter where you take a reading.
Trust your eye-ball reading. Then when your are sure it's right, leave it and pick it back up later and check it again. You'll probably make an adj,,maybe not (I usually do!)
Use a fine cut narrow file to put a crown on the muzzle from the outer edge. You can use a 1/2 round pointed file, a small one very carefully to file in the inside radius to the crown to finish it. Careful you don't nick the bore with the tip of the file as you work, this is very short strokes and somewhat tedious work.
Finish with grit paper rotated w/your thumb and heal of your hand. A piece of tape around the bbl right at the edge of the outside of the crown gives a nice clean edge there and also protects the bluing.
Don't forget to square and polish the front edge of the rib too.
 
The barrel looks not square so will go to another closer retired machinist soon. May have to redo the crown. Will see if he has something to mill a slot for the sight. Can’t remember where I put the pin for the sight. Larry

It's difficult to mount the tapered barrel squarely to mill the muzzle. Best way is reference off the bore which is straight. Use a tight fitting range rod sticking out of the bore and check with a level in two planes to confirm that it's perfectly vertical or horizontal, depending how you mount it for milling.
 
Last edited:
I have not purchased checkering files but always have thread files in the tool box for other purposes. The thread files can be used to lay out the back strap lines. Determine the lines per inch with a thread gauge then take the appropriate thread file, engage the file teeth in the existing back strap grooves, and cut new grooves around the rounded grip section. It is easy to keep the wider file straight with the back strap. After you have decent lay-out marks, deepen with a three square file.
 
Well, working on it between what life brings along. The pics show 2 grooves done, now have only 2 left to do. Using masking tape as a guide and it’s actually working. Moving the light around helps with angles as the file is used. The opta-visor helps but you need to get fairly close see clearly. Is there anything else to magnify and you don’t have to be so close?. Going slowly and learning a lot. Just getting the grooves lined up right now and will make them deeper after I do the last 2. Have 2 more guns I want with round butts so I started with the one I don’t care much about.

The last project will be a .327 with a 3” full lug bbl. Andy Horvath has the cylinder to ream, not sure how long he will have it. Larry

Using the coarse checkering file now and have a medium & fine also.
 
Last edited:
Well, working on it between what life brings along. The pics show 2 grooves done, now have only 2 left to do.

The last project will be a .327 with a 3” full lug bbl. Andy Horvath has the cylinder to ream, not sure how long he will have it. Larry

Using the coarse checkering file now and have a medium & fine also.

Bravo!

I don't see any photos but sounds like you're making progress.

However, reaming the cyl for 327 is a lot easier than cutting the grooves in the grip strap. You can rent a reamer (or buy) and ream the cyl in about 20 minutes. It's the easy ream job there is.

Of course you'll get a lot of personal satisfaction doing the hard part yourself.
 
That would be neat to ream it myself. Should have said that I gave Andy a .22 cylinder to make into a .327 cylinder. Remember I don’t have a lathe, just basic hand tools. The .32 that will be made will start as a model 15. Larry
 
Done working on the grooves on the back strap. This really plays with your eyes. Would like to try stippling next to see of its easier. The retired machinist cut a groove in the rib on the bbl for the front sight he changed 50.00, guess he values his time. Said it was a slow process, he did a great job on it.

Next on project .22 is a reblue with Nu-blue and a heat gun. Then a reassembly. Have the internal parts soaking in acetone to clean them. It’s an early 50’s pre 17. Will use a 13 lb rebound spring in it when assembled. Have one month to finish before hunting season.

Andy Horvath called and said the cylinder was done. He turned a .22 cylinder into a .327 cyl. Tried some factory .327 in it and they seemed to fit nicely. Set it aside till this project is done. Larry
 

Attachments

  • 09A01915-CD6E-4E9C-B912-016300326703.jpg
    09A01915-CD6E-4E9C-B912-016300326703.jpg
    72.5 KB · Views: 118
  • 8D7E65C3-2D5C-49FE-95D9-336504AE14C2.jpg
    8D7E65C3-2D5C-49FE-95D9-336504AE14C2.jpg
    64.2 KB · Views: 112
  • DCDCA845-7EE0-408B-B552-D88A77DDADE3.jpg
    DCDCA845-7EE0-408B-B552-D88A77DDADE3.jpg
    85.1 KB · Views: 110
  • DF39273E-BE23-4294-889A-5457AF1F7C60.jpg
    DF39273E-BE23-4294-889A-5457AF1F7C60.jpg
    47.9 KB · Views: 108
I have the old Patridge front sight & base and will probably re-use it. This will be a Gun for close range pheasants if the shotgun doesn’t do what is needed. The barrel looks not square so will go to another closer retired machinist soon. May have to redo the crown. Will see if he has something to mill a slot for the sight. Can’t remember where I put the pin for the sight.

The gun will be cold blued with Nu Blue, will use the heat gun from the body work days to heat it up when blueing. Trying to keep the cost down on this gun, if it falls in the mud or snow I won’t be mad.

The metal files are single groove so each groove will have to be close. Will have to think it out and find something as a guide. Larry


Sounds to me like this is one gun that really needs a partridge sight! :D:D:D

I’m reading this thread with great interest. It seems to me that you are making the proverbial silk purse (potential for salmonella notwithstanding) and I think you will end up with a personalized gun that will be a valued friend and companion. Rock on, my friend. :cool:

Froggie
 
Those back strap grooves (and the rounding that necessitated their re-cutting) look great! :D This is going to turn into another of those “guns S&W should have made” that when finished look like they did. :cool:

Looking forward to hearing more about your latest 327 project as well. I’m thinking that the Model 15 will be a good donor gun if the barrel you choose lines up on the top strap to rib (with regards to width) and at the yoke region as well. I had to use a Model 14 donor gun for my faux Model 16 to get everything to line up. I had bought a Model 15 to use, but it cleaned up so nicely I had no problem finding a home for it. ;) What are you planning on doing for the barrel on this project?

Keep us in the loop with lots of pictures of both projects... we LOVE pictures! :)

Froggie
 
Found a 4” 16-4 barrel that will be cut to 3”. Should be cool when done but want to save money on this one by not giving it to Andy to do. If I have problems, it will go to Andy. Larry
 
This one started out on a Model 15 frame. Just as you're doing I used a .22 cylinder and a 4" Model 16-4 barrel. I didn't save any money and had Andy do the work. It turned out well and I'm very happy.
 

Attachments

  • IMG_0498.jpg
    IMG_0498.jpg
    66.6 KB · Views: 39
Back
Top