Latest guitar work project. Final Update this guitar in post 23

Joined
Apr 24, 2013
Messages
6,704
Reaction score
19,564
Location
Meadows Place, Texas
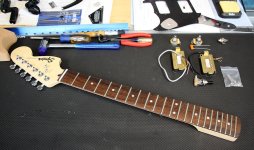
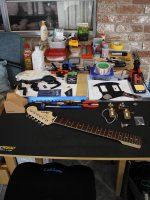
I've been waiting on parts to come in before starting on this particular guitar. It is one of the entry level Squier pieces that was dropped onto the bottom strap button, pushing it in a 1/8th inch. I had already drilled out and installed 1/2 inch oak plugs to remount both strap buttons and changed out the saddles to vintage telecaster style but with intonation. However, the list of issues/upgrades wanted on this one was a bit longer.

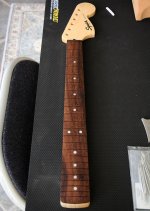
The fingerboard was supposed to have a 9.5 inch radius but is closer to halfway between 7.25 and 9.5, and the fretwork left a lot to be desired. It has loads of fret buzz all over. I also wanted to change out the plastic nut with a bone and the standard tuners with split shaft tuners off a Affinity level Squier. I will be pulling all the original electronics out and replacing them upgrades such as CTS, Puretone, Wilkinson, etc.

Spent yesterday evening pulling the stock nut and the frets off the board. Then I sanded it down to a proper 9.5 inch radius going through 60, 150, 220, and 400 grits. I gave it a light coat of lemon oil to make cleanup of the superglue easier when I install the new frets. I know they went to laurel wood on the fretboards as it is cheaper, and it definitely is not rosewood. But, it is not bad looking at all.

As I get more done on it I will post a new thread now and then.
 

Attachments

  • LaurelFingerboard.jpg
    LaurelFingerboard.jpg
    80.6 KB · Views: 78
Last edited:
Register to hide this ad
I've been dabbling in it myself.
I cannot say mine is even as dignified as the squire as it's squirted from a roll of plastic filament.
It's interesting though. first you approach it for the novelty of a 3D printed instrument, then you revisit it with much greater respect as these things punch well above their weight.

IMG-20250111-124237086-HDR.jpg
 
I've been dabbling in it myself.
I cannot say mine is even as dignified as the squire as it's squirted from a roll of plastic filament.
It's interesting though. first you approach it for the novelty of a 3D printed instrument, then you revisit it with much greater respect as these things punch well above their weight.

There are usually multiple paths to reach the same destination.:)
 
Well, you get what you pay for, and sometimes even highly rated tools turn out to be duds. Got the frets installed and leveled. Went to crown them before dressing the fret ends and the inexpensive tool I got for that does not do much anything. So now I am waiting for a better, more expensive crowning file to come in. Hopefully the 15 5-star ratings are a better indicator of this one's function.:D Live and learn. Guess I will work on the electronics while I wait.
 
Last edited:
I always dress (level) the frets, when the strings are on, tuned up,
and the guitar's truss rod adjusted, if it has one.
Crowning/shaping is another task.
I only had to glue a fret in once, when the rosewood was too soft,
in that one slot, on the treble side.
Different tang widths, can be used, to bow a neck back, when the adjustable truss rod is broken.
Correct string gauge, is important to pull it up straight.

Pic of the back of my white Tux jacket.
Just turn around, don't miss a beat,
and answers the question.
Just kidding about the Tux, it's a picture hanging in a buddy's
NYC theater, that has lotsa live music.
I gifted it to her as a birthday gift for her 75th.
 

Attachments

  • SOPSAX2.jpg
    SOPSAX2.jpg
    27.9 KB · Views: 29
Last edited:
John, you probably addressed this in an earlier post, but do you play guitar as well, or is it that you just enjoy restoring them?

I don't play any musical instruments at all, but I do often find them beautiful as objects. E.g., violins or saxophones. I could see having a musical instrument or two around primarily for display.
 
I always dress (level) the frets, when the strings are on, tuned up,
and the guitar's truss rod adjusted, if it has one.
Crowning/shaping is another task.
I only had to glue a fret in once, when the rosewood was too soft,
in that one slot, on the treble side.
Different tang widths, can be used, to bow a neck back, when the adjustable truss rod is broken.
Correct string gauge, is important to pull it up straight.

Pic of the back of my white Tux jacket.
Just turn around, don't miss a beat,
and answers the question.
Just kidding about the Tux, it's a picture hanging in a buddy's
NYC theater, that has lotsa live music.
I gifted it to her as a birthday gift for her 75th.

I made sure the neck was straight before sanding in the 9.5 radius. Once I got the frets in I checked for straightness and adjusted the truss rod before leveling. I will adjust the truss rod for a bit of relief after I get everything else done and the strings back on, in tune, and stable.

One of my projects is a early '60s single pickup kids starter guitar with a 'steel reinforced neck' and no adjustment. The action height on it is about 4 to 5mm. Just like you said, I plan to get some oversize tang frets as well as normal frets of the same height and install however many oversized are needed to get the neck to just past straight with no string tension. They also managed to place the bridge on the body by measuring from the nut instead of the zero fret, so the intonation is way off. Plus the bridge is a simple metal bar with string slots lightly filed into it. I am going to install a Les Paul style intonating bridge and get everything measured up right.

I like the idea of using string gauge to get the right relief without a truss rod. Nice thought.
 
John, you probably addressed this in an earlier post, but do you play guitar as well, or is it that you just enjoy restoring them?

I don't play any musical instruments at all, but I do often find them beautiful as objects. E.g., violins or saxophones. I could see having a musical instrument or two around primarily for display.


At this time I do not play. It really tickles the fancy of the tech in me to do this kind of work. That feeling probably comes from my paternal grandfather who was a carpenter and worked with his hands and brain all his life. I have given thought to learning how to play. It would be interesting to see if I have the coordination to match up the left and right hands on the strings.:D
 
I can understand the geometry of Relief, for someone that uses a capo,
and just strums basic chords.
Never had a guitarist who wanted anything but a correct neck angle,
to the body, easy on a bolt on neck, a dead straight fingerboard,
and a slight lowering down, on the last few frets, as necessary.
Accomplished Rockers, Country, Jazz etc etc.
 
The old style Les Paul type bridges, would bend concave.
I forget who made more robust bridges long ago.
Back in the early '70s, the crew at CBS/Columbia/Epic, would send the
new hopefuls, over to the shop, to install six piece bridges,
on Telecasters etc etc, so they played in tune.
 
Extremely satisfied with how the frets turned out. Everything straight and level with the long bar. Also checked with a fret rocker and all good. Smooth and silky edges all the way up and down. Installed the upgraded split shaft tuners that were brand new takeoffs from someone else project, as well as better string towers. Still waiting on a flat bottom bone nut since the blanks I bought a while back are all pre-radiused for a Fender neck. Electronics laid out and ready to wire up.

Adding a pic of the 'work table' here in the sunroom.
 

Attachments

  • FretJob.jpg
    FretJob.jpg
    145.7 KB · Views: 21
  • GuitarWorktable.jpg
    GuitarWorktable.jpg
    94.1 KB · Views: 23
Looks like work...looks ;ole you know what you are doing too. Back when we were playing music in the knife and gun clubs(Country bars) I couldn't afford electric guitars...and in fact we sometimes had to vacate the premises fairly quickly...We were all underage and playing for beer. I recently bought a Fender and have been practicing a bit. . Your work looks great
 
Did some more work while the forum was down. Getting close to the finish line on this Squier. Attached pics of the new pick protector with all new electronics wired in and shielding added to everything. The bone nut blank came in and I started working on shaping it. The old nut when I checked it still sets up just fine with the new frets so I used it as a template to trace onto the new nut. I still have one of the old platen glasses from the copiers I worked on before I retired. Has been quite handy for sanding anything that needed a truly flat surface. 5mm thick tempered glass with all edges rounded and smoothed from the factory. I kept one of the scratched ones pulled off a copier years ago.
 

Attachments

  • Squier1.jpg
    Squier1.jpg
    162.5 KB · Views: 13
  • Squier2.jpg
    Squier2.jpg
    127.6 KB · Views: 12
  • Squier3.jpg
    Squier3.jpg
    116.2 KB · Views: 12
Whenever bone blanks hit the grinder I donned a mask.
I used a Dremel with a sanding barrel on the outer edges of the blank until I got close to the pencil outline. I had a fan blowing the dust away from me. The rest of the sanding was done with a large piece of 150grit on that glass platen I mentioned before. Used the vacuum cleaner to suck all the dust up after.
 
Final update in this Squier. Spent a couple hours this morning and a couple more this evening finishing it up. A lot of that time was getting the setup just the way I want it. Here is a list of what all I did to it. I basically took the lowest level of guitar that Squier makes for Fender and turned it into a high mid level guitar.

Repaired the damage from the guitar being dropped on the strap button with hardwood plugs.
Fixed the improper radius of the fretboard by sanding to a 9.5inch radius.
Replaced all the frets.
Upgraded the plastic nut with a bone nut.
Upgraded the standard tuners with split shaft takeoffs from a Affinity level Squier.
Upgraded the string trees.
Modified the stock bridge to turn it into a Tele style 3-saddle(intonating) bridge
Upgraded all the electronics and wiring:
Wilkinson M Series Alnico V humbuckers
CTS potentiometers
Truetone output jack
Les Paul style Mojotone 3-way toggle switch
New black 3-ply pick guard to replace the single ply white one.

All the fret buzz is now gone. It was quite satisfying to run all the way through each strings frets and have them all ring out true and without buzzing. This experience gives me the confidence to move to the 2nd guitar I am going to try and restomod to playable condition.

I think I spent about $120 in parts on this one. I did also spend a couple hundred on tools and supplies but since I will be doing multiple other guitars, 2 on hand with another on the way, I do not count that in the cost. For those that have followed this, thanks for the support. See you in the next guitar's post.
 

Attachments

  • SquierMustangUpgraded.jpg
    SquierMustangUpgraded.jpg
    205.2 KB · Views: 7
John and I have shared several DMs about this and I am impressed with his attention to detail, his not cutting corners and the research and thought he put into replacement parts.

All this from a guy who doesn't play and has never done this before.

I doff my cap to you.
 
Last edited:
John and I have shared several DMs about this and I am impressed with his attention to detail, his not cutting corners and the research and thought he put into replacement parts.

All this from a guy who doesn't play and has never done this before.

I doff my cap to you.
One thing that Dad taught me that I totally agreed with, "If a job is worth doing, it is worth doing right." I try to do that as much as is within my abilities.
 
As someone who has worked on electric guitars for close to 60 years, looks to me like you are learning the right way with the right stuff. Thumbs up!

I have a Danelectro (Korean U2) that has been thoroughly reworked like your Squier, fun guitar. Latest change is putting plain strings on the bottom 3 (11, 14, and 10 iirc) for a fake-Nashville-strung effect. Amazing sound, so long as you stay clean and use a compressor.
 

Latest posts

Back
Top