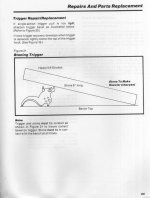
That's correct. Very little movement, moderate down pressure, and constant contact between the stone and the trigger bevel and the stone end with the bench top. I always coat the bevel with Dykem or Sharpie marker periodically so I can visually monitor the stone's cutting progress.
Norton medium India stone is the one used and provided in the armorers school tool assortment. The stone's type, length and grade are critically important.
NORTON 6" X 1/2" X 1/2" INDIA STONE | Brownells
The repair is very simple really. It involves re-sharpening the edge on the trigger bevel. The trick is to use the proper stone, and to stone it at the factory angle. You'll need a 6" medium India stone, (the stone length and grade is very important) and a flat clean surface to work on. I use the kitchen counter, but don't tell my wife. Don't try to repair the cocking notch on the hammer. If the SA hammer notch is toast, it's best to buy a new hammer. The following is what the armorer's school teaches.....
Only remove as much material as is necessary to restore a very sharp edge.
To start, the bevel end and edge should be degreased and made clean. After cleaning, I take a look at the bevel edge with a magnifier to see how bad/dull it is. After checking the edge, I apply some Dykem, or ink from a Sharpie permanent marker to the area where the material will be removed….basically that area along the edge, and on the flat surface directly behind the edge.
After marking, just set up the trigger on the bench as shown in the drawing. On preparing to move the stone, hold the trigger between your index finger and thumb….hold the trigger down firmly and squarely so that it is resting on the hammer hook and the bottom of the tang as shown. Trigger should be at 90 degrees to the table top. The stone moves from right to left in short strokes. (if you are right handed. If you're left handed, you can reverse the trigger and stone and go the other direction)
Place the stone on top of the bevel and while holding the trigger in the position shown in the drawing, make a short 1 to 1.5" stroke across the top of the bevel edge. (start at the end of the stone….the illustration shows the stone in place at the end of the stroke, not the beginning) Pressure on the stone should be directed mostly at the end over the trigger bevel, but use caution to keep both ends of the stone down on the table as the stoke is made. This is crucial to keeping the proper angle. Heavy pressure on the stone is not required.
Make three or four of these short strokes and check your progress in removing material toward the edge of the bevel. (use a magnifier) Continue applying Dykem or Sharpie as you check the work. You should continue this procedure until the dull edge has been sharpened along it's entire surface. Check periodically with a magnifier.
Once this sharp edge has been restored you're done. Just clean up the trigger so that no residue from the stone, or metal chips remain.
Remember, full length rebound springs will usually give a slightly heavier SA pull that reduced weight ones. After re-assembly, be sure to function and safety check the gun
and check the trigger pull with a quality pull gauge. S&W recommends a 3 pound trigger pull.

![20211114_175800[1].jpg](https://cdn.smith-wessonforum.com/attachments/447/447318-6d0206481d14fbabe985ce3daf983a72.jpg?hash=y3OhFmgSPn)
![20211114_175206[1].jpg](https://cdn.smith-wessonforum.com/attachments/447/447320-84abcbdb0433e4776129322961cb3525.jpg?hash=-WFZ-IFdq-)
![20211114_183937[1].jpg](https://cdn.smith-wessonforum.com/attachments/447/447325-1da1c935f66de66f47f3ebcb64bed0e5.jpg?hash=zdoPimHf6p)
