My first "push off" repair, model 19

Joined
Feb 16, 2021
Messages
1,644
Reaction score
6,049
Location
Green Valley AZ
19-2 shipped to the Buffalo NY PD in 1966 had scary touchy SA when I got it and would push off with a little effort.


I read up on the condition and possible repair, determined the sear had been rounded off and gave it a shot, now has smooth action and no push off with considerable pressure.


Very satisfying.
 

Attachments

  • 20211114_175800[1].jpg
    20211114_175800[1].jpg
    122.6 KB · Views: 160
  • 20211114_175206[1].jpg
    20211114_175206[1].jpg
    44.8 KB · Views: 212
Register to hide this ad
Many of the "push off" conditions, particularly in older revolvers, are from modification of the factory installed rebound spring by cutting coils or, by using aftermarket, lower rate, rebound slide springs. In many of these cases, where tampering, wear and tear, or modification of the hammer and/or the trigger are not involved, replacing the defective rebound spring will often have the desired affect without any further modification. Very light single action trigger pulls, as you mentioned, are a good indicator of the "push off" problem.

If the springs are judged to be ok, then sharpening the trigger bevel is the standard remedy for this problem, as long as the single action hammer notch is in-tact. The factory teaches a bench top method for sharpening the bevel, which maintains the proper angle. They recommend using a Norton 6" medium India stone for this repair.

Congratulations on doing the proper research and successfully repairing the problem yourself. Be sure to verify your work with a quality trigger pull gauge. S&W recommends a three pound single action pull.
 
Last edited:
Many of the "push off" conditions, particularly in older revolvers, are from modification of the factory installed rebound spring by cutting coils or, by using aftermarket, lower rate, rebound slide springs. In many of these cases, where tampering or modification of the hammer and/or the trigger are not involved, replacing the defective rebound spring will often have the desired affect without any further modification.

If the springs are judged to be ok, then sharpening the trigger bevel is the standard remedy for this problem, as long as the single action hammer notch is in-tact. The factory teaches a bench top method for sharpening the bevel, which maintains the proper angle. They recommend using a 6" medium India stone for this repair.

Congratulations on doing the proper research and repairing the problem yourself. Be sure to verify your work with a quality trigger pull gauge. S&W recommends a three pound single action pull.


Thanks! I used that method, but used a 7" vintage Sears stone, because it was what I had. It took 5 passes and provided a nice clean even sear.


I will check the pull, but it feels like some of my favorite older revolvers.
 

Attachments

  • 20211114_183937[1].jpg
    20211114_183937[1].jpg
    80 KB · Views: 120
I agree, replacement aftermarket or modified springs MAY be the cause for pushoff. I almost had a stroke with my first M27-2. I checked it thoroughly before I bought it. After a little spring replacement, I had a very nice trigger, but then it pushed off! Back went the factory trigger return spring and no more push off. Lesson learned!

However, sometimes it's not that easy, so be safe and be sure. Triggers are not something to fool around with!
 
I had a really bad push-off thing going on with my 686-3. Luckily I live close to Frank Glenn and he did it while I waited for $25. No problems since.
 
Could one of you share the method used to do this repair ?


There is a video on YouTube that describes the process.


I don't recommend it unless you fully understand the decision process to determine that this is what needs to be done.


I used a hard surface to keep the trigger from moving up and down and shorter strokes with the stone to keep the angle as true as possible.


[ame]https://www.youtube.com/watch?v=0mvpBmlx54o[/ame]
 
Several omissions and errors in this video.

You should never operate/cycle the action under spring tension....or check for push off, with the sideplate off. And, without marking the bevel during stoning (Dykem), and checking it periodically with a magnifier, it's nearly impossible to tell when the correction is complete, and the bevel is sharp. It's very important to only remove the amount of material necessary. This is not as critically important when resurfacing the MIM trigger bevel, but is very important when stoning a case hardened trigger, as the hardened surface is very thin.

He also doesn't mention checking the cocking notch in the hammer for damage prior to the repair.....and doesn't check the trigger with a pull gauge to verify it is safe after the repair is completed. (3+ pounds)

He states that this condition (push off) can only be caused by wear, or improper modification of the parts. There are other factors that can contribute to this condition, including weak, damaged or altered rebound spring, excessive gauge on the hammer and or trigger studs, and excessive sideplay on the hammer or trigger. These conditions should also be checked out before the repair.

Caution: Another important thing I didn't hear him mention is that this repair only works properly, restoring the proper angle to the trigger bevel, if you use the proper Norton 6" medium India stone.
 
Last edited:
Caution: Another important thing I didn't hear him mention is that this repair only works properly if you use the proper 6" medium India stone.[/QUOTE]


Just curious, if I use a 7" stone (like I did) and start at the 6" spot on the stone, it's the same thing yes?


Thanks.
 
If you are interested, here is the page from the S&W Armorers Manual.

Stu
attachment.php
 

Attachments

  • Trigger stoning.jpg
    Trigger stoning.jpg
    43.8 KB · Views: 314
I was under the impression that it was possible to stone the trigger to sharpen the bevel, but that the SA notch on the hammer should NOT be touched, if the problem/damage is determined to be that then replace the hammer.

Is this true?
 
Last edited:
I used this procedure to fix a "touchy" model 15 and it worked great.

I have a 27-2 with push off and I want to understand the correct way to stone the trigger hook. From what I can see, one end of the 6" stone stays in full contact with the bench. The left end of the stone makes contact with the trigger, then the stone is stroked to the left until the left hand end of the stone lines up with the tip of the trigger (6-8 times)--correct? Basically about an inch of movement?
 
That's correct. Very little movement, moderate down pressure, and constant contact between the stone and the trigger bevel and the stone end with the bench top. I always coat the bevel with Dykem or Sharpie marker periodically so I can visually monitor the stone's cutting progress.

Norton medium India stone is the one used and provided in the armorers school tool assortment. The stone's type, length and grade are critically important.

NORTON 6" X 1/2" X 1/2" INDIA STONE | Brownells


The repair is very simple really. It involves re-sharpening the edge on the trigger bevel. The trick is to use the proper stone, and to stone it at the factory angle. You'll need a 6" medium India stone, (the stone length and grade is very important) and a flat clean surface to work on. I use the kitchen counter, but don't tell my wife. Don't try to repair the cocking notch on the hammer. If the SA hammer notch is toast, it's best to buy a new hammer. The following is what the armorer's school teaches.....

Only remove as much material as is necessary to restore a very sharp edge.

To start, the bevel end and edge should be degreased and made clean. After cleaning, I take a look at the bevel edge with a magnifier to see how bad/dull it is. After checking the edge, I apply some Dykem, or ink from a Sharpie permanent marker to the area where the material will be removed….basically that area along the edge, and on the flat surface directly behind the edge.
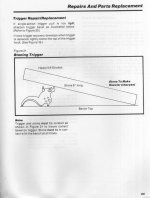
After marking, just set up the trigger on the bench as shown in the drawing. On preparing to move the stone, hold the trigger between your index finger and thumb….hold the trigger down firmly and squarely so that it is resting on the hammer hook and the bottom of the tang as shown. Trigger should be at 90 degrees to the table top. The stone moves from right to left in short strokes. (if you are right handed. If you're left handed, you can reverse the trigger and stone and go the other direction)

Place the stone on top of the bevel and while holding the trigger in the position shown in the drawing, make a short 1 to 1.5" stroke across the top of the bevel edge. (start at the end of the stone….the illustration shows the stone in place at the end of the stroke, not the beginning) Pressure on the stone should be directed mostly at the end over the trigger bevel, but use caution to keep both ends of the stone down on the table as the stoke is made. This is crucial to keeping the proper angle. Heavy pressure on the stone is not required.

Make three or four of these short strokes and check your progress in removing material toward the edge of the bevel. (use a magnifier) Continue applying Dykem or Sharpie as you check the work. You should continue this procedure until the dull edge has been sharpened along it's entire surface. Check periodically with a magnifier.

Once this sharp edge has been restored you're done. Just clean up the trigger so that no residue from the stone, or metal chips remain.

Remember, full length rebound springs will usually give a slightly heavier SA pull that reduced weight ones. After re-assembly, be sure to function and safety check the gun and check the trigger pull with a quality pull gauge. S&W recommends a 3 pound trigger pull.
 
Last edited:
That's correct. Very little movement, moderate down pressure, and constant contact between the stone and the trigger bevel and the stone end with the bench top. I always coat the bevel with Dykem or Sharpie marker periodically so I can visually monitor the stone's cutting progress.

Norton medium India stone is the one used and provided in the armorers school tool assortment. The stone's type, length and grade are critically important.

NORTON 6" X 1/2" X 1/2" INDIA STONE | Brownells
Thanks! That's what I thought but I wanted to be absolutely certain of the technique.
 
Back
Top