Photography

andy52

US Veteran
Joined
Feb 20, 2017
Messages
2,788
Reaction score
6,717
City & State/Province
Missouri
I'm really impressed with the way some members get shots of their revolvers. I've got a good camera it's a Nikon D7100 but for the life of me I just can't get those classy looking shots like some here do. Maybe it's the lighting they use I just don't know.
If anyone has any helpful hints or techniques I would be grateful to hear them.

Thanks
 
In addition to ParadiseRoads suggestions- Tripod! I can't hand hold it steady enough without one. My pics aren't the best, but using a tripod eliminates one problem.

And Practice, lol. That's the great thing about digital, keep shooting till you get good ones and delete the rest :D
 
Last edited:
I prefer using natural light outdoors. Avoid full-on sunlight though unless it is low to the horizon. I have also experimented with a light box, but tend to go back to the natural lighting. And I use Paint to crop and resize images and Photoshop Elements to adjust light and contrast.
 
Sometimes learning to shoot a camera can be harder than learning to shoot a 357 J frame, right? A good way to get these kind of pictures is to avoid using flash and relying on natural light. Set up near an open window or outdoors in the shade. Don’t be afraid to get up close.

It’s like creating a still-life. Think when you buy flowers and chocolate for your wife on a special occassion. You take the time to set everything up on a table before she gets home in a way that looks presentable and pleasing to the eye. Think that way before you press the shutter and you’ll be getting great shots in no time.
 
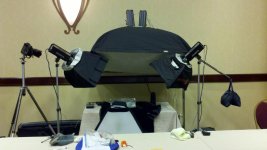
I did pro photography after retiring. I had been an enthusiast since age 12. Photography is from the Greek and means write with light. If you want good photographs of your guns, you have to light them. The lighting tent shown in a previous post is the way to do it.
 
Soft flat even lighting will normally get you the detail you want without the reflections. Can be accomplished by a "Light Box". Look on amazon, are dozens available with lights.
They're also easily built out of 1/2" PVC pipe for a few dollars.

I built one using plans that were posted here.
 
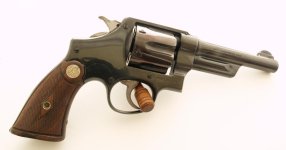
I use a homemade light box, tripod, very slow (0.25-0.50 sec, sometimes slower) shutter speed, F16 or so aperture for the most depth of field, and set the camera for a 2 second delay before it snaps the shutter. It helps to prop the gun off the background for a little shadowing. My eyes have a little trouble focusing in the dim light. I like a white background for blue guns and black background for nickel or stainless. Lot's of people here create very interesting backgrounds with other colors, textures, or objects. My iPhone will also take passable pics for a quick shot, just not as good as the DSLR.
 

Attachments

  • Pre-war HD.jpg
    Pre-war HD.jpg
    37.4 KB
Last edited:
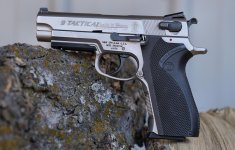
I have two nickle guns that I have been trying to take good pics of for over a year now. Tried outside in overcast weather, light box, and desk lamp style. They always come out looking like stainless steel or so scratchy like someone took a grinder to them.

Wonder the best color background to photograph nickle guns.

The only thing I have not tried is using manual adjustments as I have no clue whats what. I have a very nice canon rebel, and i use the close up(flower) setting lol

Might try taking a class.
LxURzhr.jpg


Blue guns I do better

dERXPrN.jpg
 
Last edited:
Light is the most important element. Daylight is best--but there is a catch. An outdoor photograph with the mid-day sun is too harsh and makes for a bad photo. Use outdoor light within an hour or two of dawn & dusk. Mid-day light on a cloudy day can work too.

You need a good background. A solid dark or light tone is usually the best. It puts the emphasis on the object. Some sort of setting with a texture is ok, but be careful of it being a distraction in the photo.

Use a low ISO to avoid "noise" in the photo. ISO is the modern version of film speed in digital photography. The right ISO is a function of the shutter speed and the aperture. (Think of a camera as a window. The shutter speed is how long the window is open and the aperture is how big the window is.) The aperture can also be used to make things near or far from the camera look blurry.

Use a tripod to make the object look crisp. That, combined with using the timer on the camera, will avoid the inevitable vibration that will be introduced by a person holding the camera and manually pressing the button to take the photo.

You can do other things to make the photo more interesting. Most people on this forum probably know the object you are photographing looks like. Taking the classic side profile of a handgun may be less interesting than a close-up view of a certain part.

Eliminating certain dead spaces of a photograph can make it more appealing. If you are wanting to showcase a gun, then crop the image around it and take away the excess background. (The old idea of "less is more.")

I've attached a recent photo I took in which I tried to use some of the elements I've described. Hope it helps.
 

Attachments

  • a1AP1270397.jpg
    a1AP1270397.jpg
    99.1 KB
The out of focus in the background in the above photo is referred as bokeh correct?
 
It could, but I would probably just call it shallow depth of field. Bokeh (in my opinion) is usually when the background is made to be out of focus in a way that adds to the beauty of the image. My intention with the small area of focus is to make the viewer look at the pistol and not what is beyond it.
 
A YouTube search for "light box" will you show you how to make an amateur photo booth for about 25 bucks. There are a lot of people that construct them to take photos of the crud, excuse me, collectibles they sell on eBay.
 
Last edited:
The out of focus in the background in the above photo is referred as bokeh correct?
It's a good question that only someone interested in understanding photography would ask.

There are a couple of fundamentals you must understand to take good pictures:
Cameras don't take good pictures, photographers do.

Take lots of pictures, but take notes. If you take 20 pictures of one thing while experimenting with camera settings, but don't remember what you did when, all those pics aren't helping. Yes, the meta data will record a lot of it for you, but only you can put down lighting conditions and why you chose those settings.


About equipment- Take a look at these two pics:
mPg61lU.jpg

kUpGKMo.jpg


Which was taken with a $2K DSLR and which was taken with a cell phone?


About lighting...
One was taken indoors with controlled artificial lighting and one was taken outdoors in bright sun/shade. Do you know which is which? It's about using the light you have more than forcing the light to your will (which also works if you know how).


Spend some time on this website: How to Take Better Pictures Ken Rockwell offers up some great advice on that site.

Just for the record, taking pictures of anything with a shiny, reflective surface is very difficult.
 
The out of focus in the background in the above photo is referred as bokeh correct?
Yes and it's a function of depth of field, controlled by the aperture size.

All things being equal, the larger the aperture, the shallower the depth of field.

You're going to get better bokeh at f1.8 than at f8. That's why people like lenses like the Canon 50mm f1.2.

Sent from my Nexus 5 using Tapatalk
 
The cheap white garbage can liners make a great light defuser. Get a cardboard box and cut it so it becomes just a frame with big openings. Use duct tape on the out side to hold it together. You can also just make a frame and use flat white paint. Use the trash bags to cover the sides, back and top. Get 3 lamps with the flexible necks and put high output daylight spectrum bulbs in them. You can try different bulbs for effects. Lights place to shine through the plastic. Props to position the piece. A camera stand to keep steady. Play with different materials for the back grounds on the floor. Close ups use the macro setting on digital cameras.

Get a good photo editor.

I am not that good, but I can get clear pictures that are not washed out. Just like anything else work at it. I like the shooting a J frame analogy.
 
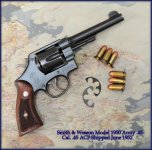
I do my photography in my bathroom which has a translucent white skylight. There are a couple of hours during the day that the sun is at the optimum angle that I don't get any glare so I just start taking shots, varying the exposure and slightly tilting the angle that I am holding the camera. I may take a dozen photos to get one good one but being that I can erase the card in the camera and it didn't cost anything, who cares ? I use Picasa as the photo editor to crop, adjust brightness/contrast/chroma/white balance if needed and add text. It's not as convenient as having a light box set up to take photos any time I want, but it works for me. Here is one I took recently.
 

Attachments

  • S&W Model 1950 Army .45.jpg
    S&W Model 1950 Army .45.jpg
    91 KB
If you are ever stuck with only the flash attachment one thing you can do is "bounce" the flash off the ceiling or wall or other white or light colored surface. I had to do that a lot back in my 35mm days.
 
Back
Top