Reaching out to the grip refinishers

AtTheRange

Member
Joined
Oct 9, 2020
Messages
22
Reaction score
41
Location
St Louis area
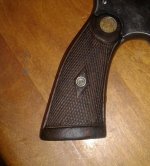
In my last (and very first) post, I introduced you to my inherited #19 made in the last quarter of 1958.
I was told to get rid of the horrid finish on the stocks. Well, I went to my first gun show last Saturday and yep, these are horrid.

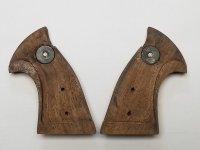
I did the initial stripping with acetone and much came off so, I'm guessing I was dealing with old varnish. However, after that, it still looked like there were patches of something else the acetone didn't touch. So, I used Jasco paint/epoxy stripper on them, and that didn't seem to help at all.

I was going to refinish them with polyurethane but, a little voice in my head said: "Have some respect for what you're working on! Take another chill pill and do some more research."
This probably comes from seeing a YouTube video of a polyurethane-finished grip looking like it's made of plastic (although very pretty).

I just spent hours surfing the S&W forum while doing searches on grip refinishing. I came across a couple of tutorials that I copied over to a word document; including the pictures. Now I get why they use Tung oil. This is what I'd like to use as well but, I'm concerned that there is still some kind of finish imbedded in the wood.

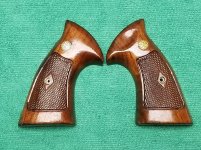
It was also suggested that these are not the original stocks because they look like they're made of walnut. I have a copy of the Standard Catalog of S&W (issue #3 I think) and they sure look like the original cut to me? I've seen posts that say walnut 'was' also used in the late 50s and early 60s.

Pictures are posted for your viewing pleasure. The first one is what I started with. I have three questions:
1. If there is still some kind of finish imbedded in the wood, how do I deal with it?
2. There's some brass showing thru on the medallions; any way to deal with that?
3. Is there some way to patch the small chip in the base of the one stock?
 

Attachments

  • 20201020_170945.jpg
    20201020_170945.jpg
    253.6 KB · Views: 380
  • 20201023_164932.jpg
    20201023_164932.jpg
    200.9 KB · Views: 383
  • 20201023_164949.jpg
    20201023_164949.jpg
    197.2 KB · Views: 353
  • 20201023_165028.jpg
    20201023_165028.jpg
    214.1 KB · Views: 354
Last edited:
Register to hide this ad
I'm not an expert on stock refinishing. However, I have done some restoration. If the varnish has run down into the wood grain, you may never be able to get it out. You can try 4-0 steel wool or 600 grit sandpaper and lightly go over the surfaces but not in the checkering. In the checkering, try acetone and a brass brush to clean out the rows. If this doesn't work, you may need to buy a checkering tool or a dental pick to get into the trough. As far as finishing coat, I like a 50-50 mix of linseed oil and mineral spirits. Three or four coats scrubbed in between with 4-0 steel wool should give a deep satin finish that looks good on stocks, IMO.


Maybe someone else will comment. I know there are a lot of members who have used varying techniques to restore these old stocks to something near their original elegance.
 
To fill the chipped areas - get a piece of matching wood (walnut?) , sand it to produce sawdust. Make a paste consisting of epoxy and sawdust , use as filler. After curing is complete , sand to conform.
Polyurethane glue may also work. I prefer epoxy for its adhesion.

Please note that I am not a pro and have not borrowed that method from a pro. The recommendation is a product of my own trial and error.
 
To professionally fix the chip, you need to find a small piece of walnut that matches the color and grain. Then you use a small mortise chisel to cut out the chipped area on the grip to a nice rectangular or square mortise. Using the scrap piece, prepare a matching piece that will press fit in place, with the grain lines matching as close as possible. This might take several attempts.
Make the new piece fit proud of the surrounding area. Glue the new piece in place with a high quality wood glue. Dress down the proud material on the filler piece to match. Done properly, such repairs are almost invisible.

As for the finish work, keep in mind the old adage that good finish work is always at least 90% prep work. Old finish or glue, sandpaper scratches, or "sawdust and glue" filler paste always look terrible when the finish hits them.
Keep a critical eye on the sanding you've done. It's all too easy to compromise the fair curves that were designed into those grips.

Best Wishes in the successful completion of your grip project.
 
Last edited:
The technique of scarfing in a replacement/filler piece of wood , matching grain and color , is certainly superior to simply filling with a paste made of similar wood. The limiting or determining factor is whether or not an individual has the skills and tools to employ that technique. Matching grain and achieving a tight fit with the filler piece is not an easy accomplishment.

I do not execute projects of this nature often enough to have developed those skills.

That said , I feel that
" "sawdust and glue" filler paste always look terrible when the finish hits " is a bit harsh. I have performed such repairs and have seen similar work by others , the result being an appearance of a solid ding repair done by someone who cared enough to go to the trouble to make the improvement.

It is important to know one's limitations. Engaging professional help is always an option. I derive more satisfaction from doing such work myself that if I paid someone else to do it.

The suggestion of using a file type tool rather than sandpaper is a good one. Cleaner wood particles that way.
 
Personally, unless the ding was an inch deep I would leave it alone. Small dings add character. Look in the mirror!!:eek:

Glue or epoxy and sawdust is fine if you plan to paint over the area however, any dried epoxy or glue will not accept the finish the way that the surrounding wood will and will usually show up worse than the ding that you are trying to remove.

Again I would clean and refinish the stocks in your chosen finish and go shoot the gun.
 
For the ding repair try epoxy after you wipe the spot down with laquer thinner or similar to get the oils out. Beware of finger print oils etc.
Skim on some epoxy and wait until it dries,give it a light sanding and then skim another epoxy layer until you get it satisfactory. Let it cure. Wipe again to get oils off. Skim a light coat of spackle over the epoxy. Again light,fine sand and light skim. The idea is to get a fine skin of spackle over the epoxy surface so the next step bites into material.
Get yourself some tinted gel stain that matches the walnut. Try to get some other tinting colors so you can play with the color until you like it.
Mix the gel stain on a piece of glass for a pallette. Mix a dab of polyurethane into the gel stain . The polyU or perhaps other vehicle is what allows the gel stain to dry. You can also add a bit of paint thinner into your mix to keep it thin coat. If you don't like what you see,wipe it off with paint thinner and get your mix recipe redone. Etc.
After you let that mix dry overnight,you can touch it up and or use black stain in your color recipe in order to simulate wood grain stripe or points. You will be surprised how you can mask a repair.
The main thing is to be patient and do each step lighly even if it seems like no color adheres. Don't get anxious for a wallah moment. Methodical over a period of a week or two if need be.
A satin sheen polyurethane finish applied thinned with paint thinner can get a nice thin finish. Again thinned applications. During all this use a fine artist brush. Not a big 2 inch monster!
Get some fine brushes like what you used for painting car model kits!
You might be able to sub out your choice of oil instead of polyU in the steps but ask someone first as I used polyU all through.
Anyway, the other guy's have similar ideas so pick your own.
That chip is an easy fix. The cut out method may be super pro but it's your call. Nice grips!
P.s try to wet sand the left over laquer with fine sand paper and thinner before you tackle the chip. Lightly each time since you don't want to loose natural form with a flattened over done area .The brush or pick is a good idea for the checking.
 
Last edited:
Myself, I'd just leave the chip, it is small. The methods to splice in actual replacement wood are too difficult for a newbie, and the powdered wood approach inevitably has glue affecting the finish, plus it doesn't have grain like the surrounding wood.

Finding exactly matching wood can be difficult. You could drill a few small shallow holes in the interior or cut a small piece from the inside and get some matching wood that way.
 
1.) Leave it alone . It might be wood sealer that has penetrated the wood fibers .
2.) No I don't ... my usual method is to cover the medallion with stock finish.
3.) Leave it alone . The "fix" would stand out like a sore thumb . Call it "Character" and LIA .

Try staining the wood to get an overall color you like ... a great finish is Minwax Tung-Oil Finish ... it's not pure tung oil but it is tung oil based and for my work does a better job .
Gary
 
I am not a great fan of acetone for removing finishes. I use it to soak out oil in old stocks, but trust a good quality paint remover to remove paint and/or varnishes. MEK (Methylethylketone), DCM (Dichloromethane), etc, work very well and one can submerge a set of stocks in paint remover, seal the container and let it go for a day for polyurethane, but usually it can remove most finishes in an hour or less. Take a section of plastic wrap, place stocks, pour on paint remover, and cover with more plastic wrap.

Clean off with a toothbrush and wipe down with a wet cloth. Let dry and start the refinishing process. You can also use the toothbrush under running water, but the stocks will take longer to dry.
 
I just looked at the 'damaged' area again in the original post. Does anyone else see the evidence of an earlier repair where perhaps a considerably larger piece of wood may have been replaced? In any event, I would clean out that area thoroughly (expecting a small loss of existing material), then using a very coarse rasp file on another piece of walnut, gather up the chunkiest filings. At that point I would use a wood glue to make a relatively 'dry' paste (just enough to hold it together). With a toothpick add a small amount of wood glue to the damaged area, and pack in the wood chip glue mix. Pack it tight and make it overflow the area. Let it dry, and pack a couple times while drying. After dry. sand with 220 grit or higher to be flush with the surrounding surface. I often will touch up with a drop of stain if it does not match the surrounding area (may not be needed). I am a fan of boiled linseed oil for a finish. It will bring a lot of color and depth. Don't get much in the checkering (use a toothbrush). Remove excess and let it sit for two days. Go over the smooth surfaces with a green or gray 3M pad and oil again to repeat the process. Second and third application should only require a cotton rag (no abrasives) and no oil in the checkering. If you have pure tung oil, that will work well. Be aware that some tung oil finishes contain more varnish than tung oil, and some of the offerings are said not to contain much if anyany tung oil at all.... they act more like a wiping varnish than they do an oil finish, especially with their drying characteristics...... I much prefer real oil finishes, not varnish on nice stocks. The extra effort and time is well worth the extra effort.
 
I just looked at the 'damaged' area again in the original post. Does anyone else see the evidence of an earlier repair where perhaps a considerably larger piece of wood may have been replaced?

I think you're right. I'd just keep an eye out for a suitable piece of wood and replicate that repair again.
 
I used walnut dust and super glue to do this repair. Ithen sand to contour then take an exact-o knife and, simulate grain pattern then a light coat of True Oil
Here is the link to the original post
Thinking About This .22/.32
 

Attachments

  • 20180425_115331.jpg
    20180425_115331.jpg
    23.1 KB · Views: 98
  • 20180425_115204.jpg
    20180425_115204.jpg
    78 KB · Views: 76
Last edited:
That said , I feel that
" "sawdust and glue" filler paste always look terrible when the finish hits " is a bit harsh. I have performed such repairs and have seen similar work by others , the result being an appearance of a solid ding repair done by someone who cared enough to go to the trouble to make the improvement.

I think that the work done by merl67 is a good example of what I said.
 
I think that line in the wood is just the natural grain structure as well.
What it does do is provide a nice pattern to play off of in hiding a repair done in that area.

I sometimes splice in a new piece of wood, sometimes simply patch the area with fibreglass/epoxy.

Something this small I'd just use epoxy.
The color doesn't matter as once it's set and then filed and sanded to contour, the patch is colored to match the surrounding wood.

Before any coloring is done, I stain the entire piece including the patch.
I rarely leave a piece of wood it's natural color. I like the darker tones.
But what ever you have to do to the stock or grip. Sometimes it's a restoration, sometimes you just like to change to color tone of the wood.

Once the staining is done, I carefully brush a very thinned wash of shellac over just the patched area.
Let that dry.
Then on that I color the patch to match the surrounding wood.

I use artists water colors (acrylic I guess is the right name) The stuff in a tube from a art supply store or hobby store. Simple Earth colors and black will do.

No glopping on the colors. No painting like you're painting with oil paint. This is a somewhat slow process where ultra thin layers of a color tinted wash go on and over each other to build color and tone.

Details get placed in by dotting them in carefully with a short bristled brush or dragged along the surface. Always allowing the layer to dry before the next one goes on.

When done, I 'fix' the color with a thin spray coating of a semi gloss enamal right from a spray can. Just a light coating. That protects the color. Another coating on top when dry can be applied.
The 'fix' coating is then carefully sanded out with 1000 grit to blend any edges into the surrounding stained wood.

Final finish of your choice goes on top.

Here's a wood patch done to a Win21 stock. The patch doesn't come close t matching the original stock wood.
But it's fitted pretty well and epoxied in place. So we'll work with it instead of removing it and replacing. All that would do is get us back to the same place pretty much.
Some final sanding to the area was all that is needed.


Here's the patch after coloring with the water color paints. I don't think I had put any spray coating fixed over the top yet in this pic. The area shows a little different overall shade than the surrounding wood which it will do till the clear coating goes on. Something you have to get used to and recognize while doing this.
(The grey matrl in the inletting is fibreglass bedding compound)


Area with I think one fixer coating applied. Another will bring it up to speed. Then the entire stock was finished up with a tung oil varnish,


Finished stock, pic taken while the checkering being recut.
Unfortunetly it doesn't show the repair!
But it does show what the nearly final stock finish looked like. A couple coats of stock finish got brushed into the checkering after the recut was completed. That really brings out the fancy grain through the checkering pattern.
Then the entire stock gets a very thin rubdown coating (usually 3) with linseed to bring out a little gloss on the wood,,but not too much!


This is the shotguns forend completed. Refinished and recheckered.
There were no repairs to deal with on the F/E.
You can see the difference in the checkering with the brushed in stock finish in it.
Also the very slight gloss given to the wood finish with Linseed rubbed out ultra thin.
 
2152hq
Your input and experience, esp on your wood working talent, always impresses me.
Having used some of your methods yrs ago
when I was better able to, I always check your posts out because I always learn something new.
Appreciate you on this site/forum..
Best Randy..
 
Last edited:
Thank you all for your inputs.
I have saved all your suggestions in a word doc.
For now, I'm going to hold off on taking any action. I have some friends that do a lot of medieval woodworking and if this pandemic ever ends and we can congregate again, I'll show them the stocks and consult.
In the meantime, I bought a pair of Altamont factory second grips to shoot with as not to put any more wear and tear on the originals.
Now, if I could find ammunition to practice with....
 

Latest posts

Back
Top