Refreshing rifle receiver stampings

DWalt

Member
Joined
Dec 19, 2009
Messages
35,912
Reaction score
32,606
Location
South Texas & San Antonio
I won’t get into details, but I have a friend who owns an old refinished 98 Mauser. During the refinishing, the front receiver ring military stampings were nearly polished off. He would like to find someone capable of refreshing them. I have no idea who is capable of doing that sort of work. Does anyone here know of somebody who might?
 
Register to hide this ad
There would be no way to find copies of the original stamps. On a "sporterized" K98 from the father-in-law, I did stamp the caliber (8x57JS) on the barrel just so some future person would know for sure what ammo it takes. Still can't believe the world's militaries didn't mark caliber as a general rule on any of their main battle rifles. Stamp sets are inexpensive and widely available in different type sizes.
 
I won’t get into details, but I have a friend who owns an old refinished 98 Mauser. During the refinishing, the front receiver ring military stampings were nearly polished off. He would like to find someone capable of refreshing them. I have no idea who is capable of doing that sort of work. Does anyone here know of somebody who might?
Deep pockets and an engraver....whoever did the refinishing wasnt a professional...Bubba
 
There would be no way to find copies of the original stamps. On a "sporterized" K98 from the father-in-law, I did stamp the caliber (8x57JS) on the barrel just so some future person would know for sure what ammo it takes. Still can't believe the world's militaries didn't mark caliber as a general rule on any of their main battle rifles. Stamp sets are inexpensive and widely available in different type sizes.
Marking a surplus rifle, especially a sporterized one, is a good idea, I've run across several over the years that the person who ended up with it had no idea what it was chambered for. And several of them turned out not to be what they were originally built as!

As to the original military users, they knew what guns they issued and what caliber they were so I suspect most of them never felt any need to mark the caliber on their rifles. The only exception I can think of offhand was Italy when they tried to do a caliber change from 6.5 to 7.35 in the late 1930's (and then got into WWII and gave up on the caliber change idea). Since the only real difference was the caliber they did mark the rear sight with the appropriate caliber to avoid confusion. Japan also started a caliber change around the same time (6.5 to 7.7) but their rifles were prominently marked with a distinctive model number (in Japanese of course) which served to identify them and their caliber.
 
FWIW, on Collectable firearms marking caliber should be on bottom of barrel as to not “ damage” firearm. For the most part semi autos or revolvers calibers are “ open and obvious” unless someone is clueless and most likely should not have them. Tragedies Ive seen in firearms in 60+ years is a crying shame….
 
When it comes to milsurps and damage to the metal, it's usually a case once bubba'd, it's bubba'd forever. Yes, there are stamp sets on Ebay to stamp all kinds of stuff with SS runes, waffenamt marks, and dirty birds. They are also the tool of the unscrupulous to "correct" common or garden issue rifles into matching examples with fake provenance. This process is known in milsurp circles as humping. It has been a major issue with k98k rifles but has occurred with just about every milsurp you can name.

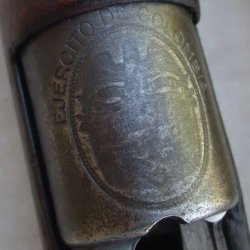
Sometimes the damage is inflicted during an update program. Below is a picture of the crest on my Colombian VZ24 that had been converted to 30-06. Quite why the crest was polished close to oblivion during the update is unknown, but it is extremely common. Maybe the Famage armory facility did this because the old crest related to an earlier regime. Look up La Violencia.


ColombianVZ24Crest02.jpg
 
Many recv'r markings can be re-cut by hand by an engraver. Not all engravers are willing to do this type of work (restoration). It's tedious and exacting work to make hand cut lettering and figure work end up looking like stamping/roll imprinted markings.

I used to do quite a lot of that sort of work as I did the restoration work and recut a lot of lettering damaged by buffing, drilled holes, doetailes cutting thru the lettering, etc.
It entails filling the holes and cuts first of course and those fillers must not show either.
I never used welding, just a cold, swaged steel plug. Of the right steel and done correctly it won't show and will not loosen.

Here's a rifle I've shown before, a 1950 Mann/Schoenauer with 9 D&T holes in it from 2 different scope mt attempts.
One was a side mount placed into the provided area on the left side of the recv'r, but they mounted it crooked.
The other a Leopold mt IIRC that D&T'd right thru the front ring and the lettering there as well as the left side wall of the recv'r and the lettering there as well. They broke a drill off in one of those holes as well.

All the holes were cleared and plugged using my method. Then taken down to the orig surfaces cleanly.
The orig lettering was then retraced/redrawn in simple pencil to pick it back up with the surrounding lettering.
Then hand cut the lettering that was damaged and missing back in with chisel to match the original look.

On the hidden sideplate surface, there was orig a filler plate installed when the rifle was made held with the one center screw. The owner removes the filler plate and installs the scope mount and D&T's the flat surface as needed.

The 'As Needed' didn't go too well for someone as they got the mount crooked. Plus they drilled straight through into the feed area of the recv'r when they did this (and the side wall screws as well).
All of these were plugged and finished off flush on the outside AND the inside as well.

Since the factory supplied steel filler dummy side plate was missing, someone filled the cavity for it on the LH side with brown epoxy. Remanants of the goo can be seen in one of the pics after early disassembly.
After digging that out and cleaning up the stock cut, I fitted a piece of matching wood to the cut. It's in place securely but not so much that it can't be cleanly removed if someone in the future might want to place a proper M/S side mount in there.
The wood filler can be seen in one of the last pics fitted betw the small dovetail edges on the LH side of the recv'r that orig held the steel dummy plate in place.

When done, the entire bbl, recv'r and parts were given a polishing to straighten out the slight rounding of edges an old refinish had done to it. I recut lettering on the floor plate, even the proof marks.
A Cold Rust Blue job finished it up. Customer was very happy.
Saved a nice rifle.
2 other Restoration Shops had the rifle prior to myself.
The first, a very well know entity, refused to do any work on it saying they don't work on Chevys, theirs is a Cadillac restoration business.
The other said they would put plug screws in the holes and that was it.

It shows what can be done, I've done likely hundreds of such jobs small and large on commercial and military pieces over the 50yrs of work.
Retired now, no more FFL, so I'm out of the biz.

Simple lettering is the easiest of course.
Recutting the very complex Crests seen on some Military rifles like the contract Mausers is more difficult especially as many have been very badly drawn out by buffing or are pitted and will leave nearly nothing to work with once cleaned up.


That's beautiful work.
 
I won’t get into details, but I have a friend who owns an old refinished 98 Mauser. During the refinishing, the front receiver ring military stampings were nearly polished off. He would like to find someone capable of refreshing them. I have no idea who is capable of doing that sort of work. Does anyone here know of somebody who might?
I believe the nazi markings was removed from the rifles that were imported.
 
I believe the nazi markings was removed from the rifles that were imported.

The Russians and the Yugoslavs often peened out any nazi marks on the guns they had. The Yugos also reworked quite a few rifles and added their own national markings on the receiver ring. Which meant you sometimes had to do a little sleuthing to figure out what they started with as they also reworked older models of guns they had purchased before WWII as well as WWII captures and guns they made themselves. Most other countries (such as France) never seemed to bother with removing German marks on guns they ended up with.
 

Latest posts

Back
Top