Repaired .32 Hand Ejector - Range Report

huskerbob

Member
Joined
Mar 30, 2016
Messages
101
Reaction score
87
UPDATE - RANGE REPORT!!!

On January 16th I posted as seen below. The response I received from you guys was almost immediate. I received tips/suggestions/guidance all of which was very, very helpful.

Most people suspected the problem was excessive 'end shake' which was preventing the firing pin from contacting the rounds properly resulting in failure to fire.

Over the course of the first 24 hours I received guidance on how to measure and resolve the end shake. The measurements revealed about .013 of play in the cylinder. The solution appeared to be the installation of a very inexpensive shims to 'tighten up' the cylinder.

I ordered a set of shims and in the meantime, as was suggested, cleaned the internals thoroughly. The shims arrived yesterday and I installed them this morning.

I added two shims with thicknesses of .004 inside the cylinder and one .002 shim underneath the ejector star (a tip from 'BC38). This allowed me to reduce the end shake while minimizing additional gap between the cylinder and the barrel. The shims virtually eliminated the end shake and the cylinder felt rock-solid!

Once I had the gun reassembled I took off for a patch of Utah desert just a few miles from my house. I loaded the cylinder, held my breath, and squeezed the trigger - BANG!!!

Squeezing the trigger again and again - BANG, BANG, BANG, BANG, BANG!!!

I reloaded and emptied another cylinder without a single failure!!!

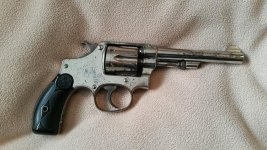
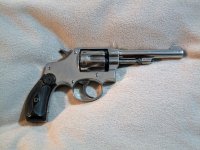
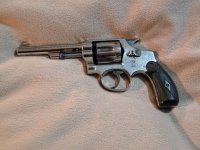
I now have a Nickel 1903 .32 Hand Ejector, born in 1909, with Mother of Pearl Grips that is fully functional!! More importantly is that's it's a gun that belonged to my Dad who passed away in 2004, and which as I mentioned in my first post, was written off as "too far gone" to repair by a local gunsmith!

I cannot begin to express my gratitude to everyone who responded and took the time to offer advice and encouragement , ESPECIALLY "BC38" :D who took the time to walk me through the entire process step-by-step. Without the help I received for you all, the gun would be a "paper weight with sentimental value" sitting in my safe instead of a piece of family history I can take out, shoot and enjoy!!!

I think my Dad would be proud that his gun has found a new life!!!

My next step is to cough up the $$$ to get an offical S&W Letter to see what I can learn of the revolvers history. I don't expect to learn anything earth-shattering but just know a little of when and where it came from will be worth the money to me.

Thank you all for everything you did for me!!! YOU GUYS ARE THE BEST!!!

Bob Neely a/k/a huskerbob
St. George, UT.


ORIGINAL POST

I have a .32 CTG I inherited when my Father passed. I don't know a lot about it other than the S/N which is 99851. It has MOP grips. It is in pretty rough shape. I would love to get it functional again. I have shown it to a gunsmith locally and he indicated the gun is probably "too far gone". That may well be the case. However, since it belonged to my Dad, I feel like I need to give it another try before giving up on it.

I have posted about the gun on this forum a few years ago but at that time I was trying to determine whether or not the gun had any value beyond sentimental.

What I'm hoping to learn this time is if they're might be a highly regarded gunsmith for this type of S&W revolver I might contact for a 'second opinion'

I will appreciate any guidance anyone can provide!!

Thanks!
 

Attachments

  • S&W .32.jpg
    S&W .32.jpg
    142.9 KB · Views: 229
Last edited:
Register to hide this ad
Welcome to the Forum.

You have a .32 Hand Ejector Model of 1903-4th Change, made around 1910. The grips are aftermarket. "CTG" is an abbreviation for "cartridge". It appears to have the original nickel finish. Open the cylinder and look at the serial number stamped under the barrel. If there is a "B" stamped in front of the SN, the revolver shipped with a blued finish.

Without examining your .32 in person, it is hard to say what may be wrong with it. It does appear the strain screw, located in the front grip strap needs to be tightened.
 
Last edited:
Did the guy give you any indication of exactly why he feels it is "too far gone"? When you pull the trigger does the hammer cock and release? Does the cylinder turn as you pull the trigger?
FWIW, it doesn't look that bad. A good polish with Mother's Mag Polish will do a lot for the finish if that is the thing that is "too far gone".
Here are some before and after pics of one I shined up with some Mother's
 

Attachments

  • 20200306_111458(1).jpg
    20200306_111458(1).jpg
    127.6 KB · Views: 102
  • RightSide.jpg
    RightSide.jpg
    205.2 KB · Views: 102
  • 20200306_111513.jpg
    20200306_111513.jpg
    128.7 KB · Views: 96
  • LeftSide.jpg
    LeftSide.jpg
    173.8 KB · Views: 97
Did the guy give you any indication of exactly why he feels it is "too far gone"? When you pull the trigger does the hammer cock and release? Does the cylinder turn as you pull the trigger?
FWIW, it doesn't look that bad. A good polish with Mother's Mag Polish will do a lot for the finish if that is the thing that is "too far gone".
Here are some before and after pics of one I shined up with some Mother's

He said he didn't believe he would be able to locate parts for a gun of that age. He may have had other concerns too, I just don't recall. As I said, it was about 2-3 years ago.

Before I took it to him I had tried to fire it. Some rounds would fire, some would not. As I recall (and it's been a few years ago) the cylinder would advance but not all rounds would fire. When you dry fire the gun, either by the trigger or by the hammer, the cylinder seems to index properly.

There is a small amount of wiggle in the cylinder and a little front to back play but neither seem to me to be excessive.

There is no "B" prefix in the S/N under the barrel or on the butt of the gun.

I kind of suspected the local smith just didn't want to get involved with a 'project' of this nature and I guess I don't really blame him.

I think the only reason to pursue a cure is because it belonged to my Dad. But at this point, that's reason enough for me to investigate my options.......if any.

Bob
 
Last edited:
I doubt it it to far gone. Be really had to wear out a little 32 S&W. More like I don't want to bother. Go to another Gun smith, One that knows revolvers. Lots of Gunsmiths" can only mount scopes etc. Ones that know revolvers are a bit of a dying breed

My thoughts exactly. Unfortunately I live in a relatively small community (St. George, UT) and don't have the luxury of an abundance of smiths to choose from. That's why I've posted here.
 
He said he didn't believe he would be able to locate parts for a gun of that age. He may have had other concerns too, I just don't recall. As I said, it was about 2-3 years ago.

Before I took it to him I had tried to fire it. Some rounds would fire, some would not. As I recall (and it's been a few years ago) the cylinder would advance but not all rounds would fire. When you dry fire the gun, either buy the trigger of by the hammer, the cylinder seems to index properly.

There is a small amount of wiggle in the cylinder and a little front to back play but neither seem to me to be excessive.

There is no "B" prefix in the S/N under the barrel or on the butt of the gun.

I kind of suspected the local smith just didn't want to get involved with a 'project' of this nature and I guess I don't really blame him.

I think the only reason to pursue a cure is because it belonged to my Dad. But at this point, that's reason enough for me to investigate my options.......if any.

Bob
Sounds like too much end play - easy fix with cylinder endplay shims and they are available from multiple sources.
It might also need a new mainspring and/or strain adjustment screw. Numrich has the screw but not the spring
Strain Screw | Gun Parts Corp.
The spring might be a little difficult to find, but a WTB ad on the forum here might get you one - if you even end up needing one.
Mine needed about .006" worth of endshake shims, but that was all it took to solve the problem.
 
My thoughts exactly. Unfortunately I live in a relatively small community (St. George, UT) and don't have the luxury of an abundance of smiths to choose from. That's why I've posted here.

Do NOT give up.

Your Dad's revolver deserves better, as you obviously know.

Here's a thought that may or may not jell, but have you talked to the folks at S&W about having them take a look?

You never know.

If they say "no," keep us posted, and perhaps somebody can come up with a solution to help you feel confident about returning your Dad's revolver to fully functional status.

Do NOT give up.
 
Sounds like too much end play - easy fix with cylinder endplay shims and they are available from multiple sources.
It might also need a new mainspring and/or strain adjustment screw. Numrich has the screw but not the spring
Strain Screw | Gun Parts Corp.
The spring might be a little difficult to find, but a WTB ad on the forum here might get you one - if you even end up needing one.
Mine needed about .006" worth of endshake shims, but that was all it took to solve the problem.

DISREGARD - Found some YouTube Videos. I'll start there. Thanks!! Any tips on where I might written or video instructions on disassembly of the cylinder assemble to install the shims? Also, how to properly adjust the Strain Screw?
 
Last edited:
Do NOT give up.

Your Dad's revolver deserves better, as you obviously know.

Here's a thought that may or may not jell, but have you talked to the folks at S&W about having them take a look?

You never know.

If they say "no," keep us posted, and perhaps somebody can come up with a solution to help you feel confident about returning your Dad's revolver to fully functional status.

Do NOT give up.

I'll stick with it. Do you happen to know 'who' or 'which' department I would contact at S&W??
 
DISREGARD - Found some YouTube Videos. I'll start there. Thanks!! Any tips on where I might written or video instructions on disassembly of the cylinder assemble to install the shims? Also, how to properly adjust the Strain Screw?
Strain screw is easy. It is the one on the front side of the grip down near the bottom. Tightens clockwise (right hand thread). Make sure you use a good hollow ground screwdriver to avoid messing up the screw slot.

Before taking it apart to install the shims you need to measure the gap between the rear end of the barrel and the face of the cylinder with a set of feeler gauges to determine what thickness of shims you need to install. Measure the gap with the cylinder pushed forward and again with it pushed backwards. That will tell you the max amount of shims to use. When you're done you want no more than a couple of thousandths of forward-backward movement. So for example, if the difference between the full forward and full backward positions is say 8 thousandths you'll want to install about 6 thousandths worth of shims - a couple of .003" shims or one .002" shim and one .004" shim.

Installing the shims requires taking out the screw farthest toward the front on the right side just above the trigger. After removing that screw swing the cylinder fully open and slide the cylinder and its hinge piece (called the yoke) out the front of the frame.

Once you have the cylinder and yoke out, then you have to unscrew the ejector rod from the cylinder. I usually wrap the cylinder in a short length of leather cut from a belt, and clamp it in a vice. I then use another smaller strip of leather wrapped around the ejector rod and grip the leather-wrapped rod with a pair of pliers. Not a bad idea to spray the screws and the ejector rod with penetrating oil (like PB Blaster) and let it sit overnight before trying to loosen anything.

IIRC the ejector rod on this model is standard right-hand threads (unscrews counter-clockwise when viewed from the front). Once the ejector rod is out you can slide the tube of the yoke out of the cylinder. Then you just slide your combination of shims into the center hole of the cylinder from the front, slide the yoke back into the center hole, and reinstall the ejector rod. Firmly hand-tight is generally tight enough. Then you reinstall the yoke and cylinder into the frame, and replace the forward screw on the right side above the trigger to keep the whole assembly retained in the frame.

IIRC there is a Midway U-Tube video that demonstrates the process, though I believe they demonstrate by working on a newer revolver with a left-hand threaded ejector rod.
 
Last edited:
Strain screw is easy. It is the one on the front side of the grip down near the bottom. Tightens clockwise (right hand thread). Make sure you use a good hollow ground screwdriver to avoid messing up the screw slot.

Before taking it apart to install the shims you need to measure the gap between the rear end of the barrel and the face of the cylinder with a set of feeler gauges to determine what thickness of shims you need to install. Measure the gap with the cylinder pushed forward and again with it pushed backwards. That will tell you the max amount of shims to use. When you're done you want no more than a couple of thousandths of forward-backward movement. So for example, if the difference between the full forward and full backward positions is say 8 thousandths you'll want to install about 6 thousandths worth of shims - a couple of .003" shims or one .002" shim and one .004" shim.

Installing the shims requires taking out the screw farthest toward the front on the right side just above the trigger. After removing that screw swing the cylinder fully open and slide the cylinder and its hinge piece (called the yoke) out the front of the frame.

Once you have the cylinder and yoke out, then you have to unscrew the ejector rod from the cylinder. I usually wrap the cylinder in a short length of leather cut from a belt, and clamp it in a vice. I then use another smaller strip of leather wrapped around the ejector rod and grip the leather-wrapped rod with a pair of pliers. Not a bad idea to spray the screws and the ejector rod with penetrating oil (like PB Blaster) and let it sit overnight before trying to loosen anything.

IIRC the ejector rod on this model is standard right-hand threads (unscrews counter-clockwise when viewed from the front). Once the ejector rod is out you can slide the tube of the yoke out of the cylinder. Then you just slide your combination of shims into the center hole of the cylinder from the front, slide the yoke back into the center hole, and reinstall the ejector rod. Firmly hand-tight is generally tight enough. Then you reinstall the yoke and cylinder into the frame, and replace the forward screw on the right side above the trigger to keep the whole assembly retained in the frame.

IIRC there is a Midway U-Tube video that demonstrates the process, though I believe they demonstrate by working on a newer revolver with a left-hand threaded ejector rod.

I was able to disassemble per your instructions. Fortunately, I have a spark plug blade type feeler gauge that seems to work.

When I push the cylinder as far forward as possible I get a measurement of .006. When I push the cylinder as far to the rear as possible, I get .019. A difference of .013. If I understand you correctly, I would want to reduce that spread by about .010...is that correct?

I had searched "shims for end shake .32 Hand Ejector and found several sites where they're available. Just want to be sure I order correctly. Looks like the different frames are designated by a letter such as K, L, N, etc. Which am I looking for?
 
Last edited:
I was able to disassemble per your instructions. Fortunately, I have a spark plug blade type feeler gauge that seems to work.

When I push the cylinder as far forward as possible I get a measurement of .006. When I push the cylinder as far to the rear as possible, I get .019. A difference of .013. If I understand you correctly, I would want to reduce that spread by about .010...is that correct?

I had searched "shims for end shake .32 Hand Ejector and found several sites where they're available. Just want to be sure I order correctly. Looks like the different frames are designated by a letter such as K, L, N, etc. Which am I looking for?
Yeah around a .010" reduction is what you want. IIRC I got the K-frame shims, and they worked for me. If you have a set of calipers you can measure the ID of the center hole in the cylinder and compare that to the OD of the shims you are ordering. The OD of the shims should be a few thousandths smaller than the ID of the center hole in the cylinder.

Be aware that your barrel to cylinder gap will be out of spec afterwards, but reliable ignition is more important. S&W currently says anything less than .012" is within spec for new guns, and you'll end up with around .016", based on the measurements you've given, but like I said, if that's what it takes to get reliable ignition, that's what it takes. Reliable ignition trumps excessive barrel to cylinder gap in my book. Mine ended up right at .012".

The only way to fix the larger gap is to have the barrel set back. That will be an expensive proposition, but if money is no object due to the sentimental factor, it might be worth considering. It will shoot just fine with the larger gap. Just more leakage creating a bigger flash at the gap (unlikely that you will ever notice unless you watch slow-mo film of the revolver being fired) and you'll loose a little bullet velocity.

Good luck with it.
 
Last edited:
Yeah around a .010" reduction is what you want. IIRC I got the K-frame shims, and they worked for me. If you have a set of calipers you can measure the ID of the center hole in the cylinder and compare that to the OD of the shims you are ordering. The OD of the shims should be a few thousandths smaller than the ID of the center hole in the cylinder.

Be aware that your barrel to cylinder gap will be out of spec afterwards, but reliable ignition is more important. S&W currently says anything less than .012" is within spec for new guns, and you'll end up with around .016", based on the measurements you've given, but like I said, if that's what it takes to get reliable ignition, that's what it takes. Reliable ignition trumps excessive barrel to cylinder gap in my book. Mine ended up right at .012".

The only way to fix the larger gap is to have the barrel set back. That will be an expensive proposition, but if money is no object due to the sentimental factor, it might be worth considering. It will shoot just fine with the larger gap. Just more leakage creating a bigger flash at the gap (unlikely that you will ever notice unless you watch slow-mo film of the revolver being fired) and you'll loose a little bullet velocity.

Good luck with it.

Thanks so much for the guidance!!! I do have calipers and will measure the cylinder as you've suggested and order the appropriate shims. Hopefully that will get me to the point that the gun fires reliably. If I can get that far and know the gun works properly, I'll investigate the possibility/cost of the barrel setback you mentioned. The main thing is having a gun I can take to the range and shoot.

If I can get that far, I plan on ordering a 'letter' from S&W to see what that reveals. Just like on the Colt S.A.A.'s I own, I'm sure it won't tell me anything 'earth-shaking'. But if it's tells me only the age, original configuration and shipping destination of the gun, knowing that would be worth the $$$ to me.

Thanks again for your time and knowledge!! I will definitely get back to you with a 'range report'!!

Bob
 
huskerbob, there is an excellent repair manual for S&W revolvers authored by Jerry Kuhnhausen. It will give you several ways to correct excessive end play/head space including using shims/end shake bushings. I must say that if your original barrel to cylinder gap is .006", it is right on. If you don't have a proper feeler gauge, you can use a credit card, the thickness of which is approximately the desired B2C gap.


By the way, don't even waste your time calling S&W. They wouldn't work on my model marked 1959 Model 16 because it was "obsolete" despite having the same action components as more recent guns.

Thank you Sir!!
 

Latest posts

Back
Top