Repairing broken trigger stud on Highway Patrolman

larbike

Member
Joined
Apr 23, 2010
Messages
56
Reaction score
89
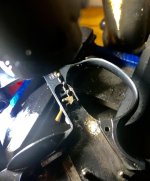
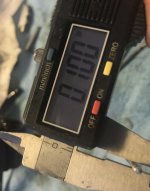
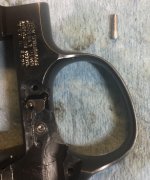
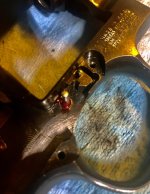
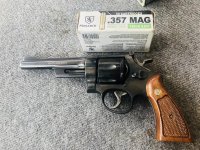
I was out at the range a few weeks ago shooting my M-28-3 Highway Patrolman. This gun was my first .357 revolver which I purchased new back in 1985, and it has seen many thousands of rounds over the years with zero issues. On this occasion though the revolver misfired after about 20 rounds of magnum ammo. I noticed that the cylinder would not turn when the trigger was pulled or the hammer was cocked manually. I took the gun home and removed the side plate to see what was going on. I found that the trigger stud had sheared off! A search on google revealed that the replacement for the stud required sending the gun back to Smith & Wesson for a fairly expensive and lengthy repair process. Typically this involves pressing out the stud, replacing it with a new one, and then re-bluing the gun. I really dislike having to send guns out for repair if I can help it. My father was a machinist and I inherited his tools and equipment when he passed a few years ago. Although I am not a machinist by trade, I often worked on projects with my father, so I decided to attempt the repair myself. I started by locating a solid steel roll pin that I might be able to use as a replacement. I measured the broken stud and ground down the replacement pin to the same diameter (0.100 inch). I then carefully placed the revolver in my drill press and drilled a hole in the frame concentric with the broken stud. I drilled the hole 2 thousandths of an inch smaller than the diameter of the pin to allow an interference fit, and then drilled deep enough to retain the pin but not deep enough to perforate the frame. I did some trial fitting and trimmed the new pin just enough to allow the sideplate to fit flush on the frame as before. For the final assembly I added some red Loctite to the pin and hole. I then tapped the pin with a brass hammer until it was seated fully in the drilled hole. I allowed the Loctite to set up for 24 hrs before final assembly. I checked the revolver’s single and double action pulls and checked the hammer for push-off and everything was working fine. A trip to the range showed the revolver to be working flawlessly after a full box of fifty .357 rounds. I also decided to attempt this type of repair because I don’t ever plan on selling this gun due to it’s sentimental value and so far the repair is holding up splendidly!
 

Attachments

  • 53BEBEBC-772F-4D2F-8D16-46FFEB8796E2.jpg
    53BEBEBC-772F-4D2F-8D16-46FFEB8796E2.jpg
    69.8 KB · Views: 365
  • B799C1E9-A837-4115-B83F-4E00A734B27C.jpg
    B799C1E9-A837-4115-B83F-4E00A734B27C.jpg
    55.9 KB · Views: 316
  • 275B3B54-6658-4392-95A8-2171E134F0DB.jpg
    275B3B54-6658-4392-95A8-2171E134F0DB.jpg
    77.1 KB · Views: 355
  • 7400715E-620C-47B1-9BEC-FF30315A23D0.jpg
    7400715E-620C-47B1-9BEC-FF30315A23D0.jpg
    69.3 KB · Views: 336
  • 46350E6F-3E82-4D9F-8C20-6944406A7A29.jpg
    46350E6F-3E82-4D9F-8C20-6944406A7A29.jpg
    138.1 KB · Views: 318
Register to hide this ad
A novel approach to replacing a trigger stud. With a precision fit to both the frame and side plate sides, and the Locktite too, it should work well. Time and thousands of rounds will tell.
 
S&W and many GS's make more of this repair job than it really needs to be. I have repaired these pins a few times with excellent results WITHOUT the need to refinish the gun.

Smith & Wesson can't be bothered doing a job that is not their conventional method and I'd also venture to say at this point they probably only have one or two Technicians left that are even capable. That is why they charge so much and demand you let them refinish the gun after the repair. No thank you - I'll do it myself just as good and no refinishing needed.
 
Beautifull repair. Too bad you couldn't have located a hole in the side plate to take up the extra length thus capturing the pin (no locktite) at both ends. Still, had it been my 28, I likely would have sent it to the mothership for the repair. I'm glad my 28 doesn't need this one.
 
Good job, larbike! It can be hard to get the drill location exactly right, but if everything works as it should, it's a good repair.

It can be hard to find a .100 pin (a solid pin is not a roll pin) but I save the trigger stop pins that come inside the rebound spring for this job. They are the perfect size, except for length, and worthless for the intended function, as they are always too short for that.
 
Beautifull repair. Too bad you couldn't have located a hole in the side plate to take up the extra length thus capturing the pin (no locktite) at both ends. Still, had it been my 28, I likely would have sent it to the mothership for the repair. I'm glad my 28 doesn't need this one.

The pins do have holes in the sideplate. They are supported on both ends.
 
That is a most excellent repair! Your father taught (and you learned) well.

On the other end, my father worked in a naval shipyard during WW II as an electrician…but I can barely change a light bulb!
 
Last edited:
Thanks for the Positive replies

I truly appreciate all of your positive comments. When I installed the pin I made sure to leave it long enough to be supported by the boss in the side plate as well as the hole in the frame. So I think it will be fairly sturdy. I’ll be keeping a close eye on the revolver to see if it stands up over time. In fact I’ll be out at the range this afternoon. Life is good! 🙂
 
This repair works very well, I've done many this way. In fact I now have a set of side plates (J,K,N) that are drilled as templates to do a perfect alignment into the frame boss and then install a pin of proper length and diameter. A good permanent repair. gets an attaboy!!
 
Had an officer at work have the same problem on the same model. Sent it back to S&W for repair. They did insert a new stud but failed to refinish the area and it looked like ****.
 
That's a great repair that you did! My only question is, how did you drill the remaining stud dead center so the pin would be dead center?
 
That's a great repair that you did! My only question is, how did you drill the remaining stud dead center so the pin would be dead center?

When the stud broke off it left the rest of the boss in the frame. The outline of the boss is almost a perfect circle, so I used a cut down machinist’s steel ruler and a ultra-fine tip sharpie marker to find the center point of the boss. I then used a center punch to mark the center point and drilled the hole with the drill press. I also made darn sure that the revolver frame was tightly clamped and perpendicular to the drill before I drilled the hole. Here’s a short video that explains how to find the center of a circle : Easiest Way To Find The Center Of A Circle. - YouTube. BTW - I had to borrow my wife’s jeweler’s loupe to get a good look at the boss and find the center.
 
Last edited:
Back
Top