S&W New Model Number 3 Japanese Navy Contract - needs some help!

Joined
Mar 19, 2019
Messages
21
Reaction score
28
Hi all! I recently won this gun from RIA's regional auction. It was sold as 'needs work' and I think I have a handle on what work that is now, however I turn to you for help in how to find the parts!

First, some pics:


Right away you can see it is missing a front sight. I have some ideas about that but there are more pressing concerns.


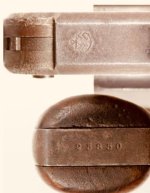
There's the serial, with a fairly lightly struck anchor. The gun has been reblued at least twice as I understand it, so the mark may just have been partly polished away.


The cylinder matches but the barrel and locking latch do not. I'm guessing either the Japanese cleaned these in batches and weren't particularly careful when reassembling them, or someone assembled this particular gun from surplus parts early in the 20th century. The serial numbers shown are all fairly close so I'm guessing they all come from the Japanese Navy contract - but I'm not sure. Something to ask Roy Jinks about!


Visible here is the main problem with this pistol. The ejector star looks like it was chewed on by a big metal dog.


As a result, if you put drag on the cylinder, it will often fail to lock up properly. Does anyone have any clue where I could find a new ejector star? I'm also guessing based on the fact that the finish doesn't match and that it isn't serialed that this ejector star is also a later replacement part?

Overall tho I'm pretty happy with it! I managed to find some .44 Russian BP loads and, after carefully checking lock up, it does fire just fine! Also a healthy cleaning got it so it wasn't insanely stiff like when I first got it.

The grips are a bit warped and that weird metal looking half circle is some kind of repair made with a soft metal that was poured into place and then hardened? It's quite odd.

As for the front sight, I'm thinking I might try and find an antique dime to saw in half and then silver solder onto the barrel. Not exactly sure how to regulate the sight under those conditions though.

Here's a gallery of more photos: https://imgur.com/gallery/zGImqa0

 
I think your best bet is to shop around for a competent gunsmith that’s willing to take on the repairs.
Does the barrel have any Japanese markings? I think it should.
If so then it’s VERY possible that a gunnersmate re-assembled The Gun with another barrel. When I was in the Navy on a Destroyer I was always hanging out with the gunners mates around shooting qualification times and when they cleaned the 1911’s the parts were all over the table top.
However, I honestly don’t know why they would remove the barrel from the frame of this type revolver to clean it?
Unless there was a malfunction from the ejector cam or perhaps chipped and needed replacing? That’s a stretch though because you’d have to have several apart with the same problem at the same time?
On the flip side I have seen broken cams on these and the top break double actions in 44 cal. A lot of stress to eject 6 large caliber empties with black powder fouling. Especially when they have been exposed to salt air the cartridge cases may have been heavily tarnished like all brass gets on a Navy ship? and therefore hard to chamber. Therefore, even harder to eject? Breaking the cam?
 
A good smith is getting tough to find nowadays! Altho thankfully this gun is an antique so shipping it back and forth isn't too arduous. I'm going to take it by a local smith tomorrow to see if he thinks he can take it on and I've also been searching around amongst cowboy action smiths since some of them have experience with the older designs.

That said, any recommendations on that front from the S&W forum would be very helpful indeed!

Edit: Also no Japanese markings on the barrel that I can see, unless they're somewhere non-obvious.
 
Last edited:
According to my notes, your S&W No. 3, serial number 26298, has a small naval anchor stamped on the butt. This is the sole Japanese marking known for this example.

C/
 
Sir-

Question: Did you know what you were getting into when you bought this one? Maybe you did. This question is more about the RIA regional auctions...and why I avoid them.
 
I'm not a sir but I did have some idea that this revolver would need some care to get it back into shooting shape - I was interested in owned a No. 3 as a project gun to build into a shooter rather than something in fully collectible shape since it's my first one.

Thanks for the note seinen!

I also wanted to ask - I've read conflicting reports on whether it is safe to fire .44 Russian cowboy or light smokeless powder loads out of this revolver or whether I need to stick purely to black powder. Does anyone have an opinion on that subject? For example I swear I read somewhere else on this forum that Black Hills .44 Russian would be ok to shoot but of course, it is still a smokeless powder.
 
I think the sight is missing because the barrel was cut off.
The star looks ok. you mean the ratchet is worn.
You have got yourself a "project"
Good luck
 
Welcome, flightlessgreeb, to the best gun forum I've ever found. I hope you'll stick around. It seems you've been doing some reading here already.

Please keep us posted on how your project proceeds.
 
Japanese Navy Markings

I knew there was more than one Anchor stamp on these. Here is at least where one of the other anchors should be and what the anchor “should” look like.
I would imagine the barrel (shortened) may be stamped or inspected somewhere as well.
Either way it’s an Antique Model 3 once repaired would be fun to shoot.
*If this was advertised as a Japanese Navy Smith and sold to you as such ahhh I would be somewhat concerned but that’s up to you.
* Also notice the surface condition of a Navy issue revolver? See the pitting in the photo? That’s normal for an authentic Navy issue gun. It’s extremely difficult to control rust on a Navy ship. I once had to wake up the on duty gunnersmate to issue me a replacement 1911 because the slide was rusted shut!
 

Attachments

  • 8FC320ED-41CD-4816-8E70-D7B14FC1C085.jpg
    8FC320ED-41CD-4816-8E70-D7B14FC1C085.jpg
    46.9 KB · Views: 93
Last edited:
Howdy

I have a Japanese issued New Model #3 that I bought a few years ago.

New%20Model%20Number%20Three%20Blue%2031022%2001_zpsmbzqn4z8.jpg


New%20Model%20Number%20Three%20Blue%2031022%2002%20jpg_zps8sck3v7l.jpg


I had it lettered shortly after I bought it. Here is what I learned:

Factory%20Letter%2002%20-%2002%20SN%20Modified_zpspl7djxsv.jpg


The only Japanese marking on this one looks like some sort of inspection stamp under the lanyard ring. Also, notice the Serial Number on this NM#3 runs perpendicular to the grip.

Butt%20Markings_zpsm2vghiwg.jpg


I have quite a few old Top Break S&W revolvers. I just grabbed a few, and the blued ones that I grabbed have blued extractor stars. I didn't grab them all so I can't be sure, but at least a couple do. However the extractor star on this New Model Number Three is nickel plated. I was starting to think that might be typical with blued NM#3s, but on closer examination, there is no Serial Number on this extractor so maybe it is a replacement. You do know that the serial number should be on the under side of the extractor star, right?

New%20Model%20Number%20Three%20Blue%2031022%2008%20Serial%20N%20Altered_zpsfy6hfqzd.jpg


From what I can see in your photos the ratchet teeth of your cylinder don't look bad at all. It does not much matter what they look like on the side, it is the rear surface, where the teeth are, that is engaged by the hand. Unless the chewed up sections on the side of the ratchet teeth are dragging on something, that should not have any effect on how well the cylinder turns. I would be more suspect of a worn hand. It is fairly easy for a competent gunsmith to weld a little bit of metal onto the hand to extend it a tad, then file it down for a perfect fit. First, you need to find out if the failure to lock up properly is happening on a particular chamber. Cock the hammer slowly, exerting a little drag on the cylinder with your thumb. Is it failing to lock up on a particular chamber, or is it random? You will need to cock the hammer a whole bunch of times to determine this. Use a water based Sharpie to mark the problem chambers. Also, make sure the bolt is popping up properly into every cylinder locking slot On old guns like this you will often find that if you retard the motion of the cylinder, the hammer will go to full cock before the bolt pops into the locking slot. This is very common on old guns. There is often some slop in the hammer so that it can be drawn back a little bit beyond full cock. Often times, if the hammer goes to full cock before the cylinder locks up, you can get it to lock up by pulling the hammer all the way back until it comes to a physical stop. I have lots of old revolvers that do this. I just always remember to give the hammer a good yank while I am cocking it. Also, check to see that the hand has enough spring tension on it to keep it pressed forward against the ratchet teeth. The hand spring is quite small, and does not exert a lot of tension, but it needs to be pressed forward at all times to engage the ratchet teeth. It is possible the spring is faulty. It is also possible a burr on the slot the hand rides in may be restricting its motion. That is an easy fix.

So, a few things to check. How well does the cylinder lock up at full cock, and is the failure to lock up at specific chambers? If the failure is at every chamber, chances are the hand is worn down a little bit and needs to be extended a tiny bit. If it happens only on specific chambers, the ratchet surface of the star may need to be built up slightly at each specific tooth. Much easier to just extend the hammer surface a tiny bit than trying to spot weld material onto specific teeth. The extractor star is brazed together and too much heat will probably disassemble it.


The front sights on these revolvers were pinned into a narrow slot milled into the rib on top of the barrel. This one is pretty typical, it stands about .250 above the rib. The exposed portion of the sight is about .780 long. It is tapered, about .061 thick at the base, tapering to about .030 thick at the top. So it would have been pinned into a slot 1/16" wide.


Front%20Sight_zpsecj6zi63.jpg


Here is a snapshot from a reprint of a 1900 S&W catalog. the front sight is part number 266. This gives you a good idea what the front sight actually looked like before it was pinned into the slot in the barrel. It is a symmetrical foot ball shape. You can even see the hole for the pin. The slot would have been cut with a circular cutter so the slot matched the shape of the sight. By the way, the price of the sight in 1900 was ten cents.

New%20Model%20Number%20Three%20Parts_zpsi7km9l22.jpg


I have considerable experience shooting S&W #3 Top Breaks. I have this one, a nickel plated New Model Number Three, a Russian a couple of 44 Double Actions and a couple of Schofields. In my experience they all tend to shoot high. The reason is the front sights were very low. At least close in they tend to shoot high. If I bring one of my Top Breaks to a Cowboy Match I have to remember to hold low on the target, or I may shoot right over the top.

A bunch of years ago I bought this 44 Double Action and somebody had replaced the front sight with a slug of metal. Since the original sight was gone anyway, I had a smith replace the slug of metal with an antique dime. The dime stands about .315 tall on top of the rib. This has been enough to bring the point of impact down so I don't shoot over the target.

NewFrontSight04_zps0685e2f5.jpg


None of my antique revolvers ever gets shot with modern Smokeless ammunition. never. NEVER! Did I make that clear?

You will read all the time how ammunition for older revolvers is purposely loaded down so the pressure will not hurt older revolvers. Pressure is one thing. Simply PSI. A pressure curve is a completely different thing. The pressure curves of most modern Smokeless powders is a sharp curve, the pressure rises and drops off rapidly making a sharp spike. Black Powder exerts a more gentle curve that is less jarring to the old iron and steel used in these revolvers. Yes, it is possible to develop loads with some powders that will duplicate the pressure curve of Black Powder. There is a guy on this forum who has done considerable work with that. However you will not find one of those powders in modern factory ammunition. Even the light 'cowboy' loads have a sharp pressure curve. None of my antique revolvers ever gets fired with ammunition loaded with Smokeless powder. I suppose if I wanted to devote the time to experimenting with those powders, and had the sophisticated pressure equipment required to determine the pressure curve, I could do so. I don't, all my antiques, S&W, Colt, Merwin Hulbert, only get fired with ammunition loaded with Black Powder.

043%202_zpsnobxmpnu.jpg
 
Last edited:
I would stick to black powder loads.

In my experience, these shoot high, as do most 19th Century firearms.

I would create a sight from a Barber dime, like Driftwood Johnson did.

I have a .44 DA 1st Model, also with a Barber dime as a front sight. Puts it in the category of really neat folk art!
 
1896 was an interesting year for the NM #3---and thank God for the Japanese or S&W might have been hurting. This from the letter on one of mine which wasn't shipped to Japan in 1896: "Smith & Wesson only produced 3,463 units of this model in 1896 of which just over 3,000 units were supplied to the Japanese Government."

Ralph Tremaine
 
Ralph,

Is that from existing frames, or was that statement meant to imply 3,463 frames were forged that year?

As all frames are pre 1899, it might be they are all pre 1897--or earlier.

We know by this time, sales could be described as nothing short of sluggish. Which is why all frames are pre 1899 and yet shipments occurred until the early to mid teens.
 
Thank you all so much for the warm welcome and the tremendous quantity of info! Will take me a bit to absorb all this haha

I'm going to get this pistol lettered I think, this is the first revolver worthy of it that I've owned I think. And yes I do think the barrel was cut down - I meant to write that in my first post but it seems I forgot. I think I actually found pics of your .44 DA Driftwood and thats what inspire me to use a dime for a front sight in the first place! Thanks very much for the info on height - that will prove invaluable I'm sure. Would it be ok to drill thru the rib on top of the barrel to make a new hole for a pin to retain the sight? Since the barrel is cut down I don't think it has a hole presently.

RIA did advertise this as a Japanese Navy gun and it seems the frame is, not so sure about the barrel now though since I think it is missing that stamp. Hopefully Roy Jinks will know.

I don't have the revolver with me at the moment to check which chambers are not locking properly and why - the hand looked good when I had the gun apart for cleaning but the spring pressing it forward did seem a bit weak. I was able to push the hand back towards the hammer with the side plate off and it didn't have enough power to push itself forward without help from that position.

Embarrassingly enough I wasn't able to figure out how to get the hammer out of the gun at that point so I just oiled it and left it alone. I'm picking up a Luger from an older gunsmith tomorrow and he said he'd be willing to look at my No. 3 at least, so maybe I'll get some more info from him.
 
Ralph,

Is that from existing frames, or was that statement meant to imply 3,463 frames were forged that year?

As all frames are pre 1899, it might be they are all pre 1897--or earlier.

We know by this time, sales could be described as nothing short of sluggish. Which is why all frames are pre 1899 and yet shipments occurred until the early to mid teens.


I quoted the line from the letter. There is nothing about the context to suggest any meaning other than as quoted. I suspect the tale of #3 frames (all forged prior to 1899---1898 actually) is one fabricated and hatched by S&W (Roy Jinks) and the ATF folks with an eye toward simplifying their respective lives----a bit of mutual back scratching. That aside for the moment, picture yourself as the man in the corner office at S&W. Your marketing guy and your plant manager have come to you with a plan to forge an unknown but large number of frames---on spec---just in case they might be needed sometime down the road. I can think of only one question you might have asked before you fired both of them----"WHAT------are you two NUTS?!!"

On the rare occasions I speak of such things, my line is "All frames are deemed to have been produced before 1898." Depending upon my audience, I might add,"as a matter of convenience."

Now, do I know for sure and certain about all this? No. I know it is what it is---and what it is, is so---and when something is so, that's the end of the discussion---never mind if it's right or wrong, true or false, fair or unfair---it's so----end of discussion. Anything beyond is a waste of time.

Ralph Tremaine
 
Last edited:
Would it be ok to drill thru the rib on top of the barrel to make a new hole for a pin to retain the sight? Since the barrel is cut down I don't think it has a hole presently.

The sight sits in a slot milled into the top of the rib. All the pin does is retain it in the slot. You would have to mill a slot first, for the front sight to sit in.

Collector's value has been reduced by cutting down the barrel. Certainly not eliminated, but reduced. So in my opinion any modification you do to add a front sight will just slightly lower its collector's value.

The dime used for the front sight of my Double Action 44 is about .045 thick. The slot it is sitting in is about .060 wide, So there is a bit of slop. When first installed the coin leaned to one side a bit, but a pair of soft jaw pliers straightened it. The pin stabilizes it and keeps it from wobbling. You will need to have a machinist carefully mill a 1/16" slot in the top of the rib. Be careful the rib is only about .125 wide at its narrowest point, so be sure everything is well centered so the slot does not break out from the side of the narrow portion of the rib. The pin is a piece of 1/16" soft rod peened over on both sides to keep it in place.
 
DO IT RIGHT!!

Any repair should be done as it was originally done. In the case of the front sight, the slot should be milled in the rib----the pin hole drilled in the rib-----as opposed to soldering the sight blade to the top of the rib (the thought of which should make your teeth hurt---at least a little bit). And any "gunsmith" who might suggest soldering the sight in place is named Bubba.(!!)

Ralph Tremaine

And the way to get the hammer out of your gun (and any other top break single action) goes like this: Get a pair of "spreader pliers"---also known as "reverse pliers", also known as "external snap ring pliers". (Use the "external snap ring pliers" lingo if you go to a real tool store----but stay away from those with pins instead of jaws. And given you're going to be working in small spaces. get some with small jaws. Suitably armed, place the plier's jaws such that you can compress the mainspring enough to rotate the stirrup out of the mainspring. At this point feel free to utter a victory cry-----VOILA!!, SHAZAM!! or some such. For those of you who are challenged when it comes to buying appropriate tools, go to WILDE TOOL, order G407B, wait for postman. Note these are good tools, as in "Made In U.S.A", as in rather expensive---and worth it. And having just returned from WILDE TOOL, they don't seem to have G407B anymore, but they do have G407P----ostensibly the same tool, polished instead of black oxide finish. You may wish to call to confirm.
 
Last edited:
Howdy Again

This is the slug of metal for a front sight that was in my Double Action 44 when I bought it. It sat quite high and the gun did not shoot high with it.

oldfrontsight_zps1a7a5a7d.jpg


I went to a coin shop and he had a pretty good selection of Barber dimes. I chose a nice one for I think $7. I instructed the smith to install it at the same height as the slug, so the point of impact would be the same.

NewFrontSight04_zps0685e2f5.jpg


The thing about these old coins is, unlike modern coins, the image on one side is flipped vertically from the image on the other side. So I had to choose which side of the coin would be facing up. I chose the ONE CENT side. In perfect hindsight I probably should have had the face image vertical, but that is what I asked for. I seem to recall that I wanted the image correct when I held the gun in my right hand, so that is why I had it done that way.

NewFrontSight03_zps4e3b8ec6.jpg


Here is what the sight looks like in the overall view of the gun. Compare it to the height of the Target model above it. For those with sharp eyes, yes, the blued one has been refinished.

Two44DAs02_zps927bf180.jpg
 
Last edited:
Back
Top