You are using an out of date browser. It may not display this or other websites correctly.
You should upgrade or use an alternative browser.
You should upgrade or use an alternative browser.
Soft fit. Hard fit
- Thread starter Jaco1234
- Start date
Register to hide this ad
DWalt
Member
I can make a good guess, but I can't say for certain. With improvements in machining precision and tightened tolerances by the late 20th century, many parts that formerly required accurate hand fitting with files, etc. to function together correctly no longer did, and if hand fitting was required, it was simple and minimal. In other words, "soft fitting" meant little or no hand fitting of components in the traditional old-school sense was needed. Fewer and less skilled assemblers were needed and payroll cost could be reduced.
Last edited:
I think soft fitting was part of the manufacturing process. Before the gun was blued or nickeled it was assembled. Major parts had the serial number applied. Barrel, cylinder, yoke and back of extractor. The parts were then sent to be blued or nickeled. They had numbers so the right parts ended up on the right gun. Hard fitting I think was the final assembly of the gun after the finish was applied. Soft fitting ended in 1957.
The unfinished parts were numbered for two reasons, namely, after soft fitting the revolver was taken apart and stored until a production order was received and the parts were taken for final polishing, finishing in blue or nickel, and final assembly at hard fitting. In 1957, manufacturing tolerances must have improved to the point that soft fitting was no longer required and finished parts were directly assembled into a completed revolver.
Bill
Bill
The serial number was stamped on the bottom of the grip frame at some point early in the manufacturing process. All other parts were stamped with this number.
Bill
Bill
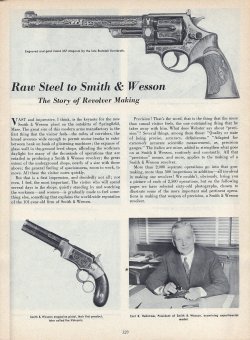
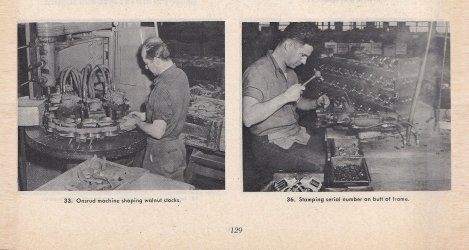
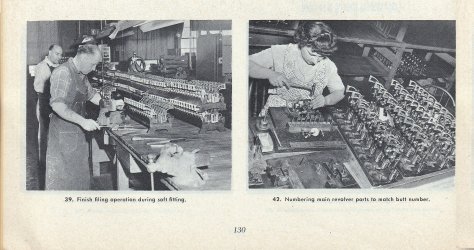
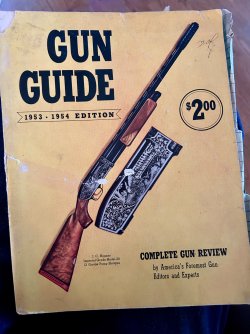
In a 1953 publication, Gun Digest, visited the new S&W factory and provided a photo essay on the manufacture of the revolver. Reduced to 60 photos, the article detailed the major steps in production and gives a great perspective on how and when things were done at the factory.
The article noted the application of a serial number to the butt, as it was done while other parts were being rough finished. Before the Roy Jinks years at the factory, stamping was reportedly done by hand with the use of jigs to provide uniform placement of numbers. Roy once stated that by the 1960s a serial numbering machine was used to roll stamp the butt, advancing the number automatically with each application. It appears in the photos that other finishing of parts was being done at the same time, with fitting the barrel to the frame and preliminary fitting of the sideplate as being done before the parts were numbered. The soft fitting was also done after assembly numbers were applied and before the parts were serial numbered. Parts were also numbered by hand at that time.


Single-click on images to enlarge, then double-click again to magnify them.
The article noted the application of a serial number to the butt, as it was done while other parts were being rough finished. Before the Roy Jinks years at the factory, stamping was reportedly done by hand with the use of jigs to provide uniform placement of numbers. Roy once stated that by the 1960s a serial numbering machine was used to roll stamp the butt, advancing the number automatically with each application. It appears in the photos that other finishing of parts was being done at the same time, with fitting the barrel to the frame and preliminary fitting of the sideplate as being done before the parts were numbered. The soft fitting was also done after assembly numbers were applied and before the parts were serial numbered. Parts were also numbered by hand at that time.


Single-click on images to enlarge, then double-click again to magnify them.
Last edited:
Soft fitting and Hard fitting when speaking of production of most European firearms of good quality meant that the (Soft fitting) was done to assemble parts with the metal being in the un-heat-treated state.
Hard fitting was then done again and if needed once the parts had been HT'd. During the HT process the parts would be subject to distortion at times and would need to be 'adjusted' by skilled assemblers to once again fit smoothly together.
This was common up to WW2 and perhaps after until more modern methods of HT and better steel alloys were avilable.
The Luger and Mauser handguns were well noted for their Soft & Hard fitting procedures.
Is that the same use of the terms as S&W used , I don't know. But generally in the industry Soft fit is something done to 'In the White' & un Heat-Treated parts.
There were many jigs and gauges used during soft fitting. The part specific jig/gauge would have hardened ways so the fitter could hand file accross the area of the part needed fitting and keep the area absolutely square. The part could be raised within the jig by 10/.000" at a time by simple thumb screws.
There were many inside corners cuts on the parts that needed to be squared out. A round mill cutter can't do that. So the Soft Fitter finished the job on each using a jig/gauge set up for each.
A Shaper machine set up was undoubtedly used on others that were a blind bottom sq corner.
Once the gun fit together and functioned smoothly, it was taken apart and any HT, final polishing, then bluing/plating were done.
Then back to final assembly.
IF there was any re-fitting to be done at this point,,it was termed Hard Fitting.
Hard Fitting should never be extensive or require any major dimensional changes to the parts to make them fit.
Simple fit gauge and jig fixture were used at Marlin during final assembly of the 336 & 444 cal series rifles when I was there (early 70's).
I would have called the following a Hard Fitting as it was done during final assembly of the rifle.
-Fitting breech bolt, locking bolt & checking headspace on rifle,,
With the brand new parts in place it usually needed to close a few .000 more.
-Remove locking bolt from rifle being assembled and place in jig and adj so that a prescribed amt of mtrl will be removed from the locking surface. The assemblers knew how much to adj the jig for by experience.
-Lock the jig and with a fine-cut mill file,,the locking surface was squarely trimmed down that amt.
Remove locking bolt from jig and reassemble into the rifle,,chk HS again.
If needs more,,repeat.
If it checks out OK,,you're done with that part of the assembly.
oops,,went too far!,,pull the locking bolt out and refit another.
You were on piece work, so the clock was ticking on you. The cost of the small block of steel that was the locking block meant nothing.
Then there was the assembler that decided he didn't need to use the jig and could trim them 'by eye'.
That's another story.
The fixtures & Jigs probably not used anymore with the ultra precision specs that the parts can be made.
Now they pull the cutters (drills, reamers, mill cutters, etc) from the machines after a pre-determined time. Usually figured on how many ft of metal they have cut.
They may look perfectly good, but they get replaced anyway. That is a way of trying to defeat the staked tolerance problem where parts need a lot of fitting.
Hand fitting is Very Expensive and something industries want to avoid.
Similar threads
- Replies
- 17
- Views
- 694
- Replies
- 0
- Views
- 50
- Replies
- 28
- Views
- 2K

