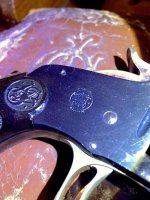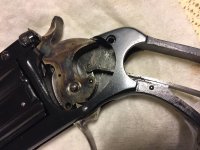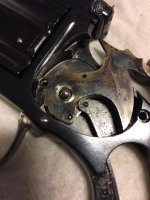

SS 2nd model trigger guard

diecidecimi

Member
Joined
Jan 24, 2015
Messages
591
Reaction score
1,344
City & State/Province
Milan, Italy
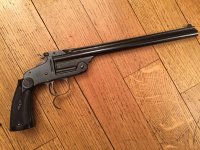
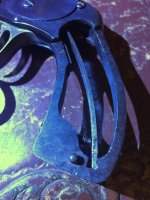
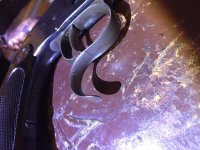
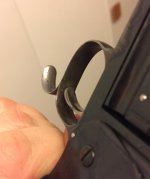
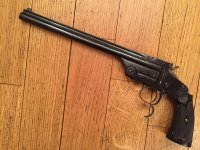
I always wondered if this trigger guard "russian" style was usual for the Single shots .
I herited this (pistol? revolver without cylinder? :) ) from my grandpa many years ago. It is in excellent shape, grips are correct and nice, the frame and the barrel matching; blueing is 99%, but the barrel is corroded in the rifling , maybe because of the corrosive powders and primers of that era.
 

Attachments

  • IMG_3528.jpg
    IMG_3528.jpg
    142.1 KB
  • IMG_3535.jpg
    IMG_3535.jpg
    68.4 KB
  • IMG_3531.jpg
    IMG_3531.jpg
    44.9 KB
  • IMG_3529.jpg
    IMG_3529.jpg
    158.4 KB
No, not usual.

Possible? Certainly.

Ever seen one? Nope!

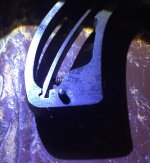
At this point I'd like to have you take a GOOD HARD look at---and tell me if you see ANY sign suggesting the (Russian) spur was welded to the (regular) trigger guard.

As far as "without cylinder" goes, this is a 2nd Model---and never had provision for a cylinder. (The 1st Model did have provision for a cylinder, and frequently had both the hand and cylinder stop installed---and functioning).

You may wish to remove the grips, and tell us about any markings stamped on the grip frame---left side.

Ralph Tremaine

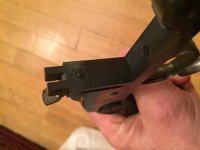
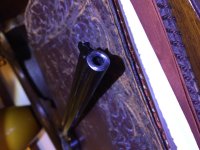
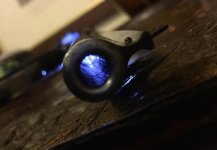
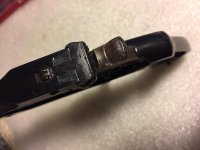
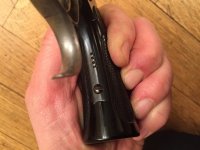
And while you're at it, please do two more photos: One from the top down, showing us the top of the latch/rear sight. Another showing us the muzzle.
 
Last edited:
I have seen that Russian "tang" on a series of New Model 3s that should not have had it, to find that they were shipped that way, as ordered.

I don't see any reason why S&W would not do the same, when requested, on a 2nd model Single Shot. Tang looks OK from what I can see. Cannot determine if original finish or not but you didn't ask. The S&W logo looks very light when magnify the image but it pixels-out before I can get a good look.

A letter should determine whether it shipped from S&W that way or not.
 
Last edited:
I have seen that Russian "tang" on a series of New Model 3s that should not have had it, to find that they were shipped that way, as ordered.

I don't see any reason why S&W would not do the same, when requested, on a 2nd model Single Shot. Looks OK from what I can see.

A letter should determine whether it shipped from S&W that way or not.

I have one of those NM #3's with the "Russian" trigger guard (Letters with it.) and the spur is checkered (That letters too.)---suggesting someone was going to hold on to it---but I don't know how.

Employing the spur as part of the grip (with a one hand hold) comes up as fun for the feeble minded. Employing it with a two hand hold comes up as not too shabby, but for all the pictures I've seen of folks shooting NM #3's, I've yet to see anybody using a two hand hold. It's been many moons since I fired one of these (.44 Russian), and I have no recollection of the recoil, nor the recoil characteristics; but looking at the relationship between knuckles and guard---and guard spur, if they rap your knuckle with the guard, they're going to rap it with BOTH the guard AND the spur-----one rap high, one rap low---double your fun!! Methinks Mr.Roper's first recommendation to achieve a proper grip would to be to get rid of the spur.

Ralph Tremaine
 
Welcome to the forum from the USA.

Certainly a cool looking firearm and family history as well. Many of us place that very high on the value list. Unfortunately, it only matters to us and usually has no merit when selling to someone else.

Don't know much about the extra piece on the guard but I have seen it on other S&W's. I would think that as long as S&W offered it on one gun, they would have no problem adding it to another if requested buy a customer.

Let us know what your letter states.
 
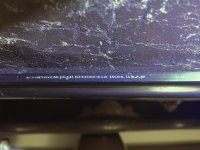
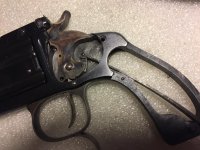
I'm doubtful that the trigger guard is factory supplied. All the factory guards that I've seen are one-piece. The photo of the serial number shows a line where the two parts of the trigger guard are joined together.
 
I'm doubtful that the trigger guard is factory supplied. All the factory guards that I've seen are one-piece. The photo of the serial number shows a line where the two parts of the trigger guard are joined together.

Yes, you are right: the medium-finger rest is welded with the usual trigger guard. I will take some more detailed picture as soon as possible to show it, and to accomplish the request of Mr Tremaine.
No way to fix , even partially, the rifling?
 
More details

Ok, I toke some detailed picture.
Doing that, I noticed the old grandma needs some more care: the trigger and his guard show a little oxydation to be carefully and gently removed. I'll use OOOO steel wool moisted with oil: is it the correct method?
 

Attachments

  • IMG_3538.jpg
    IMG_3538.jpg
    112.2 KB
  • IMG_3542.jpg
    IMG_3542.jpg
    86.9 KB
  • IMG_3550.jpg
    IMG_3550.jpg
    73 KB
  • IMG_3551.jpg
    IMG_3551.jpg
    54.5 KB
  • IMG_3541.jpg
    IMG_3541.jpg
    85.8 KB
Bronze wool would be better. It won't scratch the metal like steel wool. However, using steel wool lightly should be okay. The oxidation (rust?) will loosen if you soak the gun for a few days in penetrating oil or automatic transmission fluid. You might even be able to rub it off with a microfiber cloth.
 
..and so on....

The inlettings in the frame butt are: a letter B and a number 6, nothing else anywhere.
The curl "russian-style" medium-finger rest is welded, and retained by a large passing-through pin.
The logo on right side has very sharp edges and it's quite deep: I'd certainly exclude a reblueing.
Damn, the rifling is barely rough....
Last, but not least, many many years ago I disassembled all the gun to clean it, but...I forgot the correct position of the spring and the crank ! so, now something is wrong and the hammer doesn't return back after (dry)firing.
 

Attachments

  • IMG_3556.jpg
    IMG_3556.jpg
    86.5 KB
  • IMG_3553.jpg
    IMG_3553.jpg
    78.2 KB
  • IMG_3540.jpg
    IMG_3540.jpg
    121.9 KB
  • IMG_3552.jpg
    IMG_3552.jpg
    31.6 KB
The sideplate appears to be installed/seated improperly---should be flush with the surrounding frame. Remove it---DO NOT pry it loose. Instead, rap on the grip frame with a hammer handle (wood or plastic) to jar it loose. Several light taps should be sufficient---DO NOT use great force.

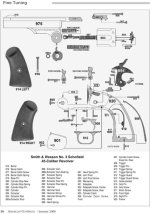
Once removed, please show us (with a photo) what you mean by "crank". The hammer spring is correctly installed (at the bottom). If the "crank" turns out to be the hammer stirrup (the little piece between the hammer and the spring) the fix is easy.

As an aside, if you have or can get a pair of "reverse" pliers, the task will be simplified. "Reverse" pliers are perhaps better known as external snap ring pliers. You want a pair with a small nose.

Ralph Tremaine

And if by "barely rough", you mean the rifling is only slightly damaged, give the bore several good scrubbings with a bronze/brass bore brush and a suitable penetrating oil/automatic transmission fluid-----leaving the fluid in the bore in between scrubbings. You'll likely end up with a bore that might look a bit nasty---but will shoot just fine.
 
Last edited:
Thanks to all for your tips. I’m aware the sideplate is badly placed: that is due to my intention to remove it to fix the connection stirrup/spring. When I cleaned “the inside” I left it semi-opened. I missed the correct way to reinstall the mechanism...Really I’d appreciate your instructions : I’ll show you how it is now. HERE it is midnight now, please wait till tomorrow. I will follow your tip about the bore. I appreciate a lot your kindness
 
I still see significant lands and grooves in that barrel. Follow the cleaning instructions above and I bet that the gun will shoot better than you do. ;)

I always recommend against steel wool. If any minute particles of the steel wool get left in any nook or cranny they can cause rust. Personally, I don't even like copper or bronze wool if it is not absolutely necessary. I have had good luck merely using my thumbnail after a good soaking in your favorite rust breaking solution. There are many out there. The internet is loaded with formulas.

Remove the stocks and soak the whole gun in the solution for a few days. It won't hurt a thing and you will be amazed how a good cleaning can make an old workhorse look again.

Make sure to show us the after photos. :D
 
THE TRUTH HURTS!!!

I still see significant lands and grooves in that barrel. Follow the cleaning instructions above and I bet that the gun will shoot better than you do. ;)

I always recommend against steel wool. If any minute particles of the steel wool get left in any nook or cranny they can cause rust. Personally, I don't even like copper or bronze wool if it is not absolutely necessary. I have had good luck merely using my thumbnail after a good soaking in your favorite rust breaking solution. There are many out there. The internet is loaded with formulas.

Remove the stocks and soak the whole gun in the solution for a few days. It won't hurt a thing and you will be amazed how a good cleaning can make an old workhorse look again.

Make sure to show us the after photos. :D

A little smiley face with a wink doesn't negate such cruel comments as "------I bet that the gun will shoot better than you do."------------never mind I was going to say the exact same thing--------but chickened out.

At least I was tempted----no guts, I guess. Maybe next time-----

Ralph Tremaine
 
Ralph, I certainly did not mean to be cruel. I was merely stating a fact regarding most guns and shooters. I know that EVERY gun that I own shoots better than me. :cool:
 
diecidecimi, "...I forgot the correct position of the spring and the crank ! so, now something is wrong and the hammer doesn't return back after (dry)firing." The 'stirrup' (crank?) is most likely installed backwards. This stirrup controls the 'rebound' feature of the hammer.
 
Ok, I toke some detailed picture.
Doing that, I noticed the old grandma needs some more care: the trigger and his guard show a little oxydation to be carefully and gently removed. I'll use OOOO steel wool moisted with oil: is it the correct method?

Brass brush inside bore for initial cleaning. 0000 steel wool for outside is good but 0000 bronze wool is better. Steel particle dust will rust over time if you do not get it all cleaned out when done.

Leave the inside of the barrel "wet" with any good penetrating oil or leave it sit for a few days with a cotton mop or swab wet with penetrating oil on the corroded areas e.g. I like Corrosion-x as a protective coating but WD-40 seems to cut light oxidation better. Use whatever you're comfortable with, then brush the inside of the bore well. You can follow with a cotton mop and FLITZ (or other similar product) to polish the inside of the barrel, but how good does it need to be? Polishing the inside of the barrel can be an arduous task. You won't be using it in competition, Heck, it's over 100 years old. Decades back I used Lubriplate motor oil if he had nothing else. Back in my Dad's day 3-in-1 oil was the tip of the sword technology. Find your own comfort level. You can get dizzy listening to all the suggestions of what to use.

For whatever reason ... I LIKE your single shot. It has character and I'd wager that trigger guard letters to the gun. I have seen others that clearly show as if the tang had been welded on afterward but the case hardening won't flow a nicely as your case coloring does. The factory case colors fade a silverish-whitish color, just like yours has. Seems to be normally time-faded nice and evenly. Others I've seen with the tang added that were not factory are not near as nice.

Don't screw it up by being too aggressive in your quest to clean it up.
 
Last edited:
I would second the suggestion of a gentle, but thorough cleaning of both the action and the bore. Once the bore's pitting is spotless, try shooting with several different types of .22 Long Rifle. I, too, will bet a small amount that your pistol is likely to still shoot very well. Even failing that, a reline would be entirely appropriate IMHO for function, if not for originality. Look forward to your followup.

Larry
 
Last edited:
disassembled....

Well, I just disassembled the SS, now soaking in anticorrosion oil.
Here the picture Mr Ralph Tremaine required, from top of the rear sights if I well understood.
Then, the stirrup assembly: something was wrong. Btw now it's all lying in a healthy bath....the challenge will follow
 

Attachments

  • IMG_3567.jpg
    IMG_3567.jpg
    55.3 KB
  • IMG_3566.jpg
    IMG_3566.jpg
    125.2 KB
Apparently, I previously inverted the stirrup (893 part) !

Yep! Easy to fix---do it again---only different.

A bit of bad news: The tops of the frame posts/lugs/whatever (that which the latch fits over) should be "in the white"-----not blue.

So----either the gun has been refinished in its entirety, or someone decided they didn't like "in the white" frame posts---and touched them up accordingly----another thing that's easy to fix.

That said, my recollection of the photo is the muzzle is "in the white"--which is as it should be------lending a bit of credibility to my touched up frame post theory.

Whatever, it's a nice looking pistol!

Ralph Tremaine

And having looked at several of your guns cousins, the front of the rib (at the muzzle) should also be "in the white"------and yours appears otherwise.
 
Last edited:
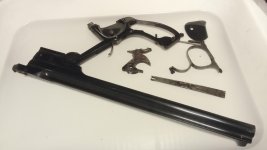
Work in progress.....she's taking her bath.
I began with WD40, and an incredible amount of black mixture dropped out from the barrel when I brushed the bore. I did it several times, then ... the WD40 can is empty. Now she lays in white petrol.
 

Attachments

  • 20171225_164004.jpg
    20171225_164004.jpg
    42.2 KB
White petrol is GOOD----let it soak for a week or more---after you have removed the latch/rear sight assembly----and after you have removed the barrel from the frame.

I'll be back after I've refreshed my memory about removing the barrel catch cam and spring from its crud infested home. In the meantime----keep soaking!! Some's good, more's better, and too much is just right!!!

As an aside, as I sit and stare at the pieces in the pan, it certainly does not look like the gun has been refinished.

Ralph Tremaine
 
White petrol is GOOD----let it soak for a week or more---after you have removed the latch/rear sight assembly----and after you have removed the barrel from the frame.

I'll be back after I've refreshed my memory about removing the barrel catch cam and spring from its crud infested home. In the meantime----keep soaking!! Some's good, more's better, and too much is just right!!!

As an aside, as I sit and stare at the pieces in the pan, it certainly does not look like the gun has been refinished.

Ralph Tremaine

Continuing----------------------------

After considerable soaking has failed to dislodge the barrel catch cam and spring, you need several special tools. The first is a friend with at least one good hand and arm----think of them as a movable vise. Friend holds the barrel---muzzle down. You hold a hammer in one hand, and a punch in the other hand, and tell your friend the hammer will be used on him/her if he/she drops the barrel. The punch is made of pretty much anything that won't mar the finish, won't dent the steel (wood/plastic/copper), and fits between the "ears" on either side of the latch recess. Place the punch between the "ears" and over the hole where the catch cam and spring is hiding. Give it good tap---as opposed to a whammity-bam---and have a look to see if the cam moved out some. Proceed accordingly. You can move up to mild whammity-bamming as tolerated by your friend. The cam will either fall out, come out far enough to get a hold of it (if you soaked enough), or far enough to get a dental pick (very small one) in front of it and pull it out. The amount of patience required is pretty much inversely proportional to the amount of crud you had to start with, and to the amount of soaking done.

As an alternative, and lacking any friends, suitable hammer & punch, you may tap---all the way up to whammity-bamming the back end of the barrel on an appropriate surface-----taking great care to not hit the "ears"----which will bend in a heart-beat! In the event you come to realize REAL whammity-bamming is going to be required, go back to soaking.

The spring is very small, may come out securely fastened to the cam by crud, or will remain in the hole to be fished out with an appropriate dental pick---or similar.

God speed!!

Ralph Tremaine
 
Last edited:
:eek::eek::eek: Bam, wham??!! Small springs jumping everywhere? Unknown parts disassembled....OMG, that's not for me....
 
:eek::eek::eek: Bam, wham??!! Small springs jumping everywhere? Unknown parts disassembled....OMG, that's not for me....

These springs don't jump. They just sit. They've likely been sitting for 100+ years. During that period of time, A LOT of dirt has collected in their little home. They were never intended to live and function in dirt. Sooner or later, depending on how much dirt has invaded their space, they get aggravated and fight back.

As an aside, soaking these bits and pieces in an assembled state, whether in a pan or with the contents of a spray can accomplishes little other than transforming the dirt to mush. Given that mush is easier to move than dirt, everything seems to be better. It isn't---it has simply delayed the inevitable.

There's a right and wrong way to clean any mechanical assembly. Cleaning it as an assembly is the wrong way.

Finally, a word about spray cans-----and fishing tackle: Were one to inquire as to why fishing tackle is made, a rather large percentage of respondents would say it's made to catch fish. The rest would say it's made to sell to fishermen.

Ralph Tremaine
 
Last edited:
Desperado....

Well, I decided the bath time is finished. The rifling is still rough but I knew it would .
But. Yeah, but... ***??? Reassemblling correctly the hammer stirrup, nothing changes about the previous issue.
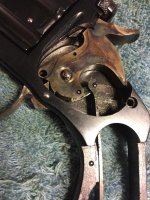
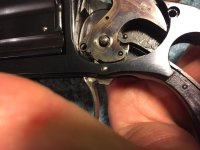
i.e. : assembling the stirrup "D-shape" oriented, tha hammer doesn't cocks because the "fork" of the main spring touches it before complete excursion. Pic 1 resting hammer, Pic 2 attempting to cock the hammer.
This was the same assembling I previously posted . Of course I inverted the stirrup, now "C-shape" oriented. I was sure it would work correctly, however the same identical fu*** problem: the hammer doesn't cocks , stopping his arch before catching the trigger sear. (I'm not sure about the correct english terms). Even in this case, due to the early interference with the fingers of the spring. Pic 3 and 4. It drives me crazy.....
 

Attachments

  • IMG_3612.jpg
    IMG_3612.jpg
    85.8 KB
  • IMG_3613.jpg
    IMG_3613.jpg
    86.7 KB
  • IMG_3610.jpg
    IMG_3610.jpg
    111.5 KB
  • IMG_3611.jpg
    IMG_3611.jpg
    64.5 KB
I noticed in the pictures the mainspring lays very flat, doesn't this model have a strain screw to put tension on the mainspring?
 
Yes, it has the screw (see post #10)... do you think that screwing down will move the other end of the spring in a proper position?
 
Last edited:

Latest posts

Back
Top