SW1911PB thumb safety is makin' me crazy!

StillCrazy

US Veteran
Joined
Jan 25, 2017
Messages
53
Reaction score
68
Location
United States of Texas
I've had this new-to-me SW1911PB apart maybe a dozen times in the week that I've owned it. Reassembling it is pretty straightforward, except for the thumb safety. I can get it back in, except it wont snap "home" and clear the end of the plunger without persuasion. I end up having to use a small flat blade screwdriver wrapped in tape and, from between the safety and frame, press the plunger into the housing, while with my third hand pushing down on the safety with enough pressure to force it past the plunger end. Should it really be that difficult? I can certainly clip a coil off the plunger spring, if that might help, but I don't want to Rube Goldberg something if it isn't necessary. Opinions?
 
Register to hide this ad
Once you get the safety properly lined up, and the safety plunger SLIGHTLY depressed to clear the front of the left side safety, you should be able to push it STRAIGHT IN and home. I've done it so many times, it's incredibly simple.

Maybe you just need to get someone with experience to show you the procedure one time?

Best of luck!
 
  • Like
Reactions: Rpg
I've owned 3 Colt 1911's , 1 AMT Hardballer 1911 and a Star model PS 1911 and used the screwdriver on every one .... I didn't know there was any other way....push the plunger back a little and press down on the safety and everything pops into place.
I have always found using the screwdriver or whatever to start the pin back the easiest way to get it done.
Gary
 
  • Like
Reactions: Rpg
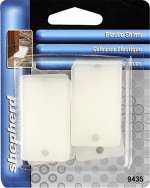
Buy a pack off these plastic leveling shims. They are about an inch wide and perfect for this job. I bought a package of them 10 years ago and have only used the same two since then on all sorts of little gunsmithing and maintenance projects.
 

Attachments

  • image.jpeg
    image.jpeg
    55.3 KB · Views: 45
Buy a pack off these plastic leveling shims. They are about an inch wide and perfect for this job. I bought a package of them 10 years ago and have only used the same two since then on all sorts of little gunsmithing and maintenance projects.

Toilet shims? I've got a drawer full of 'em! I'll try those next time.
 
Once you get the safety properly lined up, and the safety plunger SLIGHTLY depressed to clear the front of the left side safety, you should be able to push it STRAIGHT IN and home. I've done it so many times, it's incredibly simple.

Maybe you just need to get someone with experience to show you the procedure one time?

Best of luck!

You make a good point. But "SLIGHTLY depressed" is easier said than done. The plunger end extends 1/8 inch or more under the front (left) edge of the safety, so I have to push it in pretty far, with considerable pressure, in order for the safety to snap home. Guess I'll just have to keep trying 'till I develop the right technique. Then again, maybe I'm just not holding my mouth right. :o
 
I certainly would NOT clip the spring: leave it alone!

I’ve always used a GI 1911 tool : little L shaped thing with a screwdriver blade on the short leg and a pin punch on the long leg.

That said, I very rarely disassemble a 1911 to the point of removing the thumb safety.
 
Last edited:
I use a wooden gun cleaning q-tip, minus the cotton, to do this. A toothpick would work, anything reasonable strong, non-metallic, and thinner than the plunger. Get the thumb safety lined up, insert your chosen implement behind the safety against the frame, depress the plunger, push the thumb safety in to take the pressure off the thumb safety, withdraw the implement. Easy-peasy.

Same stick can be used to line up the sear and disconnector, as well as the barrel link.
 
I use a wooden gun cleaning q-tip, minus the cotton, to do this. A toothpick would work, anything reasonable strong, non-metallic, and thinner than the plunger.

Thanks. Already tried the toothpick route, but couldn't accomplish much with it. Breakin' out the popsicle sticks tomorrow!
 
You make a good point. But "SLIGHTLY depressed" is easier said than done. The plunger end extends 1/8 inch or more under the front (left) edge of the safety, so I have to push it in pretty far, with considerable pressure, in order for the safety to snap home. Guess I'll just have to keep trying 'till I develop the right technique. Then again, maybe I'm just not holding my mouth right. :o

" Not Holding Your Mouth Right " I haven't heard that in years...
My Daddy used to tell me those exact words when I couldn't get something back together ......brings back some good memories of growing up . Thanks for posting it .

If you hold your mouth in just the right way ...it will jump right in...maybe, keep the little screwdriver handy though !

Gary
 
Don't cut the spring... That spring has a tightened closed coil on each end that secures each of the two plungers to the spring. there is no place to trim or cut it without ruining the part.

Sometimes the safeties are just stubborn to re-install so you need a bit of help to depress the plunger a tad. Anything non-marring that will fit in the space will do. In the past I've used guitar picks, debit/credit cards, cut a piece off one of those annoying plastic packages, the temple on my safety glasses, and nylon black stick spudgers.

I recommend the spudgers. A useful non-marring tool that's handy for lots of stuff. Poke that plunger in the get the safety installed or take apart your iPhone to replace the battery or, a broken display.

You can get 'em here:
Spudger / Individual - iFixit

Or... check amazon for bulk packs if you want more than one;)

Cheers
Bill
 
I buy bags of 8" wood cuticle sticks at Sally Beauty, and cut them in half. The two ends are beveled, and make a good disposable push tools that won't leave marks. Also good for cleaning in tight places.

Walmart used to have them, but now they have gotten too specialized and expensive.
 
Back
Top