Allen 1
Member
In my original post titled -First post- I explaned how I did my 15-22 trigger job. It gained alot of interest.
People wanted to see how I did my "speed" hammer". Well, here ya go. I finally got some pics up as promised.
My 15-22

This is the modified "speed hammer" The rear "hook" has been removed to lighten the "mass".

This shows the JP reduced power springs installed.

Another view

This shows the foil tape I installed to fix the stock "wobble".

Vortex Strikefire - perfect co-witness.

UTG weapons light. Love this light!

ERGO Tactical grip.

Gripod - Yep, it's a real one!

People wanted to see how I did my "speed" hammer". Well, here ya go. I finally got some pics up as promised.
My 15-22
This is the modified "speed hammer" The rear "hook" has been removed to lighten the "mass".
This shows the JP reduced power springs installed.
Another view
This shows the foil tape I installed to fix the stock "wobble".
Vortex Strikefire - perfect co-witness.
UTG weapons light. Love this light!
ERGO Tactical grip.
Gripod - Yep, it's a real one!
") (no pun inteded).
(no pun inteded).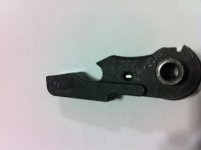
") , I shared it with you.
, I shared it with you. I do however work in the medical field on the mechanical end of the business. I have won 2 "Innovation of the Year" awards from the company I work for and the medical industry.